Test portraits (more photos and some edited pics added now)

LaFoto

Just Corinna in real life
Staff member
Supporting Member
Joined
Feb 1, 2004
Messages
34,813
Reaction score
822
Location
Lower Saxony, Germany
Can others edit my Photos
Photos NOT OK to edit
In reply to this link I made my own reflector, following the advice, using tin foil on a poster-size hard paper, but I am not happy with the photos I than made with it... The light used is the window light, with comes from two directions in that part of our living room: from the left (from my point of view) and from behind, so I placed the "reflector" on the right.

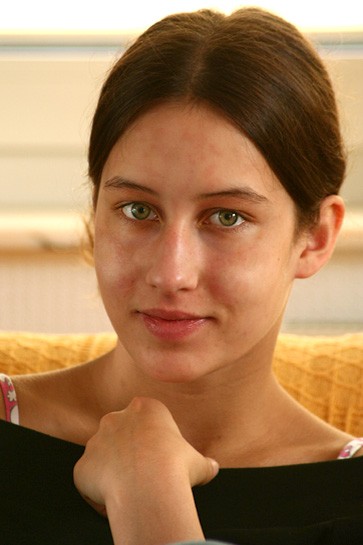
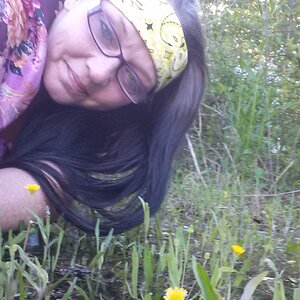
My daughter had to serve as my model, as always, though she was less than thrilled (as always...) with her bad skin (too much chlorined water...).

None of these has been postprocessed in ANY way, only resized.
If they were not test photos, and if your model had come not made up at all, and if these were your results of your session, what would you do later to make them look better? They are all OTE (okay to edit) now, I would love to see what can be done with these:

1.
Sabine-Portraits_13-Mai-2006_01.jpg

(ISO 400, 1/100 at f 5.0, 190mm)

2.
Sabine-Portraits_13-Mai-2006_02.jpg

(ISO 1600, 1/160 at f8.0, 238mm)

3.
Sabine-Portraits_13-Mai-2006_03.jpg

(ISO 1600, 1/320 at f5.0, 168mm)

4.
Sabine-Portraits_13-Mai-2006_04.jpg

(ISO 1600, 1/125 at f9.0, 214mm)

5.
Sabine-Portraits_13-Mai-2006_06.jpg

(ISO 1600, 1/125 at f9.0, 300mm)

And say thank you to Photobucket for resizing them at random :grumpy: ... they should all be the size of Photos 1 or 3 ... grrrrr :x

Oh, one more info: after I had taken 3-6 and seen them, I built myself a second reflector, but by the time that one was finished, she did not want to sit there being my "guinea-pig" any longer :roll: ... I wanted to bring some more light to the right side of her face (here left).

Now ... any ideas that don't include any special studio lights?
 
Had a play for about ten minutes and came up with this - not perfect I know, and it changes her expression slightly, but with a bit of work you can make them better.

Just feathered a selection around her eyes, adjusted levels then used the airbrush.

cor.jpg
 
"Feathered a selection"...??? :scratch:
I don't think I have ever done that before, but ... that is something to try!

"Airbrush"...??? :scratch:
Oops, one more tool in PS that is so far totally unknown to me.

(With this super clear skin and bright eyes I wonder if it still is my Sabine...!?!?! But her skin sure looks a lot nicer here than it really is right now ... but no break in sight in her swimming, only next weekend is off, i.e. no swim meets, the weekend after that are the North German Championships which will be her last chance to qualify for the Nationals over the 200m and maybe 400m freestyle, so - no pause for her skin to get better. Can the airbrush be used in real life, too? Maybe? What do you think???)
 
In several of these pictures, it seems that the window is behind the subject. What you should do, is have the subject sit right next to the window, with the window on either side of the face. Then use the reflector just out of view on the other side, at about a 45 degree angle. I can see the beautiful light coming in the window behind on these. It'd be great to get that on the face. You really have to be close.
 
Photo 3 gets closest to what you are thinking of, Matt, since the two windows are at a 90° angle, and what is in the background of Photo 3 is the corner between the two windows. However, part of her cheeks got blown out in that one :er: :meh: ...

I think I'll just have to try more... and wait for Sabine's skin to get a lot better in the first place!
 
Here's my attempt:

Sabine-Portraits_13-Mai-2006_01-mod.jpg


Here's the PSD, so you can see the layers I used.
http://photogs.net/tpf/Sabine-Portraits_13-Mai-2006_01-mod.psd

I like to work in layers. You can go back and change things very easily. I copied the background and then used heal on the blemishes (you could also use the clone tool or airbrush), and then I used dodge on the dark spots under her eyes. I made a copy of that layer and sharpened just her eyes, eyebrows, and mouth. For the rest, I used masked curves layers. The heal, dodge, and sharpen would have to be done fresh to change, but you can play with the curve layers over and over again to get it just right. BTW, left and right refer to left and right of the image, not her left and right. When you open the PSD, turn on each layer from the bottom up to see each change in steps. Turn off the ones you don't care for or change the curves to get it just the way you want it.

I think tempra did a good job, but you have to be careful not to get the eyes too white or the skin too smooth, or it looks unnatural.

As for the lighting, I think the backlight was a bit overpowering. You probably want that the weakest of the light sources in most cases, or at least not the strongest. There is very little of the light coming from the front. It's all on the two sides. If I were to use that same position, I would have had the reflector more to her front.

I also know that foil is popular, but I prefer plain white foam board.

I also like #3. It has a lot of potential with some tweaking of the lighting and such.
 
Photo #3 is the closest, for sure, but I would get even closer. I see you are shooting at ISO 1600. What lens are you using? I would use a 50mm f/1.8. If you don't have it, get one :) If you put her right by the window, I would imagine you chould shoot at ISO 100, and anywhere from f/2.8 to f/4, and have plent of light. Also, she doesn't have to always look into the camera. Try some shots with her looking out the window. In alot of these shots, she is square to the camera. Remember to try and have her sit at a 45 degree angle. It's a good start.

Also remember, when using your reflector, to move it around and make sure you are getting the most light on her. If the light is hitting it at a 45 degree angle from one side, it will bounce off 45 degrees on the other side. You might now always have it flat to her face. I think if you are closer to the window though, you'll get much more reflected light.
 
LOL Corinna hun, after ALL These pictures then the attempts to make them finer I would say your portraits look great!!! I Do try my Paint Program ALL the time to enhance my photos!! Gotta love it! lol
 
Digital Matt said:
I would use a 50mm f/1.8. If you don't have it, get one :)

The 50MM Lens.. YES I hear TONS and TONS of raves and reviews about this lens for portraits and I WISH I could get one for my camera.. GOING to run tot he camera shop to test them on mine to see if they will fit!! I Gotta have one LOL...
 
Corinna??? When uploading your photos from Photobucket HOW do you do it when pasting the text in here? Because it shouldnt resize them like that for you. Well I have not had that problem anyway.. So curious to know
 
I've worked on the ones taken yesterday a little (on some), and I took new ones this morning, following some advice from Mark and Matt.
Yesterday I took the pics from far away to much blur the background and used a long focus. Today I used the kit lens with which the camera came (still don't own the 50mm 1.8 :roll: )... and I still had to edit some.

I'll let you into my secrets now:

1.
146621773.jpg

One of yesterday's pics (first in the series above) and two editions, all packed into one frame

2.
146621771.jpg

Another of yesterday's pics and ONE edition (I hope I have learned some, like what "to feather" means... I did not have a CLUE that could be done :oops: )

3.
146621725.jpg

Another yesterday's pic and its edited version

4.
One of today's
146621763.jpg

You see, it had to be edited!

5.
146622447.jpg

A Matt-version. a lot less good, though, with her looking towards the one window (the other window was right behind me)

6.
146621759.jpg

One window as backdrop, one window on the right, one reflector on the left at about 45° and one before/below her on the table, no flash

7.
146621756.jpg

Last test portrait with flash at 1/60, automatic ... that, too, wanted to be edited (I think).

What do you say?
 
So what do you think: have my PS skills improved overnight (and maybe also those of taking portraits?) I tried to get rid of the evidence of swim goggles in my daughters face for at least two hours EVERY day in most of these! Is it obvious? Too obvious?
 
Gonna post on two of these the best I know how... PLEASE keep in mind that this is personal taste.. YOU will be the only one to kNOw what you actually LIKE or dislike in your photos..


The first one black and white with it being tinted.. (personal taste) To me its still a little dark.. It looks under exposted and could use some more light to it..
c2.jpg


#2 - The second one looks a little *Contrasted* like you tried to add MORE contrast then needed... Not sure how you brightend this one up... IN PS you can use the *curves* It helps level some lighting with out taking anything away.. (adjustments/curves)

c1.jpg


The last one I think U did pretty good removing the goggle marks!!


Keep playing with the PS! Look forward to seeing MORE!! :)
 
You can do a lot with Photoshop, but I think you still get the best results by having good lighting to begin with. The strong backlight is still throwing your exposure off. You can't trust your meter unless you spot just for her face. Otherwise you have to expose more to make up for the wrong reading.

For editing, my first step is to add a levels adjustment layer (and if needed, also a curves adjustment layer) for the whole image. Otherwise, if you start just by adjusting certain areas, it looks like a flashlight was used to highlight them.
 
levels and saturation are ok just the lighting makes it hard to work with..

try a little surface blur low low settings on level and threshold to reduce some of the skin blotches.....

thats about all I could advise...
 

Most reactions

Back
Top