What's new

Yi Technology -- Yi-M1

On 2017-12-19 Yi Technology released firmware version "3.1 Int". I missed this one until today. The update list is short:


"...
NEW
Adds RAW & RAW+JPG shooting format in AE bkt mode

Fixed
Fixed some known bugs, and improved the overall stability of the system. "

I have recently done some video and still work using "3.0" and was about to make some comments. I will probably post the comments later anyway. It is likely that there will not be another update for a long time (if at all now), so I guess this will be worth testing.
 
"Read The Manual!"

I am being partly sarcastic here. If you did read the original Yi-M1 manual, which was released on Nov. 28, 2016, you did not get much out of it for the effort. Out of roughly 24 pages, the first half of the manual gets you up to putting in the battery and setting the time and date. For actual photography they spent only one page for still pictures and another page of instructions for video recording.
[2018-04-08 replaced "ironic" with "sarcastic" which is more accurate.]

Yi Technology did provide "online support" by answering common questions and also a forum, but "in the field" unless you had mobile internet, you were stuck with guessing. Moreover, since that manual was written back in 2016, it did not cover the changes in version 2 firmware.

But with the version 3 firmware came a new "supplement" manual specifically for Video. Dated Oct. 27, 2017, this short manual (about 9 pages) actually does a pretty good job of describing the use of the current functions. The current functions combine to change the way one uses the camera.

The change in the approach to using the camera comes from being able to chose between the "still picture display mode" or the "video display mode". Toggling between these modes is done by holding down the video record button for more than two seconds.


The firmware favours the still picture mode:

1. When the camera is turned on, it starts up in the "still picture display mode."

2. If you take a still picture while in "video display mode" the camera drops out of "video display mode" until a video record is started or the display is deliberately changed to the "video display mode" again.

3. When in the "still picture display mode", taking a video will only change to "video display mode" until the end of recording and then switch back to "still picture display mode".

More Changes

"Single Auto Focus" is a completely new function. It focuses when the recording starts but does not change during the recording unless it is overridden. I believe aperture control is also new. EV setting was available before but I do not think it could be done during the recording. The small menu opened by the screen button on the right allows changes to ISO, Focus mode, video format (2K, 4K etc), meter mode, White balance and face detection. The only control still missing is contrast.


About Video Auto-Focus:

From what I understand, the camera always uses a single point for auto focus. When it is allowed to chose that point, it does look over the whole screen to find it. When face detection is on, it will favor the point where the face is. As far as I know so far, it only choses a single face, and it will track that face. If there is no face, I do not know whether it will "track" whatever was at a focus point that was automatically chosen. At any time, a manual focus point can be chosen by touching the screen. This point can also be updated by touching another point on the screen. To "clear" the manual selection and return to camera chosen automatic focus, the "Q" button it touched.

Manual focus of an electrically controlled lens can be adjusted during a video.

I have found that manually selecting the focus spot is generally the best way to use this camera, though realistically it requires the use of a monopod or tripod. I almost always use a monopod or tripod, so that has no effect on me.


Room For Improvement:

No "touch focus/with spot meter change"

The "touch-focus" and "touch-focus-shoot" functions work well but there is no way to change the metering to favour the focus spot. It would have been nice if there was an option to adjust the meter to the focus spot at the same time. This would be particularly nice for still pictures.

A Medium Focus Area Mode:

It might be a good idea to have an option to reduce the area that the camera considers for finding a "focus spot" from the current "whole screen". I would suggest a "medium zone" roughly 1/2 the area using the 7 middle rows and the 5 middle columns.

For videos in particular it would reduce the chances of picking a focus point that was "uninteresting".

Low Contrast or Log


It would be nice to have a "low contrast" option for videos. Since there is no equivalent to "raw" in videos, this has to be done during the actual recording. Even a simple "low contrast" setting would be an improvement, but a "log" setting would be welcome. The problem is choosing a "log" response. There are quite a few, and as far as I know, they are not mutually compatible.

Firmware Re-Design:

Lastly, I think that the firmware should further separate video and still picture functions and start replicate the controls. I would, for example like to have separate date-time stamp settings. Normally, I would like a date-time stamp on still pictures because I usually take stills for scouting locations and setting up videos. They are not really for "public consumption". Other people might prefer the opposite setup.


Yes, It's Better:

I think with practice, I am going to like this "3.1-Int"firmware version. Having the "video display mode" means that I am no longer guessing about the look of a video before I start to record. Any experienced photographer can understand the value of this. At this point, I have to wonder if Yi Technology has caught up to their competition in the lower end 4K video capable still cameras. I can no longer say that a GX850 or Olympus EM10 iii is clearly better. Olympus and Panasonic still have stabilization to claim superiority, but if you do not need the stabilization, then the Yi controls might actually already be better. I would have to go back over what has been written about those other cameras to be certain. And at bottom, the video quality was already quite good when using "2.0-Int".

I do not know how far Yi Technology will push the Yi-M1. I hope there is still one more upgrade to come. I would also say now, that I hope Yi Technology is working on a an "M2". I have no doubt that they have learned enough from the M1 already to make a much better camera, and Amberella already has a better processor chip to work from.

[22:05]
I forgot to mention that I now know that for still pictures, "Continuous Auto-Focus" mode stops down the lens for "continuous depth of field preview." Other mirror-less camera bodies also work this way. I have to decided whether to switch to working this way in the future. The problem is that I do not know how much battery power this uses. The reason I have never used "Continuous Auto-Focus" mode goes all the way back to my first Panasonic Lumix GF3. The manual warned that it drains the battery faster, and so I always avoided that mode.
 
Last edited:
Two More Requests:

Since I have asked for specific changes above, I thought that I would add a couple more features which I do not think are currently common, but I have found useful in the past:

1. "Level/Tilt" Indication

Of the bodies that I currently use, the Pentax Q-S1 has level indicators both for "up - down" ("climb - dive" for aircraft) and "left-right side high/low" ("roll" for aircraft). Personally, I would appreciate it if I could get "roll" markers, but I have no doubt that others like having both types. This helps setting up a tripod as well as handheld. I would use a pair of small icons in the upper corners of the display.

2. "Audio Record"

Also, I would appreciate and audio record function so I can record voice memos. I had a small inexpensive pocket camcorder that had this function. If this is added to the Yi-M1, then I could make short audio notes mixed in with the still and video files. It would be particularly useful because they would be in the right order among the videos and pictures to which they would probably refer.
 
Yi-M1 "3.1-Int" JPEG Processing
Lens used: Yi 12-40 mm F3.5 - 5.6 kit zoom

The question is "whether the Yi-M1 internal JPEG Processing is any good?" From what I have seen so far, I think that it is going to end up a matter of taste. And it will depend on what camera setting are being used, and what alternatives you have for processing raw files. This is going to take some time and a number of pictures, and I am not going to try to get it all done at once. In fact, at some point I will probably just stop and consider the question answered.

My camera settings currently are standard "Program" mode, with my choice of EV, and occasionally I will force an ISO in order to get a good exposure time/f-stop combination. Everything else is automatic or default. I have not been exploring the available rendering options because up until now, I have only used "raw" capture and processing in various versions of Corel Paintshop Pro (this set of images in 2018).

In "P3030049", the JPEG processing has handled some colour fringing from the lens. I could have done that, but I did not feel it was so bad. Likewise, there appears to be some noise reduction and sharpening. Previous versions of the Yi-M1 firmware have been criticized for going too far with noise reduction and sharpening. This image, and what I have seen since I started using 3.0 and 3.1 firmware looks typical of my Sony a5000. If someone makes a formal comparison, you would probably be able to see some differences, but really, it is not that huge. Look at the tree bark and colours are more muted than the files I made from the DNG.


"P3030049"

"a3030049a-jpg-rsz900-C1.jpg"

This is a straight resize of the original JPEG created by the camera to give you an idea of what the whole picture looked like.

Partial EXIF
March 3, 2018, 16:08:38
Image width 5200
Image height 3902
Pixel height 3888
Pixel width 5184
Component configuration YCbCr
Scene capture type Standard
Exposure mode Manual exposure [Actually I think this was "Program" w/EV compensation the same as the other pictures I took that day. I do not know why it says it is "manual".] *
Exposure time 1/60
F number f/5.4
Max aperture f/5.4 *
Focal length 33.0 mm
Focal length in 35mm 66 mm
ISO speed 200
Metering mode Center weighted average
Gain control Low gain up

* [2018-03-08 21:28 Corrections and additions:
Checking the camera JPEG file in Windows Photo viewer I found "Exposure bias +0.70 ev", which apparently I missed before, and "Max aperture 4.87". This latter discrepancy might be a bug in Paintshop Pro 2018 version "20.2.0.1 x64". The "Manual exposure" report error might be from either Paintshop Pro, or the Yi "3.1-Int" firmware. At this point I cannot tell which.

About the exposure: As you probably guessed, I deliberately over-exposed this picture because I was interested in seeing shadow detail in the cluster of branches in the upper middle of the picture. I accepted that there might be clipping since I could see the highlights where the sun was hitting the tree trunks directly. If I had left the exposure bias "EV = +0.0", I think the highlights would have stayed in bounds. But these trees are dark and I see them often, so the over exposure produced a result that was interesting for me. In case you were wondering if there was any indication of the over-exposure, the version 3.0 and 3.1 firmware have a histogram function. So yes, I could have avoided it. I just wanted something a bit different this time.]


"a3030049-Crop01-C1.jpg"

This is the detail crop from the original JPEG created by the camera. All three crop files start from 2270,0 and run 1200 right and 900 down. This is far on the edge of the picture, which means the lens is outside its best performance, though at 33 mm, it is not far at the end of the zoom range, so it is not at its worst. I do not find this over processed. The colour fringing has been handled, noise probably reduced a bit (there was not that much to start with) and particularly, it has not be "over sharpened". The sharpening is about right.


"b3030049-1-Crop01-C1.jpg"

Temperature 5050
Tint 14

This is the converted raw DNG file from Corel Paintshop Pro with no other changes. Comparing this image to the Yi-M1 and we can see what the Yi-M1 has done. Oddly, this conversion looks more contrasty. The light spots on the tree trunk on the right appear to have clipped to white and are surrounded by dark shadows. Noise in the shadows is not bad. Overall, it is quite clean. As I mentioned, since this is far off-axis, there is some color fringing showing up on horizontal branches (this crop is at the top of a vertical formatted picture). The colour of the tree bark is a bit richer than the JPEG.


"c3030049-1b-Smartfix-Crop01-C1.jpg"

SmartFix
Brightness
Overall 33
Shadows -40
Highlights -10
Focus 24
Black 18

Mainly, Smart fix has brought up the shadows and added a moderate amount of sharpening. Smart fix does not handle the colour fringing nor any noise reduction. I could have done that separately, but I did not. Because version 1.x and version 2 firmware did not support saving the DNG raw file and the JPEG file together, this is roughly what I have been seeing out of the Yi-M1 since I bought it.

"dP3030049-1b-Smartfix-rsz900-C1.jpg"

This file is a "resize" of the final "Smartfix" version from the raw DNG file. Is it better than the camera create JPEG? I think it is. The colours are a bit richer. But really, there is room for people who would disagree.

But looking at the camera JPEG, it looks similar to a file out of my Sony a5000 subject to the way I have the a5000 set up. The main difference is that I have set the Sony to automatically handle HDR (reduce contrast). I think that the Sony would have flattened the exposure of this picture a bit. I do not see any way to do this in the Yi-M1. But then again, I do not miss it.


"P3030002"

Partial EXIF
March 3, 2018, 15:44:21
Pixel height 3888
Pixel width 5184
Component configuration YCbCr
Exposure program Normal program
Scene capture type Standard
Exposure mode Auto exposure
Exposure bias 0.00 ev
Exposure time 1/250 sec.
F number f/5.6
Max aperture f/3.5
Focal length 12.0 mm
Focal length in 35mm 24 mm
ISO speed 250
Metering mode Center weighted average
Gain control Low gain up

"P3030002-rsz-1200-C1.jpg"

I am leaving this topic, at least for now, with this file which has been reduced in size, but is otherwise an un-altered version of the camera JPEG. The pale beige "grasses" in the foreground are correct. This is an end-of-winter day and nothing has started growing yet. There is a faint spot of magenta lens flare in the bottom left corner from the sun. It is not a processing error. I have no plan to go through the exercise of comparing it to a processed raw DNG. It is a nice picture. Aside from the lens flare, or maybe including that, I doubt if anyone could tell that this was from the Yi-M1 or out of some Sony or Canon.
 

Attachments

  • a3030049a-jpg-rsz900-C1.webp
    a3030049a-jpg-rsz900-C1.webp
    523.9 KB · Views: 323
  • a3030049-Crop01-C1.webp
    a3030049-Crop01-C1.webp
    316.1 KB · Views: 254
  • b3030049-1-Crop01-C1.webp
    b3030049-1-Crop01-C1.webp
    227.3 KB · Views: 277
  • c3030049-1b-Smartfix-Crop01-C1.webp
    c3030049-1b-Smartfix-Crop01-C1.webp
    296.8 KB · Views: 268
  • dP3030049-1b-Smartfix-rsz900-C1.webp
    dP3030049-1b-Smartfix-rsz900-C1.webp
    501 KB · Views: 264
  • P3030002-rsz-1200-C1.webp
    P3030002-rsz-1200-C1.webp
    588.8 KB · Views: 292
Last edited:
"Portrait Mode"

When I use my Pentax Q-S1, I use "Portrait" finish because it gives a slight global saturation boost whereas the "Vivid" on that camera" emphasizes some colours. On that camera, the "Normal" and "Portrait" settings are what I generally use, and I prefer to use "Portrait" if the subject matter allows.

If I were creating a "Portrait" mode, I would set saturation slightly high. I would set contrast low and sharpening low. I am not sure what I would do with noise reduction.

[2018-03-19]
After looking at the resulting pictures, I have found that the Yi-M1 "Portrait" setting is not one I like. The "blue cast" alone is enough to make it undesirable. Beyond that, the unnecessary over-sharpening can occasionally cause "halo". I have no opinion about noise reduction, but it would not surprise me if some people felt it was also too much. I had planned on further testing of the "Portrait" setting, but I think I will abandon it here.


Location:

This is the "Dundas St. West and Burnamthorpe Road" area of west end Toronto. around this area, along Dundas St. West there are a number of murals. I am not sure how many, but I think there are at least six. This is my first scouting trip to photograph them. Because it was late in the day (~16:30 - 17:00) the sun was low and there were strong shadows. Over the next few months I hope to return to this area and either get better stills, or record some video stock. Because of their different orientations of the various murals, it looks like I will have to make a number of trips at different times of the day.

Sadly, many of the pictures turned out poorly because of sun flare. I am finding this to be an issue when I use this kit zoom. Yi never released lens hoods for either of their lenses. As time goes on, I think I will use this kit zoom less and use other brand lenses (with lens hoods) in its place. I think finding a hood for the 42.5 mm lens should not be a problem, which is fortunate since I have found that lens to be quite good and I hope to continue using it for some time.

Conditions:

The temperature forecast for 14:00 - 19:00 was -1 deg C. and breezy. Rush-hour traffic was a minor annoyance, especially when I photographed across a busy street.

All pictures were taken with a monopod.

All JPEG pictures with names ending in "C1" are minimally compressed and retain the most detail possible.

All processing was done using Corel PaintShop ProX9 on a Gateway DX4375 with AMD A6-5200 APU and Windows 8.1


"P3160009.JPG"

Partial EXIF
Date and time March 16, 2018 14:51:46 [I forgot to set DST, so actually the time should be 15:49:xx]
Pixel height 3888
Pixel width 5184
Component configuration YCbCr
Colr space Uncalibrated [AdobeRGB -- all my pictures are re-encoded to sRGB by PaintShop Pro during output to the new JPEGs.]
White point 0 31 0 33
Primary Chromataticities 0 64 0 33 0 21 0 71 0 15 0 06
Exposure Normal Program
Scene capture Standard
Exposure mode Auto exposure
Exposure bias 0.00 ev
Exposure time 1/640 sec.
F number 1/10.0
Max aperture f/5.5
Focal length 27.0 mm
ISO speed 200
Metering Center weighted average
Custom rendered "Custom processing" ["Portrait"?]
Gain control Low gain up

P3160009_jpg-rsz1230-C1
- resized, no other adjustments

"P3160009a-Crop01-C1.jpg"
Crop01 starts 2150,2390
- 1200 x 900
- no other adjustments

I do not know whether the sharpening and noise reduction for the other finishes are the same as the "Normal" finish. I would have to repeat pictures with the different settings to tell. This "Portrait" setting picture seems to me to have a bit more sharpening than what I saw in the "Normal" pictures. The red "State Farm" sign had some over-sharpening haloing where it touches the blue sky, but that was the only instance I could find. Overall, I would probably sharpen it a bit less. It is not unpleasantly sharp, but I think, maybe a bit more sharpened than necessary, and lately, I tend to use less adjustments whenever possible. I included a lot of shadows in the detail crop to show the noise reduction. The amount of noise reduction here is appropriate for this picture. It could be argued that noise reduction is higher than necessary. I have not checked the DNG raw file yet, but I do not think there was any significant detail lost.

[2018-0323 9:25]
"P3160009 -1g-rsz-1230-C2.jpg"
This is the corrected version of "P3160047_jpg-rsz1640-C1.jpg" which I uploaded 2018-03-19 in the "2018 Toronto, Winter" topic of the Landscapes gallery. This corrected version was made from the DNG (raw) file and so it is not related to the "Portrait" version posted here. The main point of interest is the difference in colours. PaintShop Pro X9's RAW converter chose the white balance and color set using the "Auto" setting, and the resulting file was further adjusted in SmartFix. The point of this file is that for the colour and exposure choices, it is the result of "default automatic" adjustments just as can be done within camera firmware. In theory, there is no reason why the Yi-M1 could not have created the same colours.

[2018-0319 9:35]
I have posted a further corrected version of "P3160047_jpg-rsz1640-C1.jpg" at "2018 Toronto, Winter". The further corrected version was manually darkened in order to preserve saturation in the upper half of the mural. I also have more images of the murals in the area posted there.


"P3160047.jpg"


"P3160047_jpg-rsz1640-C1.jpg"
- resized, no other adjustments

Partial EXIF
Date and time 2018-03-16 15:09 [I forgot to set DST, so actually the time should be 16:09:xx]
Program name: ASDK-00141
Pixel height 3888
Pixel width 5184
Color representation Uncalibrated [AdobeRGB -- all my pictures are re-encoded to sRGB by PaintShop Pro during output to the new JPEGs.]
F-number 1/7.1
Exposure time 1/250 sec.
ISO speed ISO-200
Exposure bias 0 step
Focal length 15 mm
Max aperture 4.03
Metering mode Center Weighted Average
35mm focal length 30
Exposure program Normal

Since this is St. Patrick's day weekend, I thought I should include a picture of a pub. This pub happens to have one of the murals. Unfortunately, when photographed from across the street, the mural is blocked by a bench.


"P3160055.jpg"

"P3160055_jpg-rsz1640-C1.jpg"
- resized, no other adjustments

Partial EXIF
Date and time 2018-03-16 15:13 [I forgot to set DST, so actually the time should be 16:13:xx]
Program name: ASDK-00141
Pixel height 3888
Pixel width 5184
Color representation Uncalibrated [AdobeRGB -- all my pictures are re-encoded to sRGB by PaintShop Pro during output to the new JPEGs.]
F-number 1/6.3
Exposure time 1/250 sec.
ISO speed ISO-200
Exposure bias 0 step
Focal length 12 mm
Max aperture 3.64
Metering mode Center Weighted Average
35mm focal length 30
Exposure program Normal

This mural is the one in front of the pub.


"P3160041-1c-rsz1640-C3.jpg"

[Added 2018-03-26]
NOTE: This picture is NOT an example of Yi-M1 "Portrait" mode.


The original colours would have been acceptable, but since I needed to bring up the exposure of the mural I started with the DNG raw file and allowed PaintShop Pro X9 select the palette. As I noted, lens flair was a battle for this project. I am in the process of choosing a lens hood for the kit zoom.


Re: Continuous Auto-Focus:

This was also my first use of "Continuous Auto Focus". The experience was not one I enjoyed. If I zoomed quickly the display flickered. That was not a serious issue. The camera locked up once during the middle of the project. I removed the battery and when I powered up again, everything was fine.

The focus tends to lag. If I touched the shutter button then the lens would jump into focus.


More Changes I would recommend:

These are the last changes I would recommend to Yi:

1. "Silent shutter mode" This mode would bypass the mechanical shutter. The traditional reason to do this is to reduce "shutter shock" blurring. Personally, the reason I want this feature is because it saves power. The shutter is probably not necessary in many instances. There has even been some speculation that future mirror-less cameras might not have these mechanical shutters. I can see an advantage sometimes, but yes, I would like to have the option to bypass the shutter on demand.

2. "PNG" file output. JPEG arose back when we were using 720MB floppy disks. We are well past that. Yes, there are still times when JPEGs are handy. The best compressed PNG file is still about twice the size of least compressed JPEG. But I can conceive of times when I would be happy just saving a file in the non-loss-y PNG format. PNG is the current non-loss-y format for the Internet. When I used the Yi-M1's HDR capability, after all the effort the camera made putting together a good HDR picture, there was no option to save it except subject to JPEG quality loss. Why force us to use an image format that necessarily loses quality?

3. "Depth of Field Preview for Single AutoFocus mode" I did not like the "continuous autofocus" mode. First, I am still not sure how much power I am wasting, but I am aware of it. Also, the inability to keep up with a fast zoom change (which caused flickering) was a small annoyance. The fact that auto focus did not "keep up" while using this mode (it can be "caught up" by touching the shutter button, but that means it is not so much better than just using single autofocus mode in the first place). Also, there is no way to force the aperture open during this mode for a quick check of where the camera is actually focussed. Both open and stopped down aperture conditions are useful for photography. Being forced to only have one of these conditions available is less desirable.

What I would prefer is that during "Single Autofocus" mode, I could select an option that would work like this:

When I press the Shutter Button down "half way":
- First the focus would be set.
- Second, the lens would stop down to preview the depth of field
- Third, the aperture would stay stopped down until I un-depressed the shutter button, or if I further depressed the shutter button, then the picture would be taken.

These and the ideas I posted earlier are all the most important changes I would like to see. They have all been bouncing around in my head from early when I was using "Version 2.0-Int" firmware.
 

Attachments

  • P3160009_jpg-rsz1230-C1.webp
    P3160009_jpg-rsz1230-C1.webp
    447.5 KB · Views: 317
  • P3160009a-Crop01-C1.webp
    P3160009a-Crop01-C1.webp
    100.1 KB · Views: 285
  • P3160047_jpg-rsz1640-C1.webp
    P3160047_jpg-rsz1640-C1.webp
    508 KB · Views: 300
  • P3160055_jpg-rsz1640-C1.webp
    P3160055_jpg-rsz1640-C1.webp
    475 KB · Views: 271
  • P3160009 -1g-rsz-1230-C2.webp
    P3160009 -1g-rsz-1230-C2.webp
    377.3 KB · Views: 259
  • P3160041-1c-rsz1640-C3.webp
    P3160041-1c-rsz1640-C3.webp
    478.6 KB · Views: 260
Last edited:
"Vivid"
Yi-M1, firmware version "3.1-Int"
Panasonic 14 - 42 mm, 3.5 - 5.6 H-FS014042 zoom lens
Monopod

I am a lot happier with the result of the "Vivid" mode than I was using the "Portrait" mode. The colour balance, saturation and contrast are all well selected. Sharpening might be a bit higher than necessary, but I did not see evidence of over-sharpening, so leave that with a question mark. Noise reduction is another area where there is room for disagreement. It does seem higher than necessary, resulting in some loss of detail.

This set of files was made with a Panasonic 14 - 42 mm, 3.5 - 5.6 H-FS014042 zoom lens. This is one of the older "kit zooms" and I do not think it is currently available. It has optical image stabilization, but the Yi-M1 does not support that capability. Optically it is only a bit better than the Yi-M1 (not as much as you might have expected), yet it actually is a much better lens, not just because of the image stabilization, but because the movements of the elements do not "reverse".

In most of the kit zooms I have tried, when you are zooming from wide-angle to telephoto the front element moves back a bit and then moves foreward. This is what I would call a "complex" cam-actuated movement. The problem is that the torque required to turn the zoom control ring changes at the point where the elements reverse direction thus making it hard to maintain a consistent zoom movement for video. Also, the Yi zoom is probably not a true zoom. I have not tested for focus shifting during zooming, but I expect that there is probably enough to be visible unless autofocus is able to keep up and correct it. The Panasonic zoom does not have the "complex" cam-actuated movement, but I expect that it too probably will show focus shift when I get around to testing it.
[2018-06-20 clarification]


About the Yi Lenses:

I have actually come to like both the Yi lenses. The zoom has done better overall than I expected despite it being less than wonderfully sharp as noted by the better camera testers. I think that it boils down to it being just within range of usable software enhancement. The 42.5 mm lens has been a real bargain. Yes, I wish it had a focus ring, and yes I would have preferred it to have used some better materials, but the auto-focus and aperture selection have worked well, and really the sharpness is quite good. I have been pleased with the optical characteristics overall.


Processing:
Corel PaintShop Pro X9

Resizing was variable. I decided that these files were good enough that I wanted to upload the best versions that I could. So in many cases I tried more than one size, trying to get the largest images that allowed "C1" compression which retains the most detail.

NOTE: My names are not necessarily the official names of the various murals. I might change them later.

The name of the artist who painted all of these murals is "John Kuna". I tried searching that name in Wikipedia but did not turn up anything.
[2018-06-17]


"P3240002a-rsz1600-C1.JPG"
"Fox & Fiddle Pub"
Partial EXIF:
Date taken 2018-03-24 09:08
Program name ASDK-00141
Dimensions 5184,3888
F-stop f/9
Exposure time 1/500 sec.
ISO speed ISO-200
Exposure bias 0 step
Focal length 15 mm
Max aperture 3.71
Metering mode Center Weighted Average
35mm focal length 30


This is much better than the previous version. It can be argued that the lighting was better this time, but even taking account for that, the colour selection is much improved. Overall, there is no "blue cast" to this set of pictures.

"P3240002b-Crop01-C1.jpg"
- detail crop of above


"P3240020b-rsz1440-C1.jpg"
[2018-04-08 "P3240020a-rsz1240-C1.jpg" has been replaced. The new version is the largest I can upload]
"Cemetery" [Left 3 panels]
This has the most vibrant colour set.


"P3240030a-rsz1640-C1.JPG"
Partial EXIF:
Date taken 2018-03-24 09:16
Program name ASDK-00141
Dimensions 5184,3888
F-stop f/9
Exposure time 1/400 sec.
ISO speed ISO-200
Exposure bias 0 step
Focal length 14 mm
Max aperture 3.63
Metering mode Center Weighted Average
35mm focal length 28

"Skating"
This is one of my favorite murals.


"P3240044a-rsz1640-C1.JPG"
"Radial Line"


"P3240051a-rsz1200-C1.JPG"
Partial EXIF:
Date taken 2018-03-24 09:26
Program name ASDK-00141
Dimensions 3888,5184
F-stop f/8
Exposure time 1/400 sec.
ISO speed ISO-200
Exposure bias +0.3 step
Focal length 28 mm
Max aperture 4.55
Metering mode Center Weighted Average
35mm focal length 56

"Sledding"
This is another of my favorite murals in this series.

"P3240051b-Crop01-C1.jpg"
- detail crop of above
[I might make a version from the DNG raw file to compare later.]


"P3240086a-rsz1230-C1.JPG"
Partial EXIF:
Date taken 2018-03-24 09:48
Program name ASDK-00141
Dimensions 3888,5184
F-stop f/5
Exposure time 1/250 sec.
ISO speed ISO-200
Exposure bias 0 step
Focal length 15 mm
Max aperture 3.71
Metering mode Center Weighted Average
35mm focal length 30

"Apples"
This panel has one of the richest colour sets, but is more natural than the "Cemetery" panel above.
 

Attachments

  • P3240002a-rsz1600-C1.webp
    P3240002a-rsz1600-C1.webp
    553.8 KB · Views: 281
  • P3240002b-Crop01-C1.webp
    P3240002b-Crop01-C1.webp
    203.5 KB · Views: 318
  • P3240030a-rsz1640-C1.webp
    P3240030a-rsz1640-C1.webp
    522 KB · Views: 254
  • P3240044a-rsz1640-C1.webp
    P3240044a-rsz1640-C1.webp
    439.6 KB · Views: 261
  • P3240051a-rsz1200-C1.webp
    P3240051a-rsz1200-C1.webp
    530.4 KB · Views: 246
  • P3240051b-Crop01-C1.webp
    P3240051b-Crop01-C1.webp
    454.5 KB · Views: 271
  • P3240086a-rsz1230-C1.webp
    P3240086a-rsz1230-C1.webp
    404.3 KB · Views: 257
  • P3240020b-rsz1440-C1.webp
    P3240020b-rsz1440-C1.webp
    517.3 KB · Views: 266
Last edited:
Yi-M1 Dynamic Range

There are two specific issues I have been planning on addressing since I started looking into the Yi-M1 JPEG capabilities. One is "dynamic range" and the other is "noise handling v. detail". These are related, but I am trying to address them individually. Looking at "dynamic range" here, I am only looking at the "Natural" finish. If I look at the "Vivid" finish or the others,, the results might turn out to be different.


"P3030025-1b-rsz1200-C2.jpg"
The golf course at Eglinton Ave. W. and Jane St.

My eyesight is pretty bad. Even with my glasses I cannot see a lot of detail. So if I have a camera in my hand, sometimes I take a picture of simply to look at it later. When I was photographing the trees north of the golf course at Eglinton Ave. W & Jane St., I was looking up and wondering if there was anything interesting to see in the shadows. So I took "P3030049" [see also message #34 above]. I chose an EV compensation to get enough exposure into the shadows, expecting that I might lose some highlight areas.


"P3030049-Crop02-C1.jpg"

[Crop from 540,2300]

This crop was all that I was really interested in seeing. After seeing it, I was satisfied that, really, there was not much of interest after all -- just some branches with pine cones and needles. That was going to be the end of that picture. I might even have deleted it at that point, but I decided to keep it for a while.

As I was thinking about writing a bit about the Yi-M1's current JPEG processing, I looked through the files I had on hand and felt that this file showed a handful of issues I thought I would like to show. In particular, I was interested in the chromatic abberation issues. First, the 12-40mm kit zoom may not be wonderfully sharp but at the telephoto end in particular there was very little chromatic abberation. But there was enough to show the way the Yi-M1 handled it. It also showed a bit of the noise and resharpening issues. So I decided to use it as one of my first examples.

Having used it for this, I started thinking about the other issues that it demonstrated. "Gee, it sure is too bad I didn't have the highlights covered by the dynamic range." Now that raises a couple of interesting questions. Exactly how much dynamic range does the Yi-M1 have to work with? Did I have enough that I could have "contained" the whole of this scene? Whenever I had the time, over the last few days, I chased after the the answers to those questions, and this is what I can say for now:

First: If I had paid better attention to this picture, could I have set an exposure that would have covered the whole of the dynamic range in this situation? After trying my best with Corel PaintShop Pro 2018, I can say that no, it was not possible. It was close though. First, we know that I clipped the highlights. It does not look too bad. As I wrote above, I think an uncompensated exposure probably would have been enough to cover the highlights. But what about the darkest parts? I tried compressing the gamma curve using PaintShop Pro's "Histogram Adjust" capability, and then made a further fine adjustment in "Smart Fix".

What I found was that there were a couple of very small patches of un-correctable "black" in the deepest shadows. Raising the levels of those areas eventually just shows noise. So that answers it. Even with the small patches of overexposed highlights at the top end, there is also unusable "black" at the bottom end. The sensor's dynamic range is exceeded at both ends. Lowering the exposure to bring down the highlights would simply have increased the black areas in the shadows.


"P3030049-5c-Crop01-C1.jpg"
[Crop from 540,2300]

This is the best I could do adjusting the gamma curve to flatten the dynamic range and recover everything possible in the shadow area. Compare this to "P3030049-Crop02-C1.jpg" and yes, I think that I did manage to recover a bit of shadow detail, but not really much. I "think" I recovered detail? Well, if you look at it, the only thing for certain is that the noise is showing up, and there is some "greenish" area that used to be "black" in the original JPEG. I can "guess" that I am seeing more of the needles, but I am simply applying an assumption that it should be more needles. An "unbiased" analysis would conclude that "nothing was proven." But in the end, yes, you will find that there are still some patches that are definitely nothing but "black + noise".


Still, the camera did pretty well. According to "YI M1 Review" by Mike Tomkins ("Imaging-Resource.com" posted: 09/18/2017)
"YI M1 Review"

The Yi-M1 has "... the same image sensor as in the Panasonic GX8". I do not have a reference, but I believe I also read that this is the same sensor which is used in the current Panasonic GH5. It might also be in the G9. Looking further, DXOmark had this to say about the Panasonic GX8:

DXOmark GX8:
Overall Score 75
Portrait (Colour Depth) 23.5 bits
Landscape (Dynamic Range) 12.6 EVs
Sports (Low-Light ISO) 806 ISO

[Compared against Panasonic Lumix DMC-GH4 (16MP), Olympus OM-D E-M1 (16.3MP), Olympus PEN E-P5 (16.1MP), Olympus OM-D EM10 (16.1MP) their review continued as follows:]

"But the difference between the sensor performance of these Micro-Four-Thirds cameras is so negligible that we can essentially say they offer the same image quality in terms of Color, Dynamic Range and ISO, despite the fact the GX8 benefits from greater resolution."

I think that the sensor performance of the Yi-M1 would prove to be in this same ballpark, which is still about the same as some cameras which cost much more.
 

Attachments

  • P3030025-1b-rsz1200-C2.webp
    P3030025-1b-rsz1200-C2.webp
    410.7 KB · Views: 324
  • P3030049-Crop02-C1.webp
    P3030049-Crop02-C1.webp
    284.9 KB · Views: 344
  • P3030049-5c-Crop01-C1.webp
    P3030049-5c-Crop01-C1.webp
    277.9 KB · Views: 367
Last edited:
I think that the sensor performance of the Yi-M1 would prove to be in this same ballpark, which is still about the same as some cameras which cost much more.
My Google Pixel phone performs better...
 
I think that the sensor performance of the Yi-M1 would prove to be in this same ballpark, which is still about the same as some cameras which cost much more.
My Google Pixel phone performs better...

Well that was an interesting comment, so I took a bit of time to look into it, and came away with a bit of a headache.

The only source I had time to look up was DXOmark, and I ended up bogged down trying to get a handle on their current testing and reporting method. Put simply, I could not find a specific test of "Dynamic Range". Yet they had no problem knocking the Google Pixel for apparently not being very good in that category for video.

Here's their link:

"Google Pixel: Retested with the new DxOMark Mobile protocol - DxOMark"

Here are some of the things they wrote in summary which I might be related to "dynamic range".

Photo:
"Exposure and Contrast 90
..."
- [one of the best cellphone cameras for this]

Pros:
"•Very good highlight preservation
•Very good detail in low light
•Good noise levels in bright and medium light
..."

Cons:
"...
•Very low levels of detail for medium- and long-range zoom
..."

Video:
"Exposure & Contrast: 83
..."
- [83 does not sound so bad. I need to look at a bunch more to see why they say it lacks dynamic range below.]

Pros:
"•Good exposure in almost all light conditions
...
•Good noise reduction and color at all light levels"

Cons:
"•Lack of dynamic range
•Visible color shading in indoor conditions
..."


So it sounds like you are might be right about the "Photo" capabilities of your Google Pixel, but for video it got knocked specifically for dynamic range. In the end, one cannot assume that a smaller sensor in a particular phone camera will be out performed by a particular larger sensor in a camera, and the later technology sensors like in the Google Pixel could be up to the task.
 
Yi-M1 Noise Reduction:

First, let me say that I have not used typical "image noise reduction" functions much -- in my whole life. Well that sounds really dramatic, but if you consider that I have only been using image modifying software for maybe three or four years now, you realize that this was mainly a joke. I am excluding "paint" style programs from this because I have done "paint" work for many years, but photo retouching software is something I only really started using recently. Oddly, I had software years ago, yes, legally bought and paid for, but I did not even get around to installing it.

[2018-0410 BIG Mistake, embarrassing but not really important to anyone but me. I was very tired and in a hurry when I wrote this post so actually, I made 2 big mistakes. This one is not really important.

What I was thinking about was that I started using "Corel PaintShop Pro" about that long ago. For some reason I discounted my use of another program that came with a "Nero" installation which was a very nice, but not as advanced image manipulation program, which name escapes me right now. But I used that for many year -- over five years? I switched to PaintShop Pro because Nero dropped support of that earlier program. And yes, as I wrote above I had another program, I think by Magix, which I never even installed.]


But let me get more specific. I have probably only used "image noise reduction" functions about a half dozen times over the last three years. Here is why:

As most of you who have tried out image processing software fairly thoroughly will know, if you use a "rotation" or a "geometric perspective correction" or a "lens linearity correction" (for "pin-cushion" or "fish-eye" or "barrel" distortions), or a resize downward, then a lot of the noise will be "handled" as a result of those changes. Since almost all my pictures require some combination of these changes, there is usually not much image noise left that requires specific attention.

The result is that I have very little experience with any of the noise reduction tools that I have had in any of the programs I have used. So likewise I have very little to say about noise reduction for the Yi-M1. It surprised me at first that I read some comments that the Yi-M1 used too much noise reduction which result in loss of detail, BUT others seem to say the opposite, that the Yi-M1 did not apply enough noise reduction. At first I attributed this to the possibility that people were seeing different versions of the firmware, and that may be a part of it. But this comment makes me think that something else might be happening:

DPreview.com "New kid on the block: YI M1 review" 2018-04-08:

"The JPEG engine produces JPEGs that are full of nice detail but some of the finer detail tends to get a bit muddled as it appears that they are applying larger radius sharpening during JPEG processing."

and later:

"In terms of noise reduction the M1's JPEG engine takes a fairly lazy approach, leaving behind a lot of noise and generally not balancing detail retention and noise reduction as well as the Olympus [PEN E-PL7 specifically] with its context-sensitive approach. Color noise can be problematic with the M1, particularly at and beyond ISO 1600, although it starts to become evident by ISO 800 compared to the Olympus. It's also worth mentioning that the M1's JPEG engine also doesn't completely eliminate all of the color aliasing."

It is a bit irritating that their review did not make clear which version of the firmware that the above applies to, but their review seems to be up-to-date up to version 1.0.20 Int. and possibly up to version 2.0.0 Int. Moreover, they specifically note for "November 2017" that at least 3.0.0 Int is being tested, which I assume will probably mean that 3.1 Int is probably being tested. I applaud their efforts.

But first, DPreview.com's comments do sound like what I am seeing, so for now, it appears to me that the JPEG has not changed substantial since around 2.0 Int. If they notice later changes, I will expect them to make a comment about it. Actually, if they saw something significantly different, I would have expected them to re-do their "studio" test shots by now. So I think that their currently posted review probably is the most accurate analysis of the YI-M1's JPEG performance.

[2018-0410 -- My second BIG Mistake, and this one is important: I think I have made a mistake in my conclusions about the version 3.1-Int JPEG engine, probably because that I managed to get confused about which picture I posted was which. The file I posted below is my DNG raw file conversion and shows "colour aliasing" in a few places. It can be seen in the mortar between the bricks as magenta specks, and especially in the large sign letters which have thin black accent lines running through them which in the DNG conversion come out as a rainbow of coloured pixels but in the crop of the original camera JPEG posted previously, the JPEG engine has rendered them as grey, which is the best that can be done. If this is what the DPreview article is referring to, then it appears that the version 3.1-Int JPEG engine has been improved.]

[Compare the images posted here with:

"P3240002b-Crop01-C1.jpg"
- detail crop of original camera created JPEG.

"Yi Technology -- Yi-M1"]


"P3240002 -1c-Crop01-C1.jpg"
The detail crop.

I have created a fairly straight forward conversion of the DNG raw file and this is a crop that matches what I previously posted. If you compare the two detail crops, you will see noise specifically in the blacked out windows, and in the Pub's main sign (which includes a lot of the "color aliasing" mentioned in DPreview.com's article).

How much detail was lost during conversion? Personally, I do not feel that it was much in this sample, so I am fairly satisfied that overall, the Yi-M1 is generally "passable" in that regard. But there is another point that should be understood here. The Yi-M1 was made using a version of an Ambarella chipset. Ambarella probably has not released much information about their DSP circuitry, and decides what capabilities Yi Tech has to work with. It is entirely possible that Yi cannot do better than this because Ambarella has not provided them with information sufficient to have fine enough controls to further correct the problems. So even if their is a further firmware upgrade coming, except for perhaps a better colour balance in the Portrait mode, I am not expecting to see better JPEGs than what I am seeing now.

"P3240002 -1b-rsz1240-C1.jpg"
A resized version of the whole DNG converted image. It will not show any noise because it has been reduced so much.
 

Attachments

  • P3240002 -1c-Crop01-C1.webp
    P3240002 -1c-Crop01-C1.webp
    241.3 KB · Views: 380
  • P3240002 -1b-rsz1240-C1.webp
    P3240002 -1b-rsz1240-C1.webp
    292.3 KB · Views: 400
Last edited:
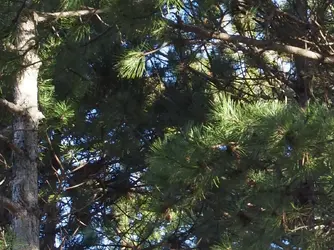
I am still exploring the YiM1's new capabilities and testing old capabilities that I did not get around to testing before. In this case I am testing use of adapted lenses, but with a lens I have not tested before. The lens is a Pentax SMC M series 50mm F2.0. This was one of the standard lenses available for the Pentax ME and MX 35mm cameras when they were introduced.

Back in the "old days" when I was using real film cameras, I did not have a special lens testing setup. I did have a target, but I did not have a large wall space to set it up, so I never got around to trying it. What I did was not much different than what I do today. Mainly I point the camera a brick wall to get an idea of some of the more formal characteristics, and then some good colour and black and white subjects. But back then, because film and development cost money, I was very economical in my approach. These days, I take a lot more pictures because I can afford to delete them. Actually, not only can I afford to delete pictures, it is imperative that I do so because it costs me to store them.

But back in the old days, I did not have much opportunity to try out a lot of lenses, so I mainly read the most reliable test reports I could find and saw whatever pictures my friends took and compared them to what I knew.

What I am going to say is my "impression" of the situation back then. There is a good chance that I am wrong about a lot of it. Frankly, I don't really care that much because when it comes down to it, I still cannot afford to buy a whole lot of equipment, and my first problem is to get what I can afford.

Anyway, my "impression" of Pentax back at that period was like this. The screw mount Super Multi-Coat Takumar lenses really were excellent lenses. That was confirmed by every lens test I ever read by Modern Photography and Popular Photography, and a few other magazines I read. The first K-Mount lenses were as good. In fact mostly they were the same lenses in new bodies. And yes, they were new bodies and not just mount changes. The K-Mount was bigger and I think they tended to make the bodies thicker in diameter.

When the M-series lenses came out, Pentax re-designed many of them to be smaller. Here I am going to say something that I know many others will disagree with. I think that many of the smaller Pentax M lenses were not as good as their predecessor models. Probably some might have improved. My "impression" was that colours might have been richer, but they might be softer overall or give away a bit of sharpness or vignetting in the far corners.

It was my "impression" that the older SMC Takumar and Pentax K 55mm F1.8 was a better lens that the M series 50mm F2.0, and moreover, both the 50mm F2 and 50 F1.4 M-series lenses were better than the 40mm F2.8 "Pancake".

Over the last year I have bought both the 50mm F2 and the 40mm F2.8 M series lenses, intending to use them on Micro 4:3. I got the 50mm F2 at about $40 US. The front element is nicked far off axis. I do not think it is affecting the lens performance, but the lens does appear to be softer than a typical SMC Takumar 55mm F1.8 would be. It is not terrible, but it is a bit under-whelming.

Buying the 40mm F2.8 was very annoying. I think I paid about $75 US for it, mainly because Kai had recently posted a YouTube clip about how wonderful 40mm pancake lenses were (this time using a Canon for an example). The old M series 40mm F2.8 is not as good a lens as the later "Limited" lens which would be well worth $75 US (or even much more). But I paid the high price because I think the price for this lens is going to be inflated for quite a while. It is legitimately a rare lens, because most people bought the 50mm F2.0 lens, but optically it is just not "wonderful". I class it as "good". Not better than that because it has severe vignetting when used on a full size sensor (or 35mm film). I bought it as a manual version backup lens for my M4:3 version 42.5mm F1.8 Yi portrait-macro lens.

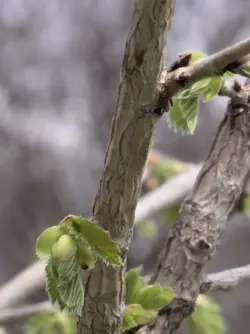
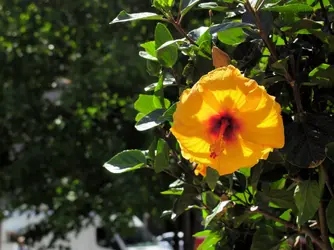
When the "first colours" of Spring, began to show, I had the 50mm F2.0 lens on a Pentax K100D, but without my monopod and had a terrible time trying to take very small early flowers. I eventually went back to the park with the Yi-M1, first with the Yi 42.5mm F1.8 lens, and then again later with the Yi-M1 with this Pentax 50mm F2.0 lens. The reason for using the 50mm F2.0 lens was because I did not like using manual focus on the Yi 42.5mm lens (which has no focussing control ring), but the Yi-M1 camera does work really well when using adapted, properly designed manual lenses. Also, the slightly longer focal length was a bit easier to work with in a park where I did not want to step into the flower bed to get closer to plants.
[2018-05-12 above 4 paragraphs have minor changes.]

Why is The Yi-M1 So Good For Real Manual Lenses?

The Yi-M1 has really good screen magnification, and in the Version 3.0 - 3.1 firmware that magnification goes beyond 4x to 6x, 8x and 10x. It works like this:

On the back of the camera, the bottom most button is called the "Q" button, and its function varies sometimes. During still and video recording it controls magnification. Each time one clicks that button the screen magnification advances to the next setting and after it reaches 10x, then it re-cycles back to 1x. So the screen magnification cycles like this: (starting from 1x), 2x, 4x, 6x, 8x, 10x, then back to 1x.
[2018-05-12 minor edit for clarification.]

The cycling can be over-ridden at any time by touching the shutter release 1/2 way. The magnification immediately reverts to 1x.

I have found that I generally use 3 quick clicks to get to 6x and do my focussing, and then touch the shutter release back to 1x and compose and take the picture (or abort). I can do this very quickly.

NOTE: Some people prefer "focus peaking" and the Yi-M1 supports this capability. I have tried "focus peaking" on the Yi-M1, the Sony a5000 and the Pentax Q-S1 and on all these cameras I did not find it helpful. In fact, it confuses me and I end up making mistakes.

Before the Yi-M1 with 3.1 firmware, my favorite camera for manual focus was the Pentax Q-S1. Now I prefer the Yi-M1. So the Yi-M1 has my favorite manual focus control, and it also is also arguably, capable of taking the best pictures of any of my cameras, when used this way. My Sony a5000 still has some advantages for still photography, but I won't go into the fine differences right now.


This Set of Pictures:

This set is really just three variations of the same picture and I should start by mentioning that almost all the in-camera JPEG pictures that I have taken with the Yi-M1 have been with AdobeRGB instead of StandardRGB. I made a set of tests (only a couple of pictures of each) comparing StandardRGB against AdobeRGB early when I started testing Firmware version 3.0. What I found was that when using AdobeRGB colour saturation turns out a bit higher. I have not decided that it is necessarily "better" but rather, I am looking at it as a long term experiment. I know that really, AdobeRGB was intended for print output rather than "on screen", but for now I have decided to leave this Yi-M1 as my only AdobeRGB camera. This goes along with the fact that I do not really intend to use it as a still camera anyway. Part of the "test" was to see if it made any difference to videos, and apparently it does not. It seems to only affect still pictures.
[2018-05-12 clarification]

With this set of pictures, two of the files are based on the AdobeRGB output of the in-camera JPEG render. The third image was made from the DNG (raw) file using Corel PaintShop Pro X9, and despite the fact that the colours have been adjusted and "brightened", the Yi AdobeRGB JPEG version is noticeably more saturated.


"P5040013b-rsz1640-C1.jpg"

Partial EXIF (from JPEG)
Date taken 2018-05-04 13:41
Program name ASDK-00141
Dimensions 5184 x 3888
Resolution unit 2
Color representation "Uncalibrated" (AdobeRGB)
F-stop f/0 [probably F16]
Exposure time 1/125 sec.
ISO speed ISO-200
Exposure bias +0.3 step
Focal length 0mm [50mm]
Max aperture 0 [2.0]
Metering mode Center Weighted Average
35mm focal length 0 [100]
[Finish is "Standard"]

- resized version of in-camera JPEG


"P5040013a-Crop01-C1.jpg"

Detail crop from in-camera JPEG
- Start 940,2200 (lower left)
1640 x 1230


"P5040013-2a-SmartFix-C1.jpg"

From DNG:
Temperature 5090
Tint 23
- crop from 950,2210 (almost a match for crop from in-camera JPEG)

- One Step Noise Removal (this function is not defined in my documentation)

- SmartFix:
Brightness
Overall 28
Shadows -50
Highlights 20
Focus 78
Black 12
White 18

NOTE: The recommended "focus" (sharpening) for the DNG without noise removal was "75". Noise removal only increased it to "78". Most images taken on the Yi-M1 using the Yi lenses have used sharpening in the range from "35" to "50". I take this as an indication that this Pentax lens is not as sharp. The only other pictures I have taken with it so far -- on the Pentax K100D, do seem to indicate this as well.

[2018-05-12]
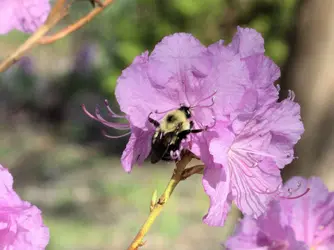
Recently I posted three pictures of flowers taken with the Yi-M1 using the Pentax SMC M-Series 50mm F2.0 lens at:

"Spring, Finally . . . ."

I did not have a chance to pay attention to these pictures earlier. Looking at them, the lens looks a bit better -- closer to the older 55mm F1.8 . If you look at "P5040057-1c-rsz1240-C1.jpg" in particular, the sharpness and detail level look much better. When I checked my processing
notes I found that the recommended sharpening was only "focus 31" which is roughly in the usual range of my Yi 42.5mm F1.8 lens. So it seems to be about as sharp as that lens. I have a couple of other pictures that show good to excellent performance at around F8, which is also typical of the 50mm F1.4. The following are from my processing notes for that picture:

"P5040057"
- unidentified blue flowers

Partial EXIF from JPEG:
Date taken 2018-05-04 14:03
Program name ASKD-00141
Dimensions 5184 x 3888
Resolution unit 2
Color representation Uncalibrated [the JPEG was AdobeRGB, but
the version I uploaded was from the DNG raw file processed i
Corel PaintShop Pro X9]
F-stop f/0 [I was trying to use between F4.0 and F16.0
and I think this was probably F16.0]
Exposure time 1/250 sec.
ISO speed ISO-200
Exposure bias 0 step
Focal length 0 mm [actually 50mm]
Max aperture 0 [actually F2.0]
Metering mode Center Weighted Average
35mm focal length 0 [actually 100mm]

- Conversion from DNG
Temperature 4282
Tint 21

- SmartFix:
Brightness
Overall 28
Highlights 10
Focus 31
White balance Yes
Black 4

- Vibrancy 20


Which Picture is More "Realistic"?

Actually neither version looks quite the same as I remember the original scene, but I think the AdobeRGB version based images are closer to reality.
 

Attachments

  • P5040013b-rsz1640-C1.webp
    P5040013b-rsz1640-C1.webp
    155.2 KB · Views: 411
  • P5040013a-Crop01-C1.webp
    P5040013a-Crop01-C1.webp
    154.7 KB · Views: 397
  • P5040013 -2a-SmartFix-C1.webp
    P5040013 -2a-SmartFix-C1.webp
    132.1 KB · Views: 417
Last edited:
Revisiting files taken this Spring.

YiM1
42.5mm F1.8 Lens
Monopod

I planned this post weeks ago, but then I covered the issues in another post elsewhere. I think that was a mistake because where it is possible, all this YiM1 information should be keep in a single topic where people can find it later. The number of other people who might buy this camera later is going to be small, but I should still finish what I started properly. The final incentive to get this done is to remove a lot of files from my computer. All these Spring files will be difficult for me to access later.

I think I have better cameras than the YiM1 to take this particular picture. The problem I had was the auto-focus. My first pictures focussed on the background (ignoring the roses which were nearer). So I decided to use the "touch focus". But the touch focus does not track movement and the branches, including the flowers were in constant motion. I set the lens to Macro which in this case limited the aperture to F3.5 and allows closer focussing, but as far as I know, makes no other adjustments. So the aperture at F7.1 was not affected by the setting. I increased the exposure 1/3 stop because a lot of the flowers were in shadows. After that, all I could do after selecting the focus point was watch the branches waving around in the air and try to take a picture when my actual target was moving into the focus box. The bumble bee came into the area after I was set up, but I decided not to make any changes (or try to chase the bee around). This picture caught the bee, but not in a bloom that was well lighted, so there has been a further adjustment of around another 1/2 stop. I did make a couple of versions using noise reductions, but in the end, neither of these uploads uses any noise reduction.
[2018-12-13 The Yi 42.5mm lens close focus limits are 19.7" in normal mode and 9.8" in Macro mode.]

Yes, it would have been nice if I had gotten closer. Maybe next time. . . .

"P5020041.DNG"
- Bumble bee on rose

Partial EXIF from DNG: (PaintShop Pro X9)
Software ASDK-00141
FlashPix version 01.00
Date and Time May 2, 2018, 17:21:19
Image width 5200
Image height 3902
Components per pixel 1
X resolution 72.0 dpi
Pixel height 3888
Pixel width 5184
Component configuration YCbCr
Color space Uncalibrated (AdobeRGB -- irrelevant)
Exposure Program Normal program
Scene capture type Standard
Exposure mode Manual exposure
Exposure bias 0.30 ev
Exposure time 1/250 sec.
F number f/7.1
Max aperture f/3.5
Focal length 43.0
Focal length in 35mm 86 mm
ISO speed 200
Metering mode Center weighted average
Custom rendered Normal processing
Gain control Low gain up

"P5020041-1-rsz1440-C1.jpg"
[The whole frame re-sized.]

Corel PaintShop Pro X9 on Gateway dx4375,
AMD A6-5200 APU, Windows 8.1

Temperature 4610
Tint 11
Brightness +1.0

"P5020041-2b-SmartFix-C1.jpg"
[Detail crop.]

Crop X=1280, Y = 960
Start @ 1872,1410

Smartfix
Brightness
Overall 24
Shadows -50
Highlights 20
Focus 68
White balance [yes]
Black 12
White 16


Detail crop
No Noise reduction.
 

Attachments

  • P5020041-1-rsz1440-C1.webp
    P5020041-1-rsz1440-C1.webp
    239.9 KB · Views: 381
  • P5020041-2b-SmartFix-C1.webp
    P5020041-2b-SmartFix-C1.webp
    293.9 KB · Views: 393
Last edited:
HDR for Architectural

YiM1 w/12 - 40 mm F3.5 - 5.6 zoom, tripod
and wide rubber lens hood

When I tried the YiM1 "HDR" capability earlier this year, the first thing I thought of was Toronto City Hall. I have not taken many still pictures of City Hall. It is a very dramatic building, and world famous, and it is easy to get a "nice" picture of it, but hard to get a really good picture of it. Part of the reason is that the shapes cause complex, unavoidable shadows on its internal faces. As far as dynamic range is concerned, it is a nightmare. The result of my first test of the YiM1 HDR capability gave me a very nice result I wanted to see what it could do for this situation.

Unfortunately, I have a problem when it comes to Micro 4:3 wide angle lenses. I do not have one that is "really good". I have two zooms that reach 12mm (eq 24mm). The YiM1 12-40 zoom was known to be poor at the wide angle end. Likewise the Panasonic 12-32 zoom is also not so good at full wide angle. Which is worse? I do not know. I do not have comparable lens test results. All the tests for the Panasonic lens are old and at best, done on 16MP sensors. In fact, I think some were tests on 12MP sensors. My experience with the Pansonic 12-32 seems to indicate that it might be a bit sharper in the middle, but I think it falls off worse in the corners.

This has not concerned me up till now because for video, I have the Git2 which does a fairly usable 21mm eq. view in "near-UHD" at 24 fps, and my Sony Z3c phone which seems to be around 24mm eq, at 30 fps. Unfortunately, it looks like the "SLR Magic 8mm F4" is not going to be useful, but I have not totally given up on it yet. For still pictures, I am only "well covered" out to around 14mm (28mm eq), where both the above mentioned zooms are much better.

Setting Up:

If you look at the reduced version of the first picture you will see that in theory, I could have zoomed out to 14mm (28mm eq), but if I decide to correct perspective I will already lose a lot of the left and right sides, and the bottom level of the building will be need to be cropped. I think that bottom level is a part of the whole and should be kept. So really, I would have preferred to start from a 20mm lens' view. The camera is on a tripod which extended to about 5' 6". The wind was a strong gusting breeze which causes some vibration on the tripod, so some motion blurring might also be a factor. The Vivitar Wide Angle rubber lens hood is minimal, but probably helps a bit. At this distance, atmosphere can also start to interfere with sharpness, though I do not think that happened in this picture. Does the HDR processing result in loss of image sharpness and detail? From my earlier test using the Yi 42.5mm prime lens, I think there might be a very slight reduction in quality, but I do not think it had much effect on this picture.

Technical Results:

The results in terms of exposure and colours was very good. But the sharpness and detail were not very good. I think the lack of sharpness was subsstantially the result of the lens, with other factors having neglibible affect. The question I am left with is how interested I am in pursuing this type of HDR photography in the near future? If so, I need to buy another lens.

Getting back to the exposure, I like the result overall. I will probably make some small adjustments, but I got a level of shadow detail that I think is nice, without clipping the top end highlights. I used 1 EV "jumps" in my bracketting. I think that there is a benefit in "filling in" the exposures by using every one of the 1/3 EV increments. I might even have gotten a "perfect" result without any further adjustments. There is also a benefit in taking more pictures because the tourists were wandering around without regard to my preference, creating different "found" compositions. The more pictures taken, the more chances one has of getting a "better" picture.

Miscellaneous:

Slowly but unavoidably, developers are filling in the backdrop of this view with typical urban clutter. It looks like the view down the middle is in the process of going away.

The Flower:

This is the same camera equipment with the lens zoomed out to 37 mm. As I have written before, the lens actually performs quite well, except at its wide angle limit.


"P6140042.jpg"
[original JPEG not uploaded.]
City Hall HDR

Partial EXIF [original JPEG]
Date and time June 14, 2018 10:28:13
Program name ASDK-00141
Dimensions 5184 x 3888
Bit depth 24
Resolution unit 2
Color representation Uncalibrated [AdobeRGB]
F-stop f/7.1
Exposure time 1/320 sec.
ISO speed ISO-200
Exposure bias +1 step
Focal length 12mm
Max aperture 3.64
Metering mode Spot
35mm focal length 24
Exposure program Normal (HDR)

P6140042a-rsz1936-C1.jpg
- resized, but no other changes.

P6140042b-Crop01-C1.jpg
- detail crop, no other changes.

"P6140068.JPG"
[original JPEG not uploaded.]
- flower

Partial EXIF (original JPEG):
Date taken 2018-0614 10:43
Program name ASDK-00141
Dimensions 5184 x 3888
Bit depth 24
Resolution unit 2
Color representation Uncalibrated [AdobeRGB]
F-stop f/8
Exposure time 1/400 sec.
ISO speed ISO-200
Exposure bias 0 step
Focal length 37 mm
Max aperture 4.93
Metering mode Spot
35mm focal length 74

"P6140068-1a-rsz1980-C1.jpg"
- processing: Corel PhotoShop Pro X9

SmartFix
Overall 28
Focus 37
White Balance [yes]
Black 12

---
[2018-06-19 20:04]

This picture is being uploaded later because I needed to alter faces. In fact, I almost decided to skip this picture because it does not really add much real information beyond the earlier pictures. It was taken about 3/4 of the distance of the earlier picture (to the center "dome") and from a lower angle. About the only thing to see is that by adding more elements so the picture is "busier", and completing the post processing (adjustments for gamma and sharpening) one gets an illusion of better image quality. If you look closely though, the level of "fine" detail has not really changed.

Another lesson is that this HDR capability does actually keep up with motion to an extent. There are people who were walking around and the plants were being moved the breeze, but they do not seem to show motion blurring more than the concrete planter and arches over the reflecting pool. It makes me curious about how this actually works. Put simply, this picture could not have been done with traditional sequential bracketing shots.

Lastly, I guess I will say that I consider these "nice" pictures. So, at least for now, I am still stuck in the "nice" zone, at least unless or until I get a better lens. . . .

"P6140044.JPG"

Partial EXIF:
ASDK-00141
Date and time Jun 14, 2018, 10:32:21
Pixel height 3888
Pixel width 5184
Color space Uncalibrated [AdobeRGB}
Primary chromaticities 0.64 0.33 0.21 0.71 0.15 0.06
Exposure Normal program
Scene capture type Standard
Exposure mode Manual exposure
Exposure bias 1.00 ev
Exposure time 1/400 sec.
F number f/7.1
Max aperture f/3.5
Focal length 12.0 mm
Focal length in 35mm 24 mm
ISO speed 200
Metering mode Spot
Gain control Low gain up

"P6140044c-rsz1840-C1.jpg"

- Manually obscured faces

Smartfix:
Brightness
Overall 0 [Recommended 4]
Shadows -10
Saturation 7
Focus 41
White balance [yes]
Black 10
White 4
 

Attachments

  • P6140042a-rsz1936-C1.webp
    P6140042a-rsz1936-C1.webp
    302.7 KB · Views: 362
  • P6140042b-Crop01-C1.webp
    P6140042b-Crop01-C1.webp
    150.8 KB · Views: 379
  • P6140068-1a-rsz1980-C1.webp
    P6140068-1a-rsz1980-C1.webp
    268.7 KB · Views: 323
  • P6140044c-rsz1840-C1.webp
    P6140044c-rsz1840-C1.webp
    315.7 KB · Views: 371
Last edited:
John Kuna v. YiM1

This is a continuation of my test of the various colour choices in the YiM1 and also an update on my pictures of the "Village of Islington" murals. As I noted, the "Vivid" finish worked much better than the "Portrait" finish. I posted the "Vivid" set in:

"Yi Technology -- Yi-M1" (see #36)

As I wrote before, I am quite pleased with that set of pictures. They are "scouting" pictures where I am mainly interested in making a record of "what is there". In particular, I felt that due to the building orientations I would need to plan the time of day when lighting and shadows were optimal.

Lately I was checking the internet researching the artist (John Kuna). There was nothing in Wikipedia(yet) but I did eventually find articles about him, and also his own website.

On his website, there are pictures of a number of his works. What I found most interesting is that there is a strong similarity in the color rendering to what I got from the YiM1 in AdobeRGB and "Vivid" finish. Have a look and compare them. Certainly the pictures on his site are better, but the colour sets are very similar. You can see them at (his website):

"John Kuna Murals"
 
You'd think that by now I would have tried all the "relevant" feature combinations on this camera, but there are still a few to go.

I have found that the "Finishes" (Standard, Portrait, Vivid, Natural B&W, H Contrast B&W) can be used for video recording. I tested them all early in the Summer in Full HD with stabilization and they worked for short clips. I had intended to try longer clips in 2K later.

This Fall, I decided on a video project using the Yi "2K" (4:3) format with the "Vivid" finish. I had a number of video clips in the camera and decided to save them off and start the editing. I have just reviewed most of the clips, and unfortunately, not much turned out. It appears that the combination of "2K" and "Vivid" only works for a limited extent. Depending on the clip, most of them "failed" after around 40 sec. recording time. This varied with the subject matter. I think it probably has to do with the complexity of the images which varies for each frame. It is probably over-running a buffer used by the Codec.

Unfortunately, that means that the project (which I was looking forward to) is a bust.

I do think that it is probably possible to use the "Finishes" in Full HD. I will have to try a longer test clip to be sure.
 

Most reactions

Back
Top Bottom