Best program for image resizing?, round 2

Garbz

No longer a newbie, moving up!
Joined
Oct 26, 2003
Messages
9,713
Reaction score
203
Location
Brisbane, Australia
Website
www.auer.garbz.com
Can others edit my Photos
Photos NOT OK to edit
There was a thread here a little while ago asking what the best program for image resizing was. I was very disappointed to see that the single most expensive image editing suite was recommended as the best solution since it is the single least effective solution for the job, akin to taking off into space and nuking the plant from orbit to kill just an annoying fly (whereas any of the 1000 free options out there would be equivalent to simply using a fly swatter).


Anyway it turns out not only is photoshop the least cost effective solution, but it's also faulty! Yes faulty! The algorithms used in image resampling do not take into account the gamma of the image. The result is subtle errors in luminance when a simple resize is performed.

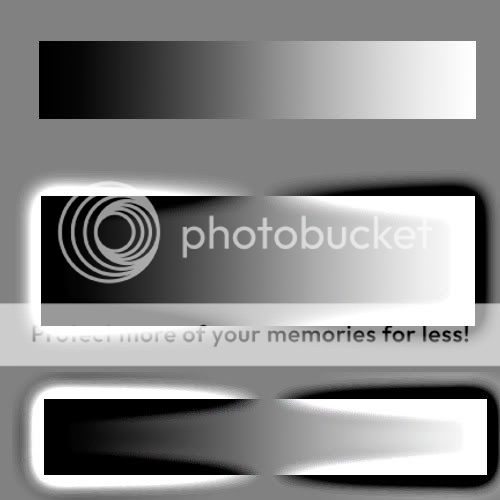
As an example take the following image and paste it into photoshop:
gamma_3x3.jpg

You'll notice that the average brightness of the image is equal all over. No really, look at the image crosseyed or squint and it'll look like one big grey square. Now resize the image in photoshop and change the size. You'll get some very weird results, the worst of which is at a 50% reduction.

The idea is that the reduction algorithm should be averaging the relative brightness of the lines in the picture. But it doesn't. In Photoshop it averages the numerical values of the lines, but due to images being displayed with a gamma 2.2 curve the resulting luminance is wrong!!!!

Photoshop is not alone with this but there are some applications that handle resizing correctly, and there are some ways to work around the problem too. In Photoshop for instance 32bit colour depth is represented in a linear scale, so if you convert your image to 32bbp before you resize it will resize correctly. The other option is to force a gamma of 1.0 in the colour management settings (this is a retarded idea through and I don't like it, to see why just try it, it's explained in the website below).

Lightroom uses a linear colour space called MelissaRGB for all calculations, and is immune from the resizing issues.


Far more information including the maths behind it, some code of how to do it correctly, and a list of applications and how they respond to the issue is available here:
Gamma error in picture scaling


The other thing to keep in mind is that resizing maybe shouldn't be your last step in processing an image, switching from 32bit back to 16/8bit should be :)
 
That link is making the rounds.

How often do adjacent pixels have high contrast as in several of the squares in your example image? Not very often.

So while technically the Gamma Error problem exists it rarely effects a photograph to the extent it's noticable.
 
That's a counter intuitive arguement. On the one side we have a thread running that is talking about the sharpest possible photos being in vogue, this is exactly what will create adjacent pixels with high contrast. Also it's not just adjacent pixels, think about it we have people here with +16mpx cameras posting images on this very forum images which are only 800px wide. That's a massive reduction that would affect more than just 2 adjacent pixels.

From that link above:
gamma_388135main_pia11667.1.jpg
gamma_388135main_pia11667.2.jpg

shows a real world example of the difference (no rings to the right of saturn on the second image). The other example is a macro on the eyes of a bug.

This isn't a case of omg that image was CLEARLY resized wrong, it's a case of an algorithm having unintended consequences. If you spend an hour or so fine tuning the micro-contrast of your image only to have the algorithm screw with it after it may become an issue.

It's not just a case of contrast too. The sharpening algorithms used in photoshop when resizing are applied post-resizing. Take the above image and reduce it with bicubic sharper and you not only end up with the wrong colours, but you also end up with haloing outlines around each sqaure, compared to if you resize in 32bbp and you still get a pretty much grey box.

Also there's enough threads on this forum talking about the differences between Photoshop and Lightroom with regards to colour reproduction, and this is just another to add to the list. The workarounds are easy enough, so it's not a real issue, but something to be aware of anyway.
 
So, Garbz--how do you think we should use PS to down-size large images fro the web? I've done it a rather old-fashioned way for a long time: namely, to apply an AA-filter sharpness recovery USM pass of something like 300 percent to 500 percent an .2 pixel width with a 0 threshold [depending on the particular camera used and the strength or weaknesses of its AA filter array], and then reduce the original large image by 50%; then another pass of sharpening, and then another 50% reduction in size, followed by a repeat size reduction and a tad bit more USM. All done using PS and bicubic.

I just cannot bring myself to perform huge down-sizing or up-sizing operations in "one,single step" types of processes. Any tips or insights for us on how to make the most of re-sizing operations?
 
The key is that you first need to convert the image in one of these encodings (you should find this easily in the software's menus):

  • 16 bit depth linear encoding per color channel. (Some specialists state that 16 bit is not enough and that you may get artifacts but I never had problems when just using 16 bit depth.)
  • 32 bit depth linear encoding per color channel.
I open my DNGs from ACR into CS4 as 16-bit and I haven't noticed anything strange either when I resize. I always convert to 8-bit as the last step before I save it as a JPEG. After whatever PP I do on the image, the final steps are always: Resize > sharpen to taste on a layer mask > flatten image > mode 8-bit > save as JPEG quality 10.

Should I take the extra step and convert to 32-bit?
 
Should I take the extra step and convert to 32-bit?

See below. But one thing to try is take a picture that is sharp and has a lot of fine contrast, and try both methods, then flick between them. There's a difference. However whether it's for the better or for worse is left entirely up to you. More contrasty images are in vogue right now anyway.

So, Garbz--how do you think we should use PS to down-size large images fro the web? I've done it a rather old-fashioned way for a long time: namely, to apply an AA-filter sharpness recovery USM pass of something like 300 percent to 500 percent an .2 pixel width with a 0 threshold [depending on the particular camera used and the strength or weaknesses of its AA filter array], and then reduce the original large image by 50%; then another pass of sharpening, and then another 50% reduction in size, followed by a repeat size reduction and a tad bit more USM. All done using PS and bicubic.

I just cannot bring myself to perform huge down-sizing or up-sizing operations in "one,single step" types of processes. Any tips or insights for us on how to make the most of re-sizing operations?

How do I think? Well I don't think this information should change people's method. I posted this more to be aware that there are differences. However in some cases the workarounds to make a proper resize is worse than the fault in the algorithm. I have come across a few images which photoshop has been unable to convert to 32bit, it just posterises the blacks in the process, and I'll say again I don't like the idea of converting to a magical custom colour space either. None of these operations are lossless, damned if you do, and damned if you don't.

One thing I do have a strong opinion about though is what you are doing. As an electrical engineer the idea of cascading successive digital filters on a signal scares me. Each time you apply the filter you introduce a change to the picture which the subsequent filter will then work over the top.

You may have heard about the problem with multiple sharpening passes causing ugly halos in areas of contrast? If not I'll run through it quickly here with an example I posted a long time ago. When you sharpen, photoshop will apply local contrast around the edge on the opposite side. This is shown by the sharpening in the middle part of the image below. I think from what I remember it's 200% at 30px. So with this edge now of different brightness when you sharpen again rather than seeing 1 edge, the algorithm will see 3. The bottom gradient has 2x 100% at 30px sharpening applied. This results in a halo.

Untitled-1-1.jpg


What does this have to do with image resizing?

Each resize step includes one element of sharpening as part of the algorithm, in some cases this is even adjustable such as using any of the 3 bicubic options in photoshop. This is why I can't imagine anything positive coming from staged reduction in image size. A while ago we had this discussion with increasing image size, and I think there was a bit of consensus that one single pass of upsampling produced nicer results than several smaller passes.

I definitely like the very harsh small radius resizes. I often also do a 200-300% sharpen at 0.2-0.4px but this is always the last step depending on my final medium. The effect of doing this first would likely be completely eaten by the large reduction in file size for posting an image to the web.


But by far the most important thing to remember is that this is all subjective, and this post is only my opinion. If you really like your sharpening method and it works for you then don't let me tell you otherwise :D
 

Most reactions

Back
Top