Casual-Executive Portrait- FINAL RESULTS (5pic).

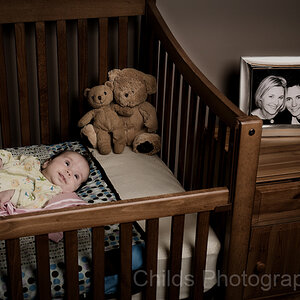
Nicely done! Lighting-wise, the only thing I would do is drop the highlights ever so slightly in post. As far as the rest goes, make sure you deal with those background wrinkles, as that doesn't look good. If you have another light, you might consider gelling it and using it as a background light for some added interest; medium grey, while versatile is a bit bland.

Thanks for your comments! The background was just a bed sheet I threw up real quick . It'll be a different background, most likely outdoor greenery or the church alter.
If it is white, I do have that Yongnuo flash in transit that I'll use per your suggestion.
 
Last edited:
nose and ears are oof. turn up light and stop down lens.

move further away from the background.


Thanks for your comment, Braineack.

I had the flash at 1/2 power. You think I should go to, maybe, 1/1.6 power and f/8?
I tried several shots at full power adjusting the distance of the umbrella from the face, and it just came off too hot. I played around with ISO and shutter speed, but didn't really play with the aperture.
 
Only thing missing is a Photoshopped-in star-twinkle off the camera-left incisor tooth!

Evaluating this, I think that honestly the light is a little too flat...too much fill light, not quite enough a lighting ratio. The shadow side of the face doesn't have much shadow, really, so the face does not have quite as much fullness, as much three-dimensionality, as maybe it could have. On a female, or a person with fairly wrinkled skill this lighting set-up would look better. This is a very flat lighting ratio, like 1 to 1.5...it's low in contrast, has a pretty close match in terms of highlight and shadow side. But by the same token if this subject were a woman or girl in pastel colors, this lighting would look really nice.

I think I might rotate this counter-clockwise about 1 to 1.5 degrees at the most. Tilting a man's head toward the lower shoulder implies a more masculine pose, and increasing the shoulder angle will make this appear more dynamic at a sub-conscious level. I'd like to see a bit more cloth below the bottom button on the shirt, and I think I'd darken the shirt and the bottom of the frame a little bit with a subtle edge burn in Lightroom. I think the neck looks like a minus .5 EV burn in would improve the shot quite a bit.

The issues I'm pointing out are mostly because the light is VERY CLOSE to the face, and coming in from a relatively straight angle, lighting the face fairly evenly. Lifting the main light up just a little higher would have moved the catchlight up on the eyeballs, and would have caused a little bit more shadow under the chin. You have to look very,very closely to see lighting effects; a good way to see them more-easily is to open the image in software, then pull the exposure down to Minus 3.5 EV, and see where the "brights" are...what areas are being hit by light most directly? It's subtle, but you can see that the umbrella is lighting underneath the chin, striking the neck a fair bit, and with a black shirt at the bottom, the neck skin is just a bit too bright...an under-chin shadow really can help keep the focus on the face. Same with a bit of shadow somewhere being cast by the nose--often but not always, a nose shadow can be a good thing.

I don't want anything said above to be construed as negative, because what you have created here is a very nice lighting effect, and overall this is a pretty surprisingly good first effort. The light is fairly even, focus is good (tip/bridge of nose is just beginning to trend ever so slightly toward OOF), and the degree of realism is very high; stubble, hair, facial texture, teeth,eyes, all look very real. I think on this particular man, eliminating the reflector fill might have looked better. Overall though, this is like an 85 score out of 100. Background wrinkles are the only real flaw; everything I have mentioned above is just minor stylistic/artistic nuance. I think for a first effort this might be the best one-person umbrella lighted portrait I have ever seen on TPF.

I think you might want to keep a good idea of how you did this, For experimentation, try moving the main light just a little bit higher, and maybe try to create a bit more of a highlight/shadow side on masculine-looking men like this guy, by reducing the fill light or feathering the light beam a bit, so it's not aimed quite so "square into" the mask of the face, but so that the light rakes across the face a little more, being interrupted by the nose, and casting a little bit of a nose shadow, and creating a bit more of an under-chin shadow.(For the record, I think it is easier to move the main light back a bit farther away that you are doing here, to avoid "lighting up" all the skin on a person so evenly...) Again, on younger people, on women or girls, or elder ladies, this lighting pattern would look very nice. I've not been C&C'ing this on the beginner scale, I've been looking at this image as if you are a professional shooter asking, "What, exactly, does this need to make it the best it can be."
 
Last edited:
Only thing missing is a Photoshopped-in star-twinkle off the camera-left incisor tooth!

Evaluating this, I think that honestly the light is a little too flat...too much fill light, not quite enough a lighting ratio. The shadow side of the face doesn't have much shadow, really, so the face does not have quite as much fullness, as much three-dimensionality, as maybe it could have. On a female, or a person with fairly wrinkled skill this lighting set-up would look better. This is a very flat lighting ratio, like 1 to 1.5...it's low in contrast, has a pretty close match in terms of highlight and shadow side. But by the same token if this subject were a woman or girl in pastel colors, this lighting would look really nice.

I think I might rotate this counter-clockwise about 1 to 1.5 degrees at the most. Tilting a man's head toward the lower shoulder implies a more masculine pose, and increasing the shoulder angle will make this appear more dynamic at a sub-conscious level. I'd like to see a bit more cloth below the bottom button on the shirt, and I think I'd darken the shirt and the bottom of the frame a little bit with a subtle edge burn in Lightroom. I think the neck looks like a minus .5 EV burn in would improve the shot quite a bit.

The issues I'm pointing out are mostly because the light is VERY CLOSE to the face, and coming in from a relatively straight angle, lighting the face fairly evenly. Lifting the main light up just a little higher would have moved the catchlight up on the eyeballs, and would have caused a little bit more shadow under the chin. You have to look very,very closely to see lighting effects; a good way to see them more-easily is to open the image in software, then pull the exposure down to Minus 3.5 EV, and see where the "brights" are...what areas are being hit by light most directly? It's subtle, but you can see that the umbrella is lighting underneath the chin, striking the neck a fair bit, and with a black short at the bottom, the neck skin is just a bit too bright...an under-chin shadow really can help keep the focus on the face. Same with a bit of shadow somewhere being cast by the nose--often but not always, a nose shadow can be a god thing.

I don't want anything said above to be construed as negative, because what you have created here is a very nice lighting effect, and overall this is a pretty surprisingly good first effort. The light is fairly even, focus is good (tip/bridge of nose is just beginning to trend ever so slightly toward OOF), and the degree of realism is very high; stubble, hair, facial texture, teeth,eyes, all look very real. I think on this particular man, eliminating the reflector fill might have looked better. Overall though, this is like an 85 score out of 100. Background wrinkles are the only real flaw; everything I have mentioned above is just minor stylistic/artistic nuance. I think for a first effort this might be the best one-person umbrella lighted portrait I have ever seen on TPF.

I think you might want to keep a good idea of how you did this, For experimentation, try moving the main light just a little bit higher, and maybe try to create a bit more of a highlight/shadow side on masculine-looking men like this guy, by reducing the fill light or feathering the light beam a bit, so it's not aimed quite so "square into" the mask of the face, but so that the light rakes across the face a little more, being interrupted by the nose, and casting a little bit of a nose shadow, and creating a bit more of an under-chin shadow.(For the record, I think it is easier to move the main light back a bit farther away that you are doing here, to avoid "lighting up" all the skin on a person so evenly...) Again, on younger people, on women or girls, or elder ladies, this lighting pattern would look very nice. I've not been C&C'ing this on the beginner scale, I've been looking at this image as if you are a professional shooter asking, "What, exactly, does this need to make it the best it can be."

Derel, thank you for taking the time to critique.
I never take your critique as negative. I really appreciate the tips. Thank you for your compliments on the picture as well. I have about 7 days of flash photography under my belt....since I received the flash for Christmas. This is all extremely new to me.
I will experiment in the next couple days with your suggestions and the other suggestions.

I did end up bringing up the shadows of this picture in post to increase the brightness on the reflector side. Since this thread is for a Pastor, Assistant Pastor, and the rest of the church staff, I wanted the face to be bright and lively. I did experiment without a reflector and some more dramatic lighting tones, I just felt it didn't feel like "church pastor" portraits.
I'll try to heighten the umbrella stand to create those chin shadows and reduce the exposure on the neck.
 
Only thing missing is a Photoshopped-in star-twinkle off the camera-left incisor tooth!

Evaluating this, I think that honestly the light is a little too flat...too much fill light, not quite enough a lighting ratio. The shadow side of the face doesn't have much shadow, really, so the face does not have quite as much fullness, as much three-dimensionality, as maybe it could have. On a female, or a person with fairly wrinkled skill this lighting set-up would look better. This is a very flat lighting ratio, like 1 to 1.5...it's low in contrast, has a pretty close match in terms of highlight and shadow side. But by the same token if this subject were a woman or girl in pastel colors, this lighting would look really nice.

I think I might rotate this counter-clockwise about 1 to 1.5 degrees at the most. Tilting a man's head toward the lower shoulder implies a more masculine pose, and increasing the shoulder angle will make this appear more dynamic at a sub-conscious level. I'd like to see a bit more cloth below the bottom button on the shirt, and I think I'd darken the shirt and the bottom of the frame a little bit with a subtle edge burn in Lightroom. I think the neck looks like a minus .5 EV burn in would improve the shot quite a bit.

The issues I'm pointing out are mostly because the light is VERY CLOSE to the face, and coming in from a relatively straight angle, lighting the face fairly evenly. Lifting the main light up just a little higher would have moved the catchlight up on the eyeballs, and would have caused a little bit more shadow under the chin. You have to look very,very closely to see lighting effects; a good way to see them more-easily is to open the image in software, then pull the exposure down to Minus 3.5 EV, and see where the "brights" are...what areas are being hit by light most directly? It's subtle, but you can see that the umbrella is lighting underneath the chin, striking the neck a fair bit, and with a black short at the bottom, the neck skin is just a bit too bright...an under-chin shadow really can help keep the focus on the face. Same with a bit of shadow somewhere being cast by the nose--often but not always, a nose shadow can be a god thing.

I don't want anything said above to be construed as negative, because what you have created here is a very nice lighting effect, and overall this is a pretty surprisingly good first effort. The light is fairly even, focus is good (tip/bridge of nose is just beginning to trend ever so slightly toward OOF), and the degree of realism is very high; stubble, hair, facial texture, teeth,eyes, all look very real. I think on this particular man, eliminating the reflector fill might have looked better. Overall though, this is like an 85 score out of 100. Background wrinkles are the only real flaw; everything I have mentioned above is just minor stylistic/artistic nuance. I think for a first effort this might be the best one-person umbrella lighted portrait I have ever seen on TPF.

I think you might want to keep a good idea of how you did this, For experimentation, try moving the main light just a little bit higher, and maybe try to create a bit more of a highlight/shadow side on masculine-looking men like this guy, by reducing the fill light or feathering the light beam a bit, so it's not aimed quite so "square into" the mask of the face, but so that the light rakes across the face a little more, being interrupted by the nose, and casting a little bit of a nose shadow, and creating a bit more of an under-chin shadow.(For the record, I think it is easier to move the main light back a bit farther away that you are doing here, to avoid "lighting up" all the skin on a person so evenly...) Again, on younger people, on women or girls, or elder ladies, this lighting pattern would look very nice. I've not been C&C'ing this on the beginner scale, I've been looking at this image as if you are a professional shooter asking, "What, exactly, does this need to make it the best it can be."

This was uploaded from my iPad, so there may not be any exit data. Here is another shot, slightly different edit.

image.jpeg
 
Pretty good! A bit less realism, but still very nice. I rotated this 2.2 degrees CCW, thus needing to clone in some backdrop all the way across the top of the frame, a bit in the lower right corner, clone the loose threads on the shirt, three or four long neck whiskers, the tiny hairs over the ear-tops on both ears, and the few small prominent gray hairs on the right hand side, right above the ear top. Realized I missed the lower left area that needed to be cloned, so I cropped some more off the left, then needed to crop a sliver off the right to balance/center the thing up. Again, what you have created is pretty impressive.

image_propilotBW_rotated 2.2 and cloned.jpg
Minor,minor retouching version


VERY nice work you did, propilotBW!

As I was cloning across the top of the background, my son entered the room and he said, "Who is that actor!? Is that Amy Poehler's husband?" (Will Arnett).
 
These are the final results from the shoot.
I have not submitted them to the client yet, so CC is welcomed. It's 5 pics, so I'm not asking for detailed critique.
I tried to remember and apply all the tips and suggestions from this thread. In the heat of the moment, sometimes things slip the mind!
I had some technical issues with the flash triggering, but after an embarrassing 10 minutes, I figured out the problem. I also attempted to use the 2nd flash for lighting the background, but I couldn't get the exposure the way I liked it, so I scrapped it.
5.jpg
4.jpg
3.jpg
2.jpg
1.jpg
 
These are wanting a bit more headroom. If your SOOC file has more acreage then extend the crop upwards.

It also appears that the camera position was a bit too low. I think portraits look best when the subject's eyes are level with the lens.
 
A couple of thoughts... overall, not a bad set. I think in #1, I would have asked her to try some different smiles; that's a LOT of teeth, and people don't always know what they look like when they smile. 2 & 3 are shot from slightly too low a perspective, putting the subject in a superior position to the viewer (and a hint of 'up the nose' as well), and in the last one, the young lady has a bit of a squint. What I do for people with this sort of eye is ask them to hold their eye open as wide as they can, and make them hold it for 5-10 seconds and as soon as I say, 'okay, relax' press the shutter. This usually results ina slightly larger eye, and in most cases, the client prefers it. YMMV

You got the main points though, nice poses, good lighting, and glare-free glasses.
 
Yea, I notice the low camera angle now. Too late for that, unless they want a re-do. They wanted the backdrop on the stage, so they're 2 steps higher than my tripod. I had it extended all the way, I guess not enough. The thought didn't even cross my mind. It seemed ok at the time.
 
pretty good.

If it were me, I'd be adding in more sharpness in post. Did you add blur to both the woman? they have a certain glow up them.
 
pretty good.

If it were me, I'd be adding in more sharpness in post. Did you add blur to both the woman? they have a certain glow up them.

Yes, I added -20ish to Clarity. Too much?
 
I have my clarity slider on +10 on default. Ive never gone negative with it ever and I always also add sharpening on top.
 
I agree that these would have benefitted from a bit more top space. I think the solution is simply to crop these, and eliminate the excess shirt/blouse, and change these into "headshots". I think that just eliminating all the chest/shirt/blouse will significantly improve them, and make that lower camera position/superior subject feeling significantly less of a factor. I would add a bit of the tooth whitening tool in Lightroom.

I would crop the mens' shirts down to one button on most, two on the suspender-wearing fellow, and also lop off the left and right hand sides of the frame as needed to get the right balance. More head, less shirt will change the feel of these quite markedly, and that goes double if these will be seen smallish.
 

Most reactions

New Topics

Back
Top