lighting testing

ronlane

What's next?
Joined
Aug 3, 2012
Messages
10,224
Reaction score
4,961
Location
Mustang Oklahoma
Website
www.lane-images.com
Can others edit my Photos
Photos OK to edit
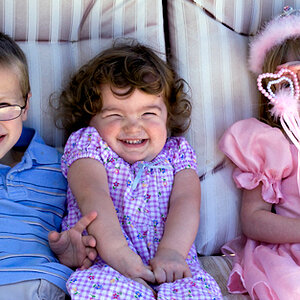
Back at it again last night. Thought I'd share what I am doing so that some may learn and that maybe I learn a few things or fix mistakes. (I know that the first two with the beauty dish are a little warmer than the others.)

I decided to go through 4 different lighting set-ups to better understand the differences and make sure that I could produce solid images with each. I used my Canon 7D mk II with a Canon 85mm f/1.8 lens. Lighting: Streaklight 360 and a Flashpoint speedlight. Modifiers: beauty dish with grid and 38" Octabox for the 360 and a 24" softbox and a rogue flash bender for the speedlight and I also used a 5-in-1 reflector.

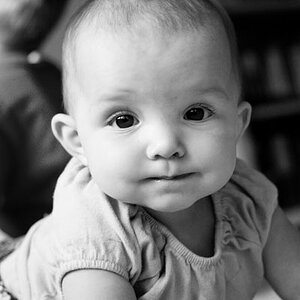
1) Since I don't have a boom for my light stand, this is a modified clamshell lighting with the beauty dish with grid on the 360 (above) and the 24" softbox on the speedlight (below). The only issue I have with this one is that I forgot to use the sock on the bd, so there were hotspots on the forehead. (The lighting was just about as close as I could get them without getting them in the shots)
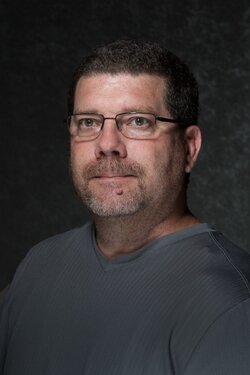
FN-Lighting practice-12-Edit.jpg

2) Still clamshell with the beauty dish but using the reflector as fill (I know not much) below and used the speedlight with a CTO and the rogue as a snoot for a hair light.
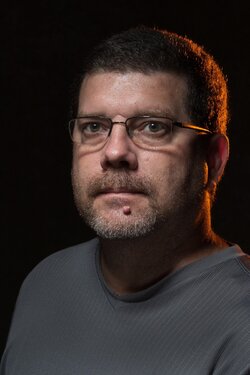
FN-Lighting practice-28-Edit.jpg

3) Clamshell with the octabox and reflector and still using the speedlight for a hair light.
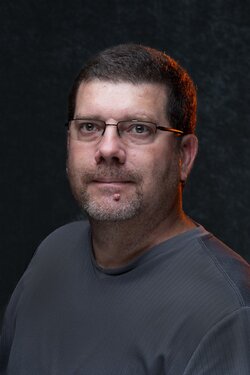
FN-Lighting practice-36-Edit.jpg

Here is the key/fill and hair light separately and then all together (before PS editing)
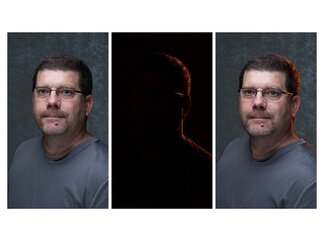
Test lighting.jpg

4) In this one, I left the Octabox where it was and moved the reflector to the side instead of clamshell.
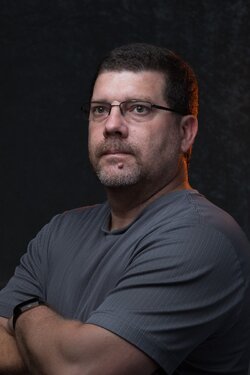
FN-Lighting practice-60-Edit.jpg
 
I'm not a fan of a lower catchlight so those with a reflector fill. Not sure I like the colored kicker. But that's me. Good job controlling any reflections in the glasses. This is the kind of testing I do with any new modifier. If you put the sock on the bd under the grid, you would see a subtle difference. As for controlling white balance, a color checker passport takes care of that or a wb card in the first of each shots or custom camera white balancing each new setup. Are you checking exposure with a meter to be sure each is identical?
 
I'm not a fan of a lower catchlight so those with a reflector fill. Not sure I like the colored kicker. But that's me. Good job controlling any reflections in the glasses. This is the kind of testing I do with any new modifier. If you put the sock on the bd under the grid, you would see a subtle difference. As for controlling white balance, a color checker passport takes care of that or a wb card in the first of each shots or custom camera white balancing each new setup. Are you checking exposure with a meter to be sure each is identical?

Yes, I did use my color checker with the BD setup and I am using my meter to get exposure. I am having an issue with my passport. To me it makes things too warm. I will continue to do more testing to see what is going on.
 
Ron, only takes a couple of seconds to do a custom wb in camera. Then use the color checker. If it is too warm, use the warming/cooling patches to find what you like. If you are shooting tethered to light room, open the color checker image, ie, on the first shot, click around on the warming cooling patches to find what you like then have that changed applied to every image from that setup as it is taken. There is no "rule" on warmth, it is your vision, but it helps to start with an accurate and consistent series so you can make consistent changes to the entire shoot.
 
I'm a fan of #1, 'though maybe 1/2 stop brighter? I agree that the lower catchlight doesn't seem the most attractive. It makes me think that you need to have your reflector/fill plane more parallel to the floor.
 
@ronlane I'll be doing one of my "themed" shoots with my star model in couple of weeks, so I'll be doing some practice myself as I set up. I think it was @mrca that made a comment a little while back about adding or subtracting to your exposure reading on portraits based on skin tone of the subject (maybe he'll chime in again on it). Since then, I've read several articles about how exposure can affect the tone setting when using Lr's WB tool, and I've encountered the same recently on some landscape shots.
 
Smoke, that's the spirit, practice. It's great to see folks on this site who work at their craft. Had a mentor who said you don't have something new mastered til you can do it 3 times. I believe the exposure post you are mentioning is that I spot meter and focus from the same spot in manual. I place the spot on the skin just below the eye and if caucasian add 2/3 stop of light past the center hash mark. If tanned or darker skin increase the exposure a bit. Rationale, the meter tries to make everything middle gray, skin is brighter than middle gray so the camera meter would subtract exposure to make skin middle gray. To compensate in manual, add 2/3 stop light. Be sure to spot on an area that has illumination from the main, not in a shadowed area. Try this a while and you will find you are nailing the subject exposure. But watch your blinkies for over exposure elsewhere. You always have a standard white color, your palm or the palm of the subject no matter what their pigment is nearly the same. Spot on your palm in the same light, learn what that is, should be 2/3 to a stop, and you always have a consistent measuring tool. Once you set exposure in manual, it doesn't change if your subject remains in the same light even if you include more or less bright/dark in the overall image as it would in aperture priority. Take a look in aperture priority and watch the meter as you move the camera around or zoom in or out changing the overall tones in the image, the exposure changes although the light on the subject did not. I want my subject correctly exposed and this works for me. Let us know how this works for you. I don't have the luxury to blow exposure on the best shot of the day. I don't trust the camera to know either where I want focus or exposure as consistently as I do myself Per another post, I use manual focus lenses and after a 15 yr lay off with digital, back to what I did for 25 years before that. Not for fast paced things, but most portraits and all landscapes, works fine.
 
@mrca Okay I've read, studied, practiced so many different things in the past few weeks my mind might be jumbled, if so then please overlook it. I'm assuming your spot meter reading is for ambient light and not studio light. Would the same apply with studio lights using an incident meter???? I say this because it seems like my studio shots historically run about a 1/2 - 3/4 stops under.
 
Smoke, work with the techniques, you will find what you prefer for what and the way you shoot and it will become automatic. Yes, the spot meter reading is for ambient. Your camera meter cannot read flash. With the incident meter and flash there are a couple of ways to take a reading, although most folks only know one, the source method. That is taking a reading aiming the meter at each light, one at a time, either turning off the other lights or blocking them from the meter. That establishes a desired ratio. Then a reading is taken with all lights on towards the camera for the camera setting. Problem, however, outside, how do you turn off or block sunlight? The additive method works both there and in studio. A reading is taken towards camera from the shadow side of the subject a second reading is taken from the area lit by both the main and fill where they overlap(including sun if that is the fill that can't be turned off) with the meter pointed towards camera. The main can be adjusted to achieve the desired ratio. The area where the overlap of main and fill reading is taken determines the exposure setting. Knowing the difference between the first fill reading and the ultimate additive reading for the ratio allows you to precisely choose your aperture in studio by setting the fill at that ratio difference below the final exposure then bringing the power up on the main to your exact chosen aperture. If you are using a Sekonic meter outdoors with one light plus ambient, it gives you the percentage your flash contributes to the shot. Learn the percentage you like and you can adjust the power to get your desired ratio. Remember, you usually have a second exposure to consider, the background in or out of studio since it can be controlled independently with shutter speed up to max sync speed or adding a nd filter to knock it down further. For that I use the reflective reading capability of my hand held meter. Once you know the delta you like, you can quickly set up to get the look you like and repeat it over and over.
 
the background in or out of studio since it can be controlled independently with shutter

Wow, thank you for the insight!!! I've been using the "source method", but I'm anxious to try the "additive method". That makes way more sense, when I think about it. Your comments have already been included in my cheat sheet book!!!!! On background Derrel put me onto Dean Collins Chromozones, which uses the reflective reading, I've become fairly adept at that process (meaning I can duplicate it more than 3 times LOL).
 
Dean is one of my heros. We share the same hyperactivity. His was a great loss. If you haven't seen Dean's videos, rent them. I recently re did my chromozone chart and in another post mentioned how it made me discover the amount of crud on my sensor. For location work I always carry plexi mirrors and scrims. The benefits of the additive method are that it works out doors as well as in studio and you can pick the precise aperture you want and nail it. Great to see you using a meter. I think I posted something about using a modified zone system to maximize the file using your reflective meter. My sekonic is calibrated to my camera's sensor so I know precisely where clipping takes place and can place the brightest highlight where I want detail just inside the highlight clipping point allowing recovery in post. That puts the darkest shadow where detail is desired as far to the right as possible at the same time giving the best possible quality black.
 

Most reactions

New Topics

Back
Top