- Joined
- Jun 25, 2023
- Messages
- 592
- Reaction score
- 1,077
- Location
- United Kingdom
- Can others edit my Photos
- Photos NOT OK to edit
I too had a little look at this. h

Follow along with the video below to see how to install our site as a web app on your home screen.

Note: This feature currently requires accessing the site using the built-in Safari browser.
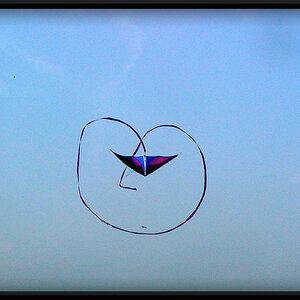
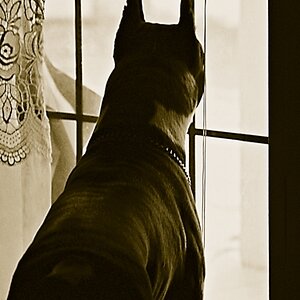
Much improved. Suspect # 2 is closer to your original concept. My only suggestion is a lighter background to separate him from it and to illuminate the crucifix.Not sure if I can continue this thread or is it better to start a new one, but I have incorporated your advices and ideas and I came up with this.
Same camera, lens, soft box, I only changed flash for Godox MS300V and I used speedlight at very low power to illumintae crucifix from behind. Changed framing and I have invested in flashmeter so exposure this time is correct (at least according to flashmeter). In postprocessing I only darkened the table nothing else.
I feel its much better, but still doesn't have that desired atmosphere of quiet prayer, how do you feel it now? What else can be changed to make it even better or moodier?
Same camera, lens, soft box, I only changed flash for Godox MS300V and I used speedlight at very low power to illumintae crucifix from behind.
Thanks.The 2nd is much improved.
With a single light portrait against a dark background you'll always run the risk of the subject blending in resulting in lack of dimension. . That's why I use a kicker (hair light), behind and on the same side as the key, metered to the match the key. It gives a nice little highlight around the subject and creates a more dimensional polished look.
Thanks.
By metered to match the key you mean that front and rear side of subject will get the same F stop reading?
What modifier would you use for kicker light?
Thank you for your time and knowledge sharing, this forum is excellent for begginers like myself to learn a lot.Yes, if you've metered your key at f/8, then meter the kicker the same or preferably a third stop under. For the kicker I use a 7" reflector fitted with a 10 degree grid. FYI lights are metered with the "Incident" meter against the subject, pointed at a single light. Your exposure reading is obtained by placing the incident meter against the subject "pointed toward the camera" and firing all lights (it will generally be a full stop or more less than your key reading). To set your subject vs background light, switch the meter to "Reflective" with the meter at the camera, pointed toward the subject take a reading with all lights firing, then take a reading on the background only. The difference determines how dark or light your background is in comparison to the subject. A difference of minus 41/3 stops will produce a pure black background while a difference of plus 11/3 stops will produce pure white.
The reason I put the kicker and key on the same side, is it gives you more latitude on movement (light or subject). Any light fall off on the side of the head or shoulder looks natural.
I like what you did around candle, nice effect.I too had a little look at this. hView attachment 272067
I also lifted JC out of the shadows a little, I like the idea you came up with for this image.I like what you did around candle, nice effect.
I was trying to meter like this and I have one more question. I metered each light individually for f/5.6. But when fired all of them outcome was too bright as you said to be expected.(it will generally be a full stop more or less than your key reading).
I was trying to meter like this I have one more question. I metered each light individually for f/5.6. But when all of them outcome was too bright as was expected.
How to compensate for this? How to set individual light then?
Nice tutorial. The little 308 is a great meter for flash and incident, Sekonic's oldest meter still in production apart from the 398.First of all, to clarify, you did get a LIGHT METER capable of reading "INCIDENT LIGHT"? The Sekonic's 308 is a good starter.
View attachment 272561
Do you have it set on "INCIDENT", the ISO and shutter speed set on the meter? To read "incident" the little frosted dome slides left over the eye. To read "Reflective" you slide the dome to the right and attach the reflective tube attachment to the eye.
Here's a simple three light set.
View attachment 272559
With a standard portrait you'd ideally want a a 2:1 ratio on the Key/Fill (1 stop difference). That will give you shadow to add dimension, if you have everything metered the same the image will be flat. You will adjust each light individually first with the others off. Typically I'll meter the #1 key to f/8. (place the meter back against the subject or object in this case, pointed toward the #1 key, fire the light and adjust the light until the meter reads f/8. Now go to the #2 Fill side and repeat, but in this case adjust the light until the meter reads f/5.6. Now go to the back and repeat with the meter pointed toward the #3 kicker, adjust your light until the meter reads equal to or just under f/8 (you don't want it brighter than the key). Now move around to the front of the subject (with all lights on), place the meter under the chin of the subject pointed TOWARD THE CAMERA, and fire all the lights. That will be the aperture reading to use on the camera (typically somewhere between f/5.6 and f/8). At this point if you want a smaller aperture you can increase ALL LIGHTS equally, until the meter reads your desired aperture.
To determine your background you change your LIGHT METER to read REFLECTIVE. Go to your camera and with the meter back to the camera, take a REFLECTIVE reading on the subject, then slide to the side and take a reflective reading on the background. On an 18% gray background, a difference between the two readings of -4 1/3 stops will produce a pure black background, while a +1 1/3 will produce a pure white. Moving the background closer or further away from the subject will change your reading, but you typically want 6 to 8 feet.
Yes, I have bought exactly this one.First of all, to clarify, you did get a LIGHT METER capable of reading "INCIDENT LIGHT"? The Sekonic's 308 is a good starter.
Now I understand, thank you very much for your time and knowledge sharing.Now move around to the front of the subject (with all lights on), place the meter under the chin of the subject pointed TOWARD THE CAMERA, and fire all the lights. That will be the aperture reading to use on the camera
This was exactly my problem, but its not anymore thanks to your tutorial.At this point if you want a smaller aperture you can increase ALL LIGHTS equally, until the meter reads your desired aperture.
What you mean by this? Not sure, if I understand correctly, is it difference of one full stop and 1/3 on top of that?a difference between the two readings of -4 1/3 stops
![[No title]](/data/xfmg/thumbnail/32/32981-27e3d29bfa5b1638f18299ec111c7b87.jpg?1619735812)