White background product photography problems

Mystery

TPF Noob!
Joined
Nov 28, 2012
Messages
42
Reaction score
3
Location
Las Vegas
Can others edit my Photos
Photos OK to edit
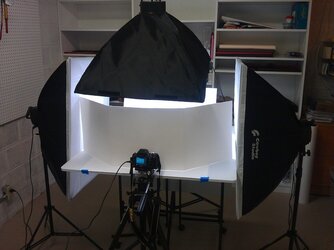
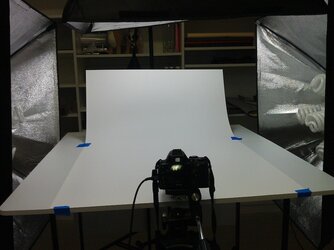
I am a beginner photographer, and learning quickly that I may have bitten off more than I can chew. I am trying to shoot small products on white background for web and print use. I purchased 3 softboxes from Cowboystudio thinking I could use them instead of a tent for what is essentially jewelry photography. Here's my setup. It's a Cowboystudio 4500 watt, 3 softbox set. Each softbox has 5, 85 watt 5500k fluorescent bulbs.
$img20121205195153.jpg$img20121206224818.jpg

I used a white poster board as my background. A softbox is on either side of the mini cyc, and one softbox is on a boom over the top. I also have a poster board with a hole cut in it for the lens to bounce the light back onto the front of the product. My goal is to get the white background totally white, 255,255,255. I want the white background to shoot white on the camera to avoid extra post work because I need the background totally white for the final product shots. I have so many shots to do, I don't want to have to separate the product from the background, it will be way too much work.

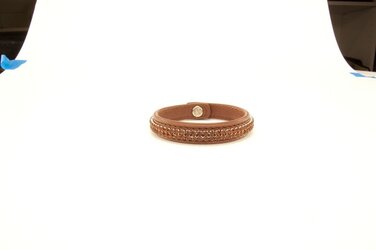
I am shooting RAW at F22, 1/25, ISO 400 on a Nikon D40. White balance is on the sunlight setting to match the daylight kelvin rating of the bulbs. At those settings, it's easy to get white background on the final image as true white. The problem I am having is that the colors of the products are getting washed out. I am able to adjust contrast and brightness on the RAW image and get the product to have good color, but then the background loses its color. Here is an example of a photo I am shooting.
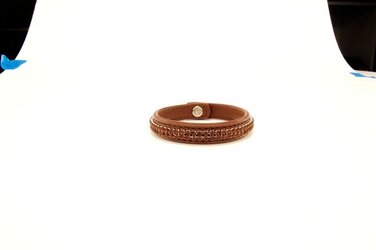
$bsc0165.jpg

In this shot, the background comes out perfectly white. The problem is that the product is washed out. The brown on that leather should be a very rich, chocolate color. The color I am getting is nowhere near the true color. As I said, I am a beginner, so I am not only limited by my equipment, but also my experience.

I have researched on this for weeks, and I have been trying to figure out what lighting I need to buy to make this work. My thoughts so far are... I am thinking about changing the poster board background to a white lexan. I am thinking that I could light the white lexan from the back and the bottom to get the white background while putting less light on the product itself. When I turn the lights down or change my camera settings to faster shutter, the color comes out much better on the product, but I lose the true white backgorund. That's why I am thinking about a backlit background. What I don't know, is it the backlit background will still overexpose the image and wash out the color because of the contrast differences in the white and the brown.

I am willing to try just about anything. My budget is limited, but I have some money to spend. Any help on this would be greatly appreciated. I have learned that this white background is probably one of the hardest setups I could have used to get into this, but at this point I don't have a choice! I hope someone has some ideas, because I am all out!
 
If you're happy with the colour of your background, but the colours of the products are wrong, I suspect your white balance is off. You said you've set it to sunlight to match the temperature of your lights, but don't forget it will affect the rendering of all other colours relative to the white background. Instead of using the sunlight setting, which will add blue to the whole image, tell the camera what white looks like under the light you are using by using the custom white balance setting and it should correct accordingly and render the colours of your products correctly.

To do that, fill the frame with your background and take a shot with all your lighting as it would be for the real shots, then set the custom white balance using that photo. That should give you accurate colours.

I never use the WB presets when shooting with lighting on a white background. I always set it myself using the background as the white card. Also, if you're shooting in a room with windows, you may need to re-set it a couple of times during the day to account for changing light temperature coming through the window as the sun moves round/clouds come over.
 
Last edited:
On the top right there is a black area but somewhat gray on the middle. use levels and click on the black eye dropper tool and click on that area. There will be a marked change on the color of your product without changing the bg color.
 
Shooting at 1/25 will let in other light unless they are turned off, also those lights are very weak in power personally i would ditch those lights
 
The subject and the background require 2 separate lighting solutions, and those need to be isolated from one another. The subject needs to be lit to get the correct diffused value, while the background and surface it's on need to be lit at its correct diffused value plus another 2-1/3 (or more) stops.

To pull that off, you'll need a bit of a trick, and the common trick is to put the subject on a riser over the background/surface so that you can light the subject and background/apparent surface separately. Then light the subject on it's own at the proper diffused value, with any shadows from it falling outside the composition's area via the separation between the subject and background/apparent surface. The more the background light is boosted beyond 2-1/3 stops over proper diffused, the less of a problem those shadows will be.

Common risers for this sort of thing are glass or clear plastics like Lexan. Depending on angles of light, you may need to employ a circular polarizer or even a sheet of polarizing film to keep from getting reflections of the subject on that glass riser, if you don't want them.
 
Can you correctly expose the subject and then pull the background in POST? i.e. raise the highlight or upper range from the curve.
 
Do you really need to shoot at f/22? That is a bit small for a D40, especially when you are using so little of the frame. Try a faster shutter speed and a wider aperture (or see the next para).

You seem to have plenty of light for inanimate objects. I use quite a bit less. I also prefer to use incandescent lamps over CFL for product shots. Can you remove the CFLs and just use one 100 W household incandescent lamp per softbox?

Do not trust the quoted CCT of the lamps. For the CFLs you will also need to change the tint, even if you got the CCT correct.
Use a custom WB, but do not use overexposed white, or what might be close to white but not true white. Better still, if you want accurate colours, use a profile.

more later, must go.


On the top right there is a black area but somewhat gray on the middle. use levels and click on the black eye dropper tool and click on that area. There will be a marked change on the color of your product without changing the bg color.

How do you know that that is a perfectly neutral surface that is lit by the same light as the subject?
 
If you're happy with the colour of your background, but the colours of the products are wrong, I suspect your white balance is off. You said you've set it to sunlight to match the temperature of your lights, but don't forget it will affect the rendering of all other colours relative to the white background. Instead of using the sunlight setting, which will add blue to the whole image, tell the camera what white looks like under the light you are using by using the custom white balance setting and it should correct accordingly and render the colours of your products correctly.

To do that, fill the frame with your background and take a shot with all your lighting as it would be for the real shots, then set the custom white balance using that photo. That should give you accurate colours.

I never use the WB presets when shooting with lighting on a white background. I always set it myself using the background as the white card. Also, if you're shooting in a room with windows, you may need to re-set it a couple of times during the day to account for changing light temperature coming through the window as the sun moves round/clouds come over.

I tried using the custom WB and the brown came out a little bit orangey. It looks decent, but not fantastic. I used the sunlight preset with a -1 value because it actually looked better than the custom. I can fiddle with it some more, maybe I just need to try it again.

On the top right there is a black area but somewhat gray on the middle. use levels and click on the black eye dropper tool and click on that area. There will be a marked change on the color of your product without changing the bg color.

I see what you're saying, that helps a little bit. It does richen up the color some. I didn't realize changing the levels like that would keep the white as it is. It darkened up the product a little bit more than I wanted, but that's probably because of the spot I clicked on. My only problem is that I can't always count on that spot in the image. I can just set the levels manually, though, right? Here's how it looks.

$bsc01652.jpg

The subject and the background require 2 separate lighting solutions, and those need to be isolated from one another. The subject needs to be lit to get the correct diffused value, while the background and surface it's on need to be lit at its correct diffused value plus another 2-1/3 (or more) stops.

To pull that off, you'll need a bit of a trick, and the common trick is to put the subject on a riser over the background/surface so that you can light the subject and background/apparent surface separately. Then light the subject on it's own at the proper diffused value, with any shadows from it falling outside the composition's area via the separation between the subject and background/apparent surface. The more the background light is boosted beyond 2-1/3 stops over proper diffused, the less of a problem those shadows will be.

Common risers for this sort of thing are glass or clear plastics like Lexan. Depending on angles of light, you may need to employ a circular polarizer or even a sheet of polarizing film to keep from getting reflections of the subject on that glass riser, if you don't want them.

I was considering something like this. My only issue is that I do want a little shadow because I am trying to match some existing photos that I had someone else shoot, and those photos have shadows. Do you think that the idea of using white lexan and lighting it from the back and bottom is about the same thing you are talking about? I'm not really sure if I would get shadows from that either, but it's just a thought.

Can you correctly expose the subject and then pull the background in POST? i.e. raise the highlight or upper range from the curve.

Yeah, but my issue is that I have about 250 photos to do. I am really trying to get this nailed down in the camera to avoid too much post work.

Do you really need to shoot at f/22? That is a bit small for a D40, especially when you are using so little of the frame. Try a faster shutter speed and a wider aperture (or see the next para).

You seem to have plenty of light for inanimate objects. I use quite a bit less. I also prefer to use incandescent lamps over CFL for product shots. Can you remove the CFLs and just use one 100 W household incandescent lamp per softbox?

Do not trust the quoted CCT of the lamps. For the CFLs you will also need to change the tint, even if you got the CCT correct.
Use a custom WB, but do not use overexposed white, or what might be close to white but not true white. Better still, if you want accurate colours, use a profile.

more later, must go.

At a larger aperture, my depth of focus is too small. This particular shot could probably go down a bit, but this is the smallest item I am shooting. For the rest, the depth of focus will lose the back of the product. I can certainly try using some incandescent bulbs today and see what happens, though.

Why not pot a whit card on a black seamless ..... you have too much white to work with

You mean just using enough white for what's behind the product instead of the entire frame? I never thought of that. For the smaller items, I suppose it would help, but as I get into the larger items that take up more room, it might get hard. I could try throwing some duvatine on the table and use it to cover as much of the white as I can. Think that might help?
 
I was considering something like this. My only issue is that I do want a little shadow because I am trying to match some existing photos that I had someone else shoot, and those photos have shadows. Do you think that the idea of using white lexan and lighting it from the back and bottom is about the same thing you are talking about? I'm not really sure if I would get shadows from that either, but it's just a thought.
In any case, you're going to need to experiment a bit with your set up until you get it dialed in, so go for it.
 
I am going to work on lighting the product and background separately today. I will go pick up some seamless paper since my poster board is too small to do this properly. My issue is the lights, I only have the 3 softboxes. I have some aluminum work light cans I can use, but whatever bulb I use in them it will not throw even light. I was thinking about maybe buying home depot halogen work lights to light the background and using the softboxes on the products. Or, I can buy some more inexpensive ligths, maybe a couple strobes? Could I use strobes to light the background white? I kind of feel like I'm starting out from scratch here, any ideas on what lights I should look for to do this properly? My budget is limited, but I need to do this for work so I will figure out a way to get what I need.
 
If you are getting Savage paper get 66 Pure White, not the Super White or the Portrait White. 66 is the closest to true neutral white.
 
If you are getting Savage paper get 66 Pure White, not the Super White or the Portrait White. 66 is the closest to true neutral white.

I thought the super white would be what I want for an overexposed background, no? Im curious why not.
 

Most reactions

Back
Top