windrivermaiden
TPF Noob!
- Joined
- Nov 2, 2006
- Messages
- 230
- Reaction score
- 2
- Location
- So Cal
- Can others edit my Photos
- Photos NOT OK to edit
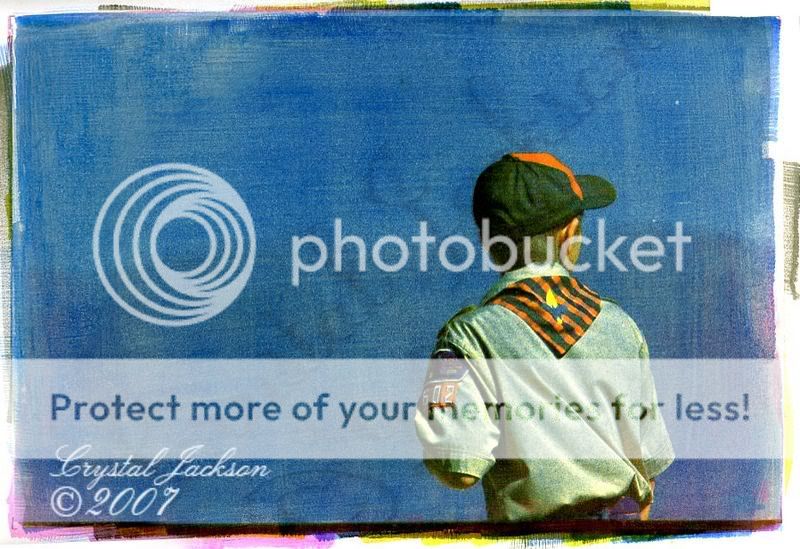
This is a gum print, also know as Gum Dichromate or Gum Bichromate(europe).

Boyscout, March Field, Riverside County CA 2007
How to make your own


Boyscout, March Field, Riverside County CA 2007
How to make your own
- Shrink 100% cotton watercolor paper by immersing in very hot water and soaking untill wet through. Hang to dry...
- Repeat 2 or 3 times. It is essential to shrink the paper because you don't want shrinkage to occur between the application of the first and subsequent emulsion layers, if the paper shrinks between the layers, the image will be offset.
- Size by brushing on a coat of softened gelatine to which a few drops of Glycol has been added. Hang to dry.(Glycol hardens the gelatine so it will not resoften when washed. It is also toxic, so proper caution should be used)
- Repeat step 3. ( if using a very porous paper, repeat twice--that means 3 layers of gelatine size. If the paper is not sized or sized enough, the pigmented gum will penetrate the substrate and stain the paper ruining the print.) I double size my papers, triple size if they are 220# or heavier. Another reason to size the paper is that the emulsion will sink into the paper fibers and the unexposed portion will not wash away cleanly, leaving you with a muddy print.
- Split image into 4 color negatives, one for each cyan, magenta, yellow and black. This can be done either in a darkroom with a color enlarger and litho film or in a pre-press program like Photoshop provided your printer driver will accomodate splitting. (Negative prep is a good pass time while the paper is drying) some type of registration needs to be incorporated into the negatives so that different color layers can be lined up precisely, the mixing of the primary colors yields the full spectrum. Some people don't print with black in their work, doing only tri-color. Some people use different pigments to give effects other than true color. Others use cyanotype as the cyan layer, when doing this method, the cyanotype must be done first before any gum layers, it is also helpful to resize the paper after the cyanotype layer. Gum can also be printed in mono-color. or with spot color. The possibilites are as endless as your imagination...and your free time or the depth of your wallet.
- Prepare pigment by mixing watercolor or gouache with liquid gum arabic, I use about 1 part premium watercolor pigment with 5 parts of 12 baum gum arabic. I mix a combination of different pigments to get the tone of cyan, magenta and Yellow I want. I use lamp black with a touch of Prussian blue for my black. watercolor pigment yields a more luminous print while gouache makes a print in which the color is more opaque.
- Prepare sensitized emusion by mixing equal parts of pigmented gum with Potassium dichromate. ( Dichromate is an oxidizer as well as carcinogenic, Use extreme caution. Print ecologically sensitively. Dispose of wastes with your local hazardous waste unit.)
- Coat sized paper with first color of sensitized emulsion. This needs to be done in low light, a safe light is not needed but once the sensitized gum starts to dry, it will develop out in UV light. Hang to dry in a dimly lit or dark place to dry. Not too warm or dry or the emusion will crack. I start with a very very very light black or blue layer to print my registration marks and then follow with yellow, red, then blue and finally black.
- Place the split-negative that corresponds to the color of emulsion you have applied and the sensitized paper into a contact printing frame and expose in UV light, I use good old CA sunshine. Midday is best...wear your sunblock! If it's good printing UV, its good sunburn UV. I have calibrated my chemical concentrations to print out in about 30 seconds to 1 minute exposure.
- Soak in a still water bath for at least 10 minutes, Drain the water away gently, Refill bath and soak an additional 10 minutes...minimum. Drain the water away gently, Refill bath and soak an additional 10 minutes...minimum. Drain....Soak again minimum 10 minutes. Lift print out on to slanted glass surface, emusion side up and gently rinse away any remaining unexposed emusion. The emusion is very delicate so be gentle. The paper is also very friable at this point so be gentle.
- Hang to dry. That is color one, coat one.
- Repeat for subsequent colors...until color tone desired is achieved. Sometimes it takes more than one layer of a color to achieve the depth of color desired. ( the print of the boyscout is 10 layers...2 each of all 4 colors and then an additional layer of magenta and cyan. Since my budget is tight, I tend to work on the side of caution with thinner layers... I can always add more color....but never remove any.


![[No title]](/data/xfmg/thumbnail/40/40300-583eaa43665714005823e12314084a4d.jpg?1734174710)

![[No title]](/data/xfmg/thumbnail/30/30876-d35f95603398bf3423b26c68d344f018.jpg?1734158870)


