MrsNesbitt
TPF Noob!
- Joined
- Feb 1, 2024
- Messages
- 4
- Reaction score
- 0
- Location
- Pennsylvania
- Can others edit my Photos
- Photos OK to edit
Hi all -
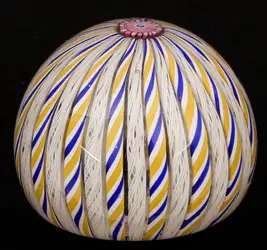
I am a self-taught photographer in the auction inudstry and I have spent hours experimenting with photographing paperweights to achieve a result that does not reflect the strobe light.
I am at something of a loss because even photographs taken from the side or even somewhat from behind reflect due to the highly curved surface of the paperweight.
The first photo is what I have been able to achieve, the second photo is what I would like to achieve (no reflection of the strobe)
Do you think that putting the weights in a light box, putting my Canon DSLR at a high ISO and pointing the strobes up/away from the paperweights in a small room is the answer? I have not tried this because the room I shoot in is large and there are reflective objects.
Thoughts are welcome and appreciated!! This is driving me a little bit crazy.


![[No title]](/data/xfmg/thumbnail/38/38263-ad5e4c9e677626ddb5b1e7cdf9ebe40e.jpg?1734172152)

![[No title]](/data/xfmg/thumbnail/35/35865-5006be46d328277e5a956fa323782d97.jpg?1734167579)


![[No title]](/data/xfmg/thumbnail/42/42253-fef7e43227f484b1a95dd6d85c03bd40.jpg?1734176623)


