LightMatters
TPF Noob!
- Joined
- Jan 16, 2013
- Messages
- 56
- Reaction score
- 7
- Location
- US
- Can others edit my Photos
- Photos NOT OK to edit
Hi,
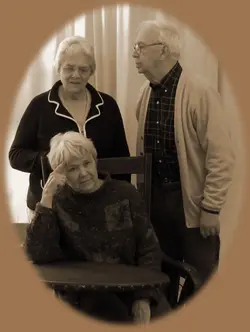
I took some family photos, one with an antique writing desk dating to the late 1700's, and wanted to make it sepia in keeping w/the age of the desk.
So here's some background info to work with ...
In Photoshop I used both a sepia photo filter and the sepia setting in HUE/SATURATION. Then I put on the vignette and tried to color match. The first turned out really more mocha and the second more cream. My memory of seeing non-digital sepia images was sort of a rich, deep brown w/a slight hint of a reddish undertone.
Does anyone have ideas for improving the sepia coloring?
And then there's the vignette. I used the color picker and just tried to get close to something that worked in terms of simultaneous contrast. Not sure I did very well in either.
Hints? Resources?
Here's the shooting info:
Shooting Mode: Indoor
TV (shutter speed): 1/8
AV (aperature value) 3.2
Exposure Compensation: 0
ISO Speed: 400 (auto)
Focal Length: 6.6 mm
White Balance: Auto
Thanks!
#1

#2
I took some family photos, one with an antique writing desk dating to the late 1700's, and wanted to make it sepia in keeping w/the age of the desk.
So here's some background info to work with ...
In Photoshop I used both a sepia photo filter and the sepia setting in HUE/SATURATION. Then I put on the vignette and tried to color match. The first turned out really more mocha and the second more cream. My memory of seeing non-digital sepia images was sort of a rich, deep brown w/a slight hint of a reddish undertone.
Does anyone have ideas for improving the sepia coloring?
And then there's the vignette. I used the color picker and just tried to get close to something that worked in terms of simultaneous contrast. Not sure I did very well in either.
Hints? Resources?
Here's the shooting info:
Shooting Mode: Indoor
TV (shutter speed): 1/8
AV (aperature value) 3.2
Exposure Compensation: 0
ISO Speed: 400 (auto)
Focal Length: 6.6 mm
White Balance: Auto
Thanks!
#1

#2


![[No title]](/data/xfmg/thumbnail/37/37138-63809b91a8061d61d48c541f18a69861.jpg?1734169836)


