Underexposed shadows/overexposed highlights

Coleman121

TPF Noob!
Joined
Oct 30, 2018
Messages
18
Reaction score
0
Can others edit my Photos
Photos OK to edit
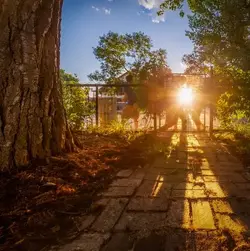
Hi guys, lately I’ve been trying to take some shots during the middle of the day as well as during sunsets. Some shots I’ve been trying to take 90 degrees from the sun, and it will either overexpose the sky to pure white, or it will expose the sky nicely but leave the foreground & shadows dark with completely no detail. How can I go about achieving a well exposed foreground while keeping the sky nicely exposed as well? Is there some hidden tricks to this? Filters? I particularly want to know how people achieve the photo below, where they’re shooting right into the sun and maintaining even exposure throughout the whole frame.
 

Attachments

  • B7A06423-8CA7-41B3-8791-F14474DA9571.jpeg
    B7A06423-8CA7-41B3-8791-F14474DA9571.jpeg
    70.5 KB · Views: 132
Hi Coleman,
I would expose for the sky, and pull up the shadows in post. Or take 3-5 shots, staring at -2 and ending at +2 exposure, and creating a HDR.
 
Hi Coleman,
I would expose for the sky, and pull up the shadows in post. Or take 3-5 shots, staring at -2 and ending at +2 exposure, and creating a HDR.
I’ve heard of HDR, but I thought people were against it as it creates an artificial effect due to such little contrast. Do most outside photographers use this type of method?
 
Yes, it is tricky to do it properly. What camera are you using, and do you use Lightroom/Photoshop to edit your files? The sample you posted look fine to me, I can still se details in the shadows. If your camera can take RAW images, that would be a good starting point.
 
There's a few things to consider going on here so lets break it down.

1) What you are encountering is the limited dynamic range of your camera, all cameras are limited in this way, even our own eyes are limited. Essentially a camera can only capture a range of values between bright and dark and when you go past that limit in light variation one area has to suffer (or both do); so you get overexposure with bright areas and underexposure with dark areas. Your eyes do the very same thing, but its harder to see because we resample a scene constantly as we view and our eyes move around a lot too as we focus on different areas so its not as bad, the camera has to do it all once for a single photo.

2) So one method can be to shoot in what people call the "golden hours" when light from the sun is more diffused and softer and thus the variation in many scenes is far less, this can work great, but many times you won't have the luxury of this type of lighting. Or you might still have a big divide between the bright and dark areas - eg taking a photo of a sunset you might well have a very bright sky, but a comparatively very dark land.

There are several methods to do deal with this
a) Take multiple photos at different exposures for different areas of the scene, then combine them in editing. This gets bundled under HDR in casual terms. In this you keep the camera still and the focus set, but you vary the exposure. Typically for something like a landscape you'd vary the shutterspeed (since you want the aperture the same each time for the depth of field); but you can also vary the ISO as well if you need the shutter speed at a certain value.
In this you'll take multiple shots, each one will have areas over and underexposed, but when added together they cover the whole range of exposure values well for the scene. Using software you then combine them into a single composite photo. The"Fake" Effect that can be generated is only a style choice when using the software and you can tailor how strong the effect is when you are adjusting the photo using the editing tools. So some HDR looks like a cartoon, others look like a good solid real photo. It's purely style and some people are not snooty and love the cartoon look and go for it - its purely your choice.

b) Take a single photo in RAW, but then process it differently to generate several photos to then combine like above. This is where some more modern sensors really shine because they can recover dark and bright areas on a single photo far better than in the past. Now you can use tools light lightroom which will let you zone off areas to edit differently on a single photo, but if the scene is very complicated with lots of areas in and out of shadow etc... then often its easier to just process the photo several times and combine the outputs (saved under different names each time of course) using HDR software (eg photoshop/elements etc...). That just cuts out huge amounts of time for you in masking areas. IF the scene is really simple like a landscape over the sea with a straight line between sky and sea then you can easily use the masking tools in software like lightroom to achieve it without having to output the photo several times.

c) Graduated Neutral Density filters - these are filters that slip over the front of the lens and block light entering the camera. The power varies and you can block anything from 1 stop of light to 5 or more based on the filter you fit (or if you add two or three at the same time). The ideal approach is to use a filter holder and square filters (rather than screw on round ones) for graduated filters. This way you can put the line of graduation where you want in the scene (since the line between, say, sky and sea will not always be dead centre in your composition). In this by blocking light (in that case from the sky) you lower the range of exposure values in the scene into something your camera can work with.

Neutral Density filters can also be used at bright points in the day and these stop light entering the whole lens, so you can use round ones (or square and then if you only put part of it over the lens view it acts like a graduated). These can be ideal if you are shooting at a very bright point in the day and your scene and settings are letting in too much light. A classic example is for misty water effects; which you might already be shooting at a golden hour time (weaker, softer light); but where you still want a much much longer exposure.

d) Add light. Yep we've talked about taking light away and combining photos which all work great for landscapes; however sometimes you might be doing a portrait and thus all those methods above just might not work; so instead of trying to combine photos or take light away; you instead add light to the foreground subject so that the exposure difference between it and the brighter sky/scene behind is, again, reduced. This is often called "fill flash" because you're filling in the light as such.
 
Hi Coleman,
I would expose for the sky, and pull up the shadows in post. Or take 3-5 shots, staring at -2 and ending at +2 exposure, and creating a HDR.
I’ve heard of HDR, but I thought people were against it as it creates an artificial effect due to such little contrast. Do most outside photographers use this type of method?

There are ways of achieving shadow and skies in a more exposure, and that’s with graduated neutral density filters. The neutral density filters are made to slow down shutter speeds and they neutralize or reduce the amount of light coming into a filter, thus slower shutter speeds.

With graduated-neutral density filters they’re made with say the upper part of the filter darker to reduce light and from top to about halfway down the filter the filter gradually allows more light through the lens. There are also hard and soft neutral density filters, with the hard ones you have an abrupt change midway down the filter to normal amounts of light passing through the filter causing a line around the middle of the photograph.

It takes good planning, the right type scenes and practice for this type filter. Where as, the soft graduated neutral density filter has a more gradual transition from darker to lighter throughout the filter from top to bottom. This allows a more natural looking composition.

So, you see how this works? Your sky can be exposed at a correct exposure while dialing in your settings to the areas more in shadow to expose them correctly, thus a more correct exposure throughout the photograph.

Another thing to lookout for is there are different densities to each filter, like .06, .09, 1, 1.5, 3, 6, 9, Ext. I don’t know the exact ratios but each either goes up half to one stop to two, maybe 3 stops lighter or darker. Most listings when you go to purchase them tell you how many stops darker the density of the filter is. So, you may want to get more than one filter over time time, or they also have adjustable ones that dial in how much light reduction you want. Now I’m not sure that have that in the graduated filters or not?? Anyone know?


Sent from my iPhone using Tapatalk
 
Thanks for the detailed responses guys!

I'm using a Nikon D7200. I can post some stuff a bit later to show you what I'm meaning. I have heard and researched a lot about ND filters and GND filters. In fact I have a CPL filter being delivered within the next week (not in an attempt to fix dynamic range issues, but just to make skies, reflections and nature look better.) I also heard the filter should bring down a stop or two of light. I do plan to get an ND filter later down the track because I have wanted to try a 30+ sec exposure shot of calm water around my area during the day, but there's just too much light without one.

I've been shooting in RAW, and with playing around in Camera Raw again I've just tried (for example, a landscape of a nice sky but an underexposed foreground) bringing up the shadows and toning down the highlights and it has actually brought back quite a lot of detail & colour in the foreground. I've tried using flash in areas where there's a harsh shadow, but I haven't really been able to execute it unless i'm really close enough.

My question is, when it comes to the average landscape/portrait photographer, out of all the options of different filters, HDR methods etc, what is the most common technique used to maintain a nice even exposure? I'm not torn against trying HDR, but I'd really like to know if I can create such pictures trying other possible methods first
 
The method varies on the situation and the photographer. There is no one single "proper" nor "popular" approach. There is just tools in the bag you can use and you make the choice which suits you in any given situation.

Some landscape photographers will never use HDR or Tone mapping (the name for when you use 1 photo and edit it several times to make results to then combine); others will use it all the time. Some will only shoot "natural light" others will use a million flashes - etc...
 
I typically under expose my photos when I am shooting toward the sun. I can always go in and remove shadows in Lightroom. I shoot in RAW a well as Jpeg at the same time.
 

Most reactions

New Topics

Back
Top