iamroyce
TPF Noob!
- Joined
- Sep 25, 2011
- Messages
- 25
- Reaction score
- 0
- Location
- Manila, Philippines
- Website
- tiny.cc
- Can others edit my Photos
- Photos OK to edit
360 product photography equipment is a so delicate and involved topic because products come in so many shapes and sizes. Some may be very reflective, some may have dimensions that will prevent you from simply dropping them on a turntable, and some may have features that can be only highlighted when shot from a specific angle while hanging from the top and with a certain lighting setup.
The more constraints you have in your 360 photography setup the less options you get at your disposal for creating smooth 360 product views. It's also very important to be able to quickly assess how your product appear from different angles with a given setup before you start on the actual production of 360 product images.
So before you go ahead and spend your hard earned money on a computerized equipment (which is invaluable if you do this commercially), here's a simple guide for building a DIY turntable that will likely solve some of your product photography needs. The good news? It will only cost you a trip to a hardware store (Ace Hardware or similar), $40 and an hour of your time to get it all assembled together!
What you need:
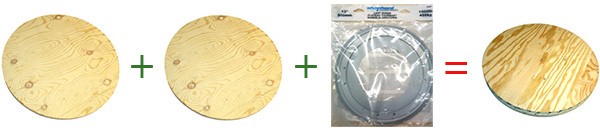
So our turn table will be built using two disks of round plywood and a lazy susan bearing attached between the disks to provide a smooth and steady movement. The bearing is tough enough to deal with weights of up to 400-500 lbs or even 1000 lbs depending on a brand, so the weak link is the plywood. If you go with Shepherd's bearing (featured on the picture), they come with pretty good assembly instructions. The key is to find and mark the center on the plywood disks. This is pretty simple as long as the disks are perfect circles:
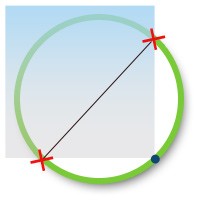
First, you will need to find something that has a 90 degree corner like a piece of a white paper sheet. Place the right-angle corner of the sheet at any point on the edge of the plywood disk and mark the other two points where it crosses the edges on the plywood. Then draw a straight line between the two marks and connect the marks with a straight line. Now repeat the same procedure using another point on the plywood. The intersection between the two lines is the center of the disk.
 The rest of the assembly is pretty straightforward - just follow instructions on the bearing package!
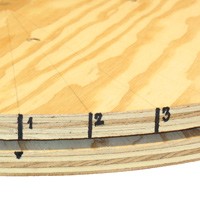
Now that the major work is done, you need to decide how many frames your 360 product views will be comprised of. We usually recommend going with 20 frames as this gives a nice balance between the total size of the images/download speed and the smoothness of your product rotations. To get 20 product shots, our turntable should be able to rotate in 18 degree increments. The key is to mark the top plywood disk in such way that you can easily identify the increments. Our approach is to put numbered marks on the side of the disk as shown on the picture. Since you already have found the center on the top disk, creating the 18-degree marks is pretty simple with a protractor.
 The final step is to attach a piece of white paper on the top of the plywood disk where you will be placing your products and put a measuring mark on the bottom plywood base. Now put your camera on, align it with the measuring mark on the bottom and the center of the rotation, then place your product on the table and you are good to go.
Happy 360 Product Photography!
The more constraints you have in your 360 photography setup the less options you get at your disposal for creating smooth 360 product views. It's also very important to be able to quickly assess how your product appear from different angles with a given setup before you start on the actual production of 360 product images.
So before you go ahead and spend your hard earned money on a computerized equipment (which is invaluable if you do this commercially), here's a simple guide for building a DIY turntable that will likely solve some of your product photography needs. The good news? It will only cost you a trip to a hardware store (Ace Hardware or similar), $40 and an hour of your time to get it all assembled together!
What you need:
- 2 x 23" disks of round plywood - $28
- 1 x 12" Lazy Susan Bearing - $6
- 1 sheet of white paper enough to cover the top of plywood disks
So our turn table will be built using two disks of round plywood and a lazy susan bearing attached between the disks to provide a smooth and steady movement. The bearing is tough enough to deal with weights of up to 400-500 lbs or even 1000 lbs depending on a brand, so the weak link is the plywood. If you go with Shepherd's bearing (featured on the picture), they come with pretty good assembly instructions. The key is to find and mark the center on the plywood disks. This is pretty simple as long as the disks are perfect circles:
First, you will need to find something that has a 90 degree corner like a piece of a white paper sheet. Place the right-angle corner of the sheet at any point on the edge of the plywood disk and mark the other two points where it crosses the edges on the plywood. Then draw a straight line between the two marks and connect the marks with a straight line. Now repeat the same procedure using another point on the plywood. The intersection between the two lines is the center of the disk.
Now that the major work is done, you need to decide how many frames your 360 product views will be comprised of. We usually recommend going with 20 frames as this gives a nice balance between the total size of the images/download speed and the smoothness of your product rotations. To get 20 product shots, our turntable should be able to rotate in 18 degree increments. The key is to mark the top plywood disk in such way that you can easily identify the increments. Our approach is to put numbered marks on the side of the disk as shown on the picture. Since you already have found the center on the top disk, creating the 18-degree marks is pretty simple with a protractor.
Happy 360 Product Photography!
Last edited:
") This type of manual turntable is very handy even for still photography when you just need to play with different product angles. Here's our original post (as the poster didn't include a reference to the source):
This type of manual turntable is very handy even for still photography when you just need to play with different product angles. Here's our original post (as the poster didn't include a reference to the source):