Any suggestions for a slow shutter speed at night shot

RumDaddy

TPF Noob!
Joined
Jun 9, 2009
Messages
210
Reaction score
1
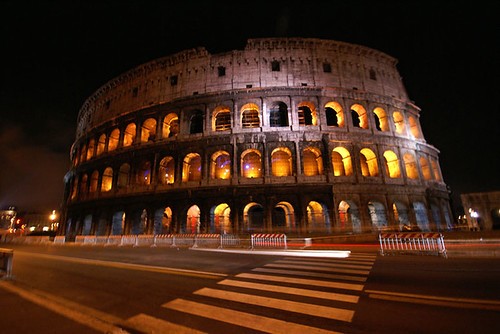
I want to one of those headlight tracer shots. My new ball head just arrived so my tripod is back in action. Ive been wanting to do one of those night shots of a downtown area where the cars headlights leave tracers. Id post a example but dont want to break any copyright rules.

How ever Im sure a ton of you know exactly what Im talking about.

And hey, for you beginners this could or may be a fun experiment or personal assignment that could help you expand your knowledge of photography as well as your amount of unique images. So feel free to follow along and give it a whirl.

All we need now is someone SMRTer then us. Someone who is wise in the ways of photography to coach us newbies in the right direction. So someone please share one of these shots and give us a break down of what ya did or how ya did. Please and thanks.
 
I am a beginner right here with ya but these pictures interest me as well! I think after trying quite a few of these last night the best way to do it is using the bulb function so that you can get just the right beginning and ending of lights going by. The other side to this though is that you better have an extremely sturdy tripod, or use a remote because with my tripod, there is now way I can have a perfect "bulb" shot.

I got a few last night that I was happy with, doesn't mean they are good though. I love these pictures! I live in a small town so lots of cars is hard to find. I need to go to a city and find a good place to try it.

I'm down for some good knowledge as well :)
 
RumDaddy,

Set camera on shutter priority. Try a 30 second exposure at night. If you're shooting just past dusk, 1/16, 1/8 or 1/4 of a second depending on how much light is still available. Use a wireless shutter release or, at the least a cabled shutter release.

Good luck.

Post your results for us to see.
 
Here are a few of mine, along with the settings used. Both shot with a Canon XSI and Canon 10-22mm, on a tripod

4097252390_82ee0c454b.jpg

Shutter 8 secs
Aperture f/13
ISO 100
Focal lenght 10mm

4084816246_67b8a29ed2.jpg

Shutter 15 secs
Aperture f/7.1
ISO 100
Focal lenght 10mm

Things to look for for the settings are a low ISO, 100-200 preferably, this allows for a crisper, cleaner image

Aperture between f/8 and f/11. As most of these scenes have alot of nice stuff, you are keeping a decent depth of field for your focus.

Timing is also key. Watch the traffic. My first image was taken while I was partially in the bike lane just past a traffic light. I waited for alot of cars to pile up at the light and when it turned green, I was ready to hit the trigger to get as many lights as possible.

You can also opt for a longer exposure and smaller aperture. Lets say that first image didnt have much traffic. I could of made the aperture smaller which would increase the shutter. So from f/13 to say f/22 and I would be shooting at say 20 seconds instead of 8. Due to the law of reciprocity, my exposure would be the same (give or take, I'm not good at math, but I'd base myself on my camera meter) but I'd have 20 seconds of cars going past instead of 8.

Tripod a must

Use a remote release or use the 2 second timer on your camera to avoid the camera shake caused by you pushing down the shutter.

The rest is just finding an interesting spot to take the image from, which is what is more time consuming

How much post processing do you do, some times when I try it light from street lamps bleed my exposures a nasty yellow.
 
bigtwinky gave some GREAT advice. Covered pretty much all the details! nice job!

I probably don't even need to share this link, but here you go (article on night shooting).
 
Excellent information BigTwink..thanks!!! I have found through trial and error that you are exactly right about lowest ISO possible..this really helps with a crisper image. I have a question for you about your second image. Were you using any type of filter? I always wonder how people get the amazing colors out of the sky like that.
 
How much post processing do you do, some times when I try it light from street lamps bleed my exposures a nasty yellow.

Not that much. Maybe 10 secs of work done in light room, slight levels adjustment and maybe some clarity slider. I might of tweaked the white balance or something with the sky to get it like that, but its more or less out of camera.

With digital, its better to under expose slightly. If you are metering part of a scene and there is a light off to the side that is way brighter (which is not always aparent when you look at it with the naked eye) this might happen.

Option 1 - recompose your shot to get this out.
Option 2 - put yourself in manual mode if you see this happening and then set your aperture to what you want and tweak the shutter until you are underexposing some.

You are on a tripod and should be taking your time, so there is no reason to review the image and try again...and again...and again.

Tip: If you want a star shape pattern on some of the street lights, use a smaller aperture

Similar to this image where the street lights on the highway camera right have a star pattern to them
3910203855_06fdda7a5e.jpg
 
I have a question for you about your second image. Were you using any type of filter? I always wonder how people get the amazing colors out of the sky like that.

No filter on that one, I rarely shoot with filters.

Night shots are about waiting for the right light and finding a good angle to shoot at. Sometimes, that means taking advantage of city lights and nice clouds. I might of done some adjustments in light room, but in total honesty, I wasnt paying much attention to the sky when I shot this one and was pleasantly surprised when I saw the results.


And keeping your ISO low is usually the best practice for almost all types of photos. The last thing I tweak in settings is my ISO. If there is a set aperture I want and I'm not getting a fast enough shutter, I'll up the ISO. But really, I treat it as a last resort
 
I always wonder how people get the amazing colors out of the sky like that.

Time of day often plays a part. If you shoot around dusk, you get city lights AND a nice sky. As Pierre mentioned, underexposing enhances the colors.

I sometimes see pinkish clouds and different colors in the sky and have wondered what causes it. Time of year? Pollution? A specific time before or after sunrise or sunset? Maybe all those things. However, as mentioned, underexposing slightly will enhance the colors that are there. I guess a circular polarizer might have the effect of enhancing them too.

You may also want to bracket your shots to help you learn the impact under or overexposing has on the night scene. Or just manually make adjustments and review as you go.

The image below was shot 20 minutes after the official sunset time, so there was still some light in the sky. To my eyes the sky was darker, but with a longer exposure the clouds and sky came through nice. Start setting up before sunset when possible (or before sunrise) and start taking a few shots. As the light changes, the results and differences can be pretty dramatic. This one was shot in Aperture Priority at -2/3EV. More from the set here: Timothy Bury Photography | Stone Arch Bridge (Click on the Photo Info tab for settings). Note, this one was in spot because I wanted to control exposure on the arches (aimed at 2nd or 3rd arch and locked exposure). Otherwise Matrix (Evaluative) metering seems to work good for me.

I plan on getting out sometime to get light trails form cars with a city scene. I may have my ND filter with, in case I want to increase exposure time more than the camera will allow. I think from what I have seen though, it's probabbly not neccessary. You can control exposure with long enough shutter speeds for these scenes without needing a Neutral Density filter (unless there are some very bright lights).

p465090978-3.jpg
 
Awesome image there Tim!


A test I want to try out, but havent had time, is using bulb mode for car trails. I would bring a black card board and a stop watch.

Lets say I meter a scene and it gives me settings of f/11, ISO 100 and shutter of 30 seconds. I would then switch the camera to bulb mode and put the board in front of the camera lens so nothing gets in. Click the shutter to activate bulb mode. Camera shake isn't an issue as long as you put the board in front BEFORE you click.

Then wait. Once I see a car go by, I move the black cardboard from in front of the image and count (or use a stop watch) to count the time that I am exposing. Lets say its 2 total seconds. Once the car has passed, I put the cardboard back in front.

I then wait again... I keep doing this until I total up 30 seconds.

Result? A scene with little constant cars looking really busy with multiple light streaks.

I'm thinking it should work
 
696490126_29478067d8.jpg


Here's one I took somewhere in Europe (can't remember where). Not that this picture is God-aweful, but you can still use it as an example of what not to do.

I didn't have a tripod, so I just balanced my camera on a nearby trash can.

Aperture is set at f4, hence the shallow depth of field which I believe is causing the left and right edges of that round building to be fuzzy. Looking back I would have chosen something closer to f8.

Exposure time is only 0.4 seconds. Long enough to get a bit of a tail light, but longer exposure would have captured more. The smaller aperture mentioned in the previous paragraph would also have increase the exposure time.

ISO was set at 400. The higher ISO coupled with a dark subject led to a little noise. The fuzzy edges may also be a result of noise reduction.
 

Most reactions

Back
Top