cropping/printing help

mitsugirly

TPF Noob!
Joined
Jan 18, 2009
Messages
487
Reaction score
1
Location
Galloway/Columbus Ohio
Can others edit my Photos
Photos OK to edit
Ok, this was brought up to me by someone and I'm really confused.

Any picture that we take we put into PS and use the crop tool and put in 8x10 or 5x7 and so on and drag it across the picture and that's all the picture would print up as??? Is this how you find out what your picture will look like if you print them?

So if you send a close up picture in (lets say of a face only) to have an 8 x 10 made of it...how do they (the place that prints up the picture for you) crop it? Will they center the picture? Or it starts at the top (or bottom) and goes down/up?

So what do we do? Do we pull back some when taking a picture? Don't crop the picture? Add canvas to to the picture to make it bigger so the entire picture will fit in the cropped area? Save it differently so that it will fit?

I'm so confused. I was going to send off for a few pictures to have done to a place to see how their work is and to see if I wanted to use them to print pictures...but now I can't because if I use the pictures I have...it will cut faces, body parts and so on off.

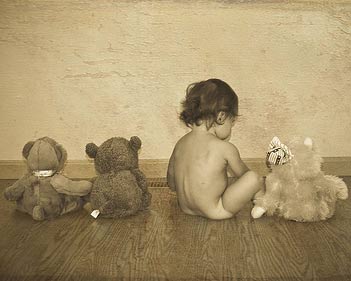
Ok, so take the recent picture I did of my daughter Sakari. This is the original:

3702409328_2ab948438c.jpg


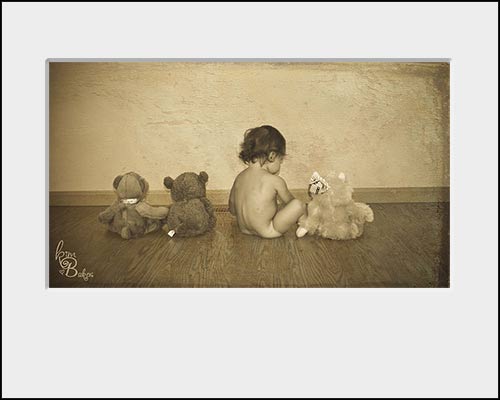
I followed the directions and cropped it for an 8x10. I now get this????
3730273087_7c4fa0c247.jpg


Then if I crop it at a 5x7, I will end up with this??

3730273191_1bcdd94d36.jpg
 
So if you send a close up picture in (lets say of a face only) to have an 8 x 10 made of it...how do they (the place that prints up the picture for you) crop it? Will they center the picture? Or it starts at the top (or bottom) and goes down/up?

Nobody knows. It's up to whoever happens to be behind the desk that day.

That's why it's better that you do it beforehand - so they don't have to.


edit

Send them the finished file - cropped for the aspect ratio you want it printed at. Anything else, and you're asking for trouble...
 
....So what do we do? Do we pull back some when taking a picture? Don't crop the picture? Add canvas to to the picture to make it bigger so the entire picture will fit in the cropped area?...

Every image is different and thus needs a different solution.

First, you need to understand that in PS, and other similar apps, a distinction exists between an 8x10 and a 10x8. Your example is a horizontal image (AKA Landscape) so cropping to an 8x10 is not likely to produce desirable results. A 10x8 crops might. In PS, you can simply click the double arrow between the two dimensions on the Crop Tool's toolbar to swap the fields.

The best artistic results will be achieved by letting the subject dictate the aspect ratio of the image. If that ratio doesn't fit well with a standard print size then you need to consider matting the image, either with a true matt in the frame or using PS's Canvas Size dialog to expand the image canvas to a standard aspect ratio. Generally, I do the latter with my art prints.

When shooting commercially, you often have to make the images fit a standard print shape. In these situations, you need to frame the image to allow for any necessary crop. Long ago in a galaxy far away (read: when I got my first SLR in the ancient film era) I actually marked my focusing screen with very fine incised lines to indicate the standard 8x10 crop. That way, my then somewhat untrained eye could easily frame an image to the crop marks when the final result needed to be an 8x10 or similarly squarish print (11x14, ...). After nearly a half century of shooting and doing my own printing, I can visualize most common print shapes without the visual guide.

As far as how a lab will react, who knows. Most won't react the same twice. The trend is generally to crop centered. The labs, though, won't distinguish between 8x10 and 10x8 the way an image editor does. They'll align the long side of the image with the long side of the print regardless of which way "down" is in the file.

IMHO, the image you posted is rather good and should not be cropped at all. My choice in this case would be to create a matt, either real or as a wide white border. To do the latter in PS for an 8x10:
1. Access File/Image Size ... then uncheck resample and set the width to 6" letting ppi and height change as they wish. At this point we do not want to change the pixel size.
2. (Optional) Reaccess File/Image Size, check Resample, and change the PPI to 300 or whatever you prefer as the final printing resolution. Select between the various Bicubic options depending on whether you are raising or reducing the PPI.
3. Access File/Canvas Size... and change the canvas size. I prefer to do this in two steps though some would just make it 10" wide and 8" high and be done with it. My choice would be to make it 10" wide and increase the height by 2" from whatever it started at when Canvas Size first opened. Leave the position array at its default of centered and click OK. This leaves the canvas 10" wide but less than 8" high. I then reaccess Canvas Size and set the height to 8" but click the top center cell in the position array. The result is a 10x8" canvas with the image higher than centered. You'll have a 1" border at the top and both sides and a wider border at the bottom.

An alternate method would be to insert a step between 2 and 3 where you double click on the background layer in the Layers panel and then create a new blank layer. Move the blank layer below the image and then do the simple version of step 3, just change the canvas to 10x8". You can now select the uppper image layer and move the image up as you desire. You can also add layer rendering options to create a shadow or imitate the look of a beveled matt.

The not perfectly centered result is generally more pleasing than a perfectly centered image as the human eye/brain is conditioned to start looking at an image nearer to the top than dead center. Actually, the eye/brain also "prefer" that the image be slightly to the left of center. but only very little. If you are creating very wide borders, you may want to make this displacement also.
 
To add illustrations of adapting the image to a 10x8" shape (5x4, 20x16, ...):

"ugly" crop:
Sakari-crop.jpg


and "matted" (I added a black outline to make the edge of the image easier to see)
Sakari-matt.jpg
 
edit

Send them the finished file - cropped for the aspect ratio you want it printed at. Anything else, and you're asking for trouble...

I'm not understanding the aspect ratio? I did a search after posting this and after a lot of reading actually found a post something about the cropping and this was mentioned in there as well... http://www.thephotoforum.com/forum/...i-had-learn-experience-newbies-listen-up.html
it said something about "3:2 ratio print sizes", "native 2:3 ratio", "the more boxy 5:4 ratio".....

This is making no sense to me. Is this something you set up in PS? Or are they talking about what you set up in your camera while taking pictures? I looked on my camera and found a setting for either 16:9 or 3:2. It shows that I have been shooting on the 16:9 aspect ratio. Is this what I should be shooting on?
 
First, you need to understand that in PS, and other similar apps, a distinction exists between an 8x10 and a 10x8. Your example is a horizontal image (AKA Landscape) so cropping to an 8x10 is not likely to produce desirable results. A 10x8 crops might. In PS, you can simply click the double arrow between the two dimensions on the Crop Tool's toolbar to swap the fields.

Sorry, I mistyped that...I did put in 10x8 on the picture that I posted as cropped (not 8x10) because it was a landscape horizontal picture. I did not get the same result as you for some reason.


IMHO, the image you posted is rather good and should not be cropped at all. My choice in this case would be to create a matt, either real or as a wide white border. To do the latter in PS for an 8x10:
1. Access File/Image Size ... then uncheck resample and set the width to 6" letting ppi and height change as they wish. At this point we do not want to change the pixel size.
2. (Optional) Reaccess File/Image Size, check Resample, and change the PPI to 300 or whatever you prefer as the final printing resolution. Select between the various Bicubic options depending on whether you are raising or reducing the PPI.
3. Access File/Canvas Size... and change the canvas size. I prefer to do this in two steps though some would just make it 10" wide and 8" high and be done with it. My choice would be to make it 10" wide and increase the height by 2" from whatever it started at when Canvas Size first opened. Leave the position array at its default of centered and click OK. This leaves the canvas 10" wide but less than 8" high. I then reaccess Canvas Size and set the height to 8" but click the top center cell in the position array. The result is a 10x8" canvas with the image higher than centered. You'll have a 1" border at the top and both sides and a wider border at the bottom.

Ok, I did these steps and made the mat and suggested and it turned out just like you picture you posted.

So....I will have to do that to every 8x10 (10x8) picture I want to print? And this will make it print JUST THE PICTURE ITSELF like I want? They will cut off all the white in the picture?


The not perfectly centered result is generally more pleasing than a perfectly centered image as the human eye/brain is conditioned to start looking at an image nearer to the top than dead center. Actually, the eye/brain also "prefer" that the image be slightly to the left of center. but only very little. If you are creating very wide borders, you may want to make this displacement also.

The way I'm reading this is as if the entire picture will be printed like this? Mat and all? Otherwise why would it matter if the canvas that was put around it was pleasing to the eye or more to the top or off center?

Thanks so much for your help and especially for the step by step instructions. I always use the canvas on a lot of my pictures to add little borders, but never thought of using that to add to the picture.
 
Also, I was thinking at it...would it be better to stretch the canvas instead of adding a white border if at all possible? That way you at least have the same colors around the edges?
 
...
So....I will have to do that to every 8x10 (10x8) picture I want to print? And this will make it print JUST THE PICTURE ITSELF like I want? They will cut off all the white in the picture?

...

No telling what some labs will do, but any halfway intellegent operator will print the whole image, white border and all.

Understand though, any "borderless" printing method requires that the image be printed slightly oversized spilling off the edges of the print material. This results in a slight crop on all four sides, but this should be a uniform crop. The 1" borders in my example might end up more like 7/8" or so.

As you your query about "aspect ratio": this is a term that refers to the ratio of the length of one dimension to another. With photos it usually follows the form of shortside:longside but movies and digital images are usually width:height (e.g. new widescreen TVs being 16:9). The numberic values are usually chosen to be the smallest integers possible so an 8x10 inch print is refered to as having a "4:5" aspect ratio even though "8:10" would be mathematically correct.

The classic 35mm "full frame", or "double frame", 24mm x 36mm format has a 2:3 aspect ratio. Most crop sensor DSLRs have an aspect ratio very very close to 2:3 (the Panasonic/Leica/Olympus 4/3rds and micro4/3rds format being the only significant exception). Most P&S cameras shot the more square 4:5 format natively, though some offer an "automatic crop" to the HDTV compable 16:9 ratio.

Common print sizes have evolved over the past nearly two centuries for a variety of hysterical/historical reasons. Many evolved from common traditional paper sizes and some from glass sizes. A few were introduced to match a film aspect ratio but became mismatched when borders became passe. As an example of the latter, 3.5x5" prints with 1/4" borders have a 3x4.5" actual image area that exactly matches a 35mm FF ratio of 2:3, but when 35mm image printed borderless at 3.5" wide it results in a 5.25 inch long image leaving 1/4" to be cropped off.
 
So I'm only wanting to print just the picture itself...none of the white border I added or anything. Do I add the border around the picture and then do the 10x8 crop when I'm done with the picture (leaving just a little of the white border around it in case the printing place chops any of it off) and I'll end up with what it is going to look like from the printer? My goal is to just print the entire picture as shot...not any added border or any matting around it. (Of course a little bit wouldn't matter and can be cut off)

The ratio thing made sense, but yet is confusing. I still didn't get an answer as to what I should have my camera setting on for the best shots. The 16:9 or 3:2? Does this make a difference in the pictures or just the printing of the pictures later?
 
I also noticed on flikr that there is a button that says "order prints" and I clicked on it just to see what it was all about. Picked the picture to be printed...it showed the entire picture as it was taken. Does that mean that they would actually print it that way as shown in the order? Or are they going to crop it as well? Not that I would order from them because it gave the option to have them mailed to you OR pick up an hour later from TARGET??? Um, No.
 
edit

Send them the finished file - cropped for the aspect ratio you want it printed at. Anything else, and you're asking for trouble...

I'm not understanding the aspect ratio? I did a search after posting this and after a lot of reading actually found a post something about the cropping and this was mentioned in there as well... http://www.thephotoforum.com/forum/...i-had-learn-experience-newbies-listen-up.html
it said something about "3:2 ratio print sizes", "native 2:3 ratio", "the more boxy 5:4 ratio".....

This is making no sense to me. Is this something you set up in PS? Or are they talking about what you set up in your camera while taking pictures? I looked on my camera and found a setting for either 16:9 or 3:2. It shows that I have been shooting on the 16:9 aspect ratio. Is this what I should be shooting on?

3:2 would use more of the sensor than 16:9 (16:9=1.77:1), unless you were using an anamorphic lens of some type (which you are not). 16:9 would crop a little off of the top & bottom.

A 4x6 print has an aspect ratio of 2:3. An 8x10 is 4:5. 5x7 is (roughly) 1.6:2.3, or 2.5:3.5 (depends on what you want to divide by), though it's probably easier to just say 5:7.

Don't send them a 2:3 file if you want an 8x10 print.
 
...
3:2 would use more of the sensor than 16:9 (16:9=1.77:1)
...

While true, its not as true as many think. Most cameras so a simple crop to get aspect ratios that differ from the sensor' default size. The Panasonic GH-1 micro4/3rds camera is a notable exception, though its little sister the G-1 isn't.

Most cameras simply crop their native format to achieve other aspect ratios. The result has the same number of pixels as would result if you shot in the native format and cropped in PS. With these models the only advantage to selecting the asspect ratio in-camera is that their LCD screens will be masked to the selected aspect ratio improving your ability to frame to the selected shape.

Its quite possible to engineer a camera to take better advantage of the image circle projected by the lens. Panasonic has a good interactive demonstration in this page:

DMC-GH1 | PRODUCTS | LUMIX | Digital Camera | Panasonic Global

Their GH-1 delivers a 4:3 aspect image, the 4/3rds "standard", of 4000x3000 pixels. If simply cropped to 16:9 you would get 4000x2250. By using a slightly oversized sensor they can use the image circle more effectively yielding a 16:9 image of 4352x2448 if you select that aspect ratio before shooting.
 
Last edited:
...it showed the entire picture as it was taken. Does that mean that they would actually print it that way as shown in the order? Or are they going to crop it as well? ...

Its quite possible that they would fit the long dimension of the image to fit with long dimension of the print and leave a blank, probably white, border top and bottom to fill out the paper. If they preview the image that way then they should print it that way. Whether they do what they should, I couldn't say. I have no experience with their printing; I do my own.
 
Maybe these links will help:

I just googled "cropping and print sizes".

I hope that helps a little.

Photoshop tip: when your using Photoshop to crop your images and you want to keep the same aspect ratios, hold down the SHIFT key while cropping. Click and drag from any corner, and the ratios will stay the same.

Dan
 
Last edited:
3:2 would use more of the sensor than 16:9 (16:9=1.77:1), 16:9 would crop a little off of the top & bottom.

Dwig said:

So, I should be using the 3:2 on my camera instead of the 16:9 because it's going to give me a wider view and better for cropping? When I did the interactive part on the link, it was clear that the 16:9 took a lot off the top and bottom compared to the 3:2. What this is telling me is I need to change my camera settings to the 3:2 for a bigger picture to start out with in processing before cropping to the size I need. Correct?


Guido44 said:
Maybe these links will help:

I just googled "cropping and print sizes".

I hope that helps a little.

Photoshop tip: when your using Photoshop to crop your images and you want to keep the same aspect ratios, hold down the SHIFT key while cropping. Click and drag from any corner, and the ratios will stay the same.

Dan

I'm going to check out all those links and see if one of them might help me a little more.

Ok, so the photoshop tip, if I enter 8x10 in the cropping size and drag the crop tool across while holding down that shift key, it will give me a crop size of the 8x10 and still have the entire picture in it? Because it's not working for me.
When I tried it, if I hold down the shift key it still drags it to the same size (cropping off parts of the picture) and then I have to let go of the crop and then it will let me drag the corner down/out to make the cropping area even bigger than the picture. When I hit the enter key, it gives me a bunch of added black border under the picture. Which is the same thing as me holding down the crop tool until it gets to the 8x10 size and then I am still able to grab the corner and drag it down (no shift key needed). :confused: Am I doing something wrong?
 

Most reactions

Back
Top