DIY sand bags

JerryPH

No longer a newbie, moving up!
Joined
Oct 14, 2007
Messages
6,111
Reaction score
15
Location
Montreal, QC, Canada
Can others edit my Photos
Photos NOT OK to edit
After a recent tip over of a lightstand (no damage, I saved it well before it hit the ground), I looked around for prices for sandbags and was surprised at what they cost. I thought it would be interesting to see what DIY ones would cost me, and it was a huge savings without a huge drop in quality at all.

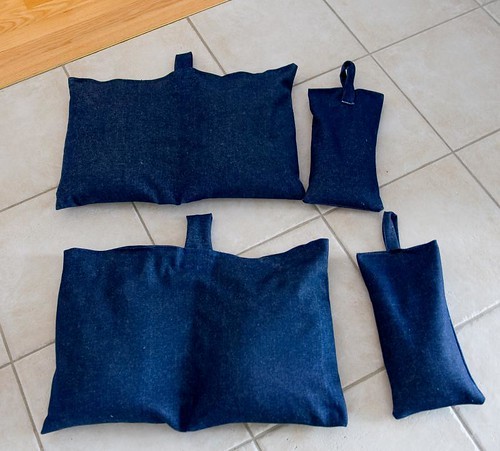
Mine cost me about 1/10th the price of store bought ones that I could find locally. The small ones are single 6 pound bags and the larger ones are 28 pounds each.

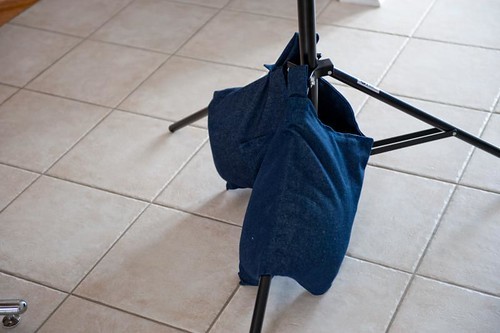
I use the smaller ones as counterweights for the boom and the larger ones to hold the lightstands down and keep them from tipping over.

I made 2 of each and the total cost of the project was about $8.25 Canadian, including the pre-dried sand.

Credit has to go to my mother for the sewing (labour is where I am sure I saved the most on!), she did an awesome job. Each sand bag is double lined and triple stitched for longevity... not that I will be all that hard on them anyways.

3721707863_e90671cae7.jpg


3722519800_676413dbfb.jpg
 
I just picked up a sewing machine for making bags for an outdoor game (cornhole, bags, bag toss, baggo, whatever your area calls it).

I might have to try something similar!

Got any more specs?
 
If you really want some weight, use lead shot instead of sand.

You should be able to buy it at any gun shop (do they have those in Canada...?), finer sporting goods stores should have it as well.

If I remember correctly, cost is about a dollar per pound.

They look nice though. I usually just use my camera bag when I need to add some weight to the tripod (I don't know if it's good or bad that it's heavy enough for that...).
 
I like the way they attach and drape over the legs too.
 
Sure... Large bags are 14 X 22 inches and the smaller ones are 12 X 4 inches. They each hold sand and when filled are about 3-4 inches thick. Each has a "handle" built into it for being held in place on the base of the stand (not really needed for the big ones, just handy to grab on to) and to slip over the end of the boom for a counter balance to the setup.

I used my reflector boom (way under-strength for the application) just to test it out, and the two smaller sand bags are perfect for balancing either the 28" or 50" Apollo softboxes holding two battery filled SB-600s up in the air above the subjects in a nicely balanced manner.

3721769717_e98d7e51fa.jpg
 
If you really want some weight, use lead shot instead of sand.
Oh heck, 28 pounds is more than enough to support this. :D
My thought was also to see for how little I could make it, and for $3.25 I had a 66 pounds worth of sand in the trunk... lol

You should be able to buy it at any gun shop (do they have those in Canada...?), finer sporting goods stores should have it as well.

I am sure they do, and it is a good alternative to sand if you want something a touch heavier and something that won't leak out of small holes if your stitching abilities suffer a little. :confused:

They look nice though. I usually just use my camera bag when I need to add some weight to the tripod (I don't know if it's good or bad that it's heavy enough for that...).

Well, I've used the camera bag in the past too. When I am using the studio head, the Vagabond II battery pack makes a nice weight. It has straps built into the case that let you attach it to the lightstand just above the outstretched legs.

I just thought it a fun and easy project for someone with a few hours, a little sand, material and sewing machine could do for near nothing. I also thought it would be nice to share this as it is something useful for anyone that uses lightstands indoors or outdoors and is VERY affordable.

Getting busted lights and softboxes that tipped over becuase of a breeze sucks. :)
 
Last edited:
for $3.25 I had a 66 pounds worth of sand in the trunk... lol

Yeah - lead would have cost considerably more...lol.


How did you "load" the bags? I assume you didn't just pour some sand in there then throw it up on the sewing machine...
 
How did you "load" the bags? I assume you didn't just pour some sand in there then throw it up on the sewing machine...

Uhhmm... yep! Is my mom good or what! :lol:

Actually, the trick is to not overfill the bags and to use pins to hold it closed. It also helps to have a helper (me) hold the bags at an angle and to raise it maybe a 1/2 inch high so that it all slides smoothly through. I took the weight off and she did the rest. :mrgreen: That is for the inner bag that holds the sand. The outer "skin" is a simple jean material and by that point, the sand bag is sealed and slipped into the pocket of each side of the "saddle bag". Honestly, not one grain of sand escaped during the whole process. Some care had to be taken, of course.

Edit:
What I am probably not explaining properly is the fact that the small bags are really 2 bags in one... the bag that holds the sand and the bag that becomes the outer shell and handle. The larger ones are 2 bigger sand bags placed into a single 14 X 22 bag that is stitched up in the middle so each bag sits in it's own pocket and remains on it's side. Each bag has a small "handle" for ease of grabbing and a offering a way to be secured to the lightstand if needed. Each "outer shell" is also sewn closed, containing the unit into one completed sand bag. I suppose it could easily all be done with one "bag", but this way everything is much stronger and last longer.
 
Last edited:
Well this sounds like a cool project. And I have a friend with a sewing machine. Might have to ask her for some help. Very cool idea Jerry. :D
 
I just throw my Camelbak Classic on my tripod. Sure it probably doesn't help *as* much as these do, but water has a pretty decent weight to it I'd think.
 
I did something simmilar just a few weeks ago.
But we used a food sealer to make the sand bags and then slid them into nylon bags with gromits to hang them.
 
Go Mom! Thanks Jerry, that will be a project for me and my mom to tackle next.
 
Go Mom! Thanks Jerry, that will be a project for me and my mom to tackle next.

Don't forget to give her a hug and nice kiss on the cheek for all her work and do what I did... take her out for a nice lunch and spend a little of what you saved over buying retail made sand bags. :D

Our next DIY project together... a belt pack for holding 3-4 lenses! I have lots of material left over from the sand bags, and saw that something like a SHOOTSAC goes for $180US... which I feel is ridiculous. A little material, some velcro, some sewing, and we have a great product for a few dollars! :D

More to come later!
 
I made 2 of each and the total cost of the project was about $8.25 Canadian, including the pre-dried sand.
So what is that in American dollars, about a buck ninety-five?? :lmao:


Jerry, nice job on the bags. Instead of lead shot, I would suggest BB's. The good old fashion shoot from you BB gun kid kind. Anymore they are cheaper then lead, which is hard to find in my area now since it is outlawed for bird hunting, and steel shot is expensive.

I will offer a thought for the non sewers out there for weights. Go to Wallyworld, Walmart for the uninformed, and buy their 20# ankle weight sets in sporting goods. $14.99 for 40#'s of total weight. They are designed to wrap around wrists, ankles, with two velcro straps, have removable individual weight tubes and easily wrap around legs and the bottom of the center column of a light stand. Once wrapped on they do not fall or slide off.
 
Last edited:
I just throw my Camelbak Classic on my tripod. Sure it probably doesn't help *as* much as these do, but water has a pretty decent weight to it I'd think.

Roughly 2lbs a liter.


(...Closer to 2.2)
 
Last edited:

Most reactions

New Topics

Back
Top