Histogram broken?

Overread

hmm I recognise this place! And some of you!
Staff member
Supporting Member
Joined
May 1, 2008
Messages
25,421
Reaction score
5,000
Location
UK - England
Website
www.deviantart.com
Can others edit my Photos
Photos OK to edit
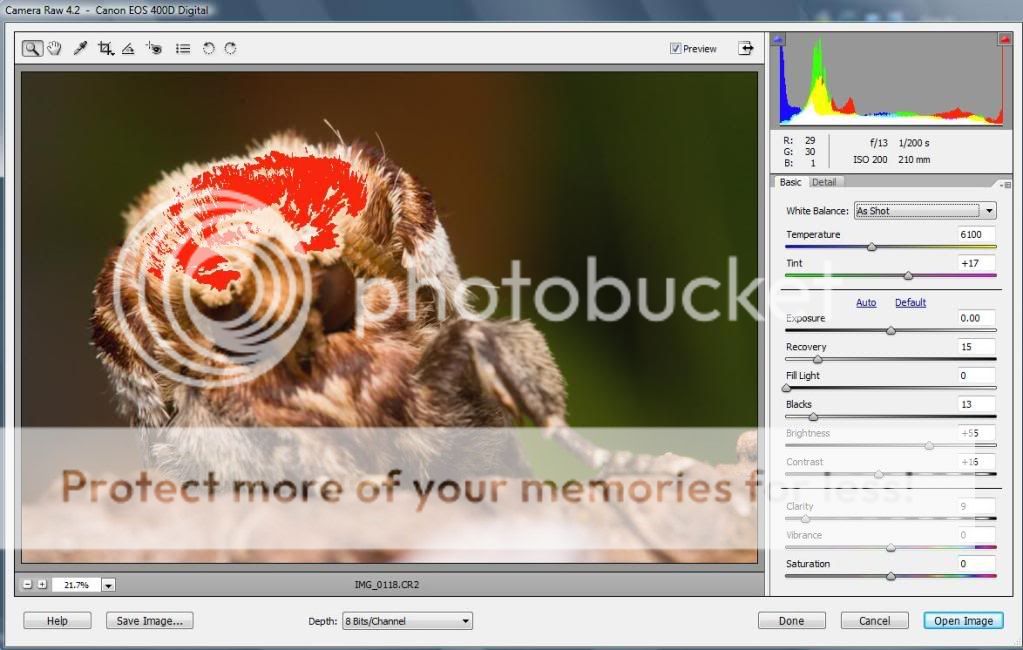
When I shoot I nearly always use the histogram to ensure that I don't have blowouts on my shots - I generally have it set to display RGB colours as well.
However this shot here:
http://www.thephotoforum.com/forum/nature-wildlife/167945-moth-stacked.html#post1624007

shows that there is blowout occuring in the shot in the whites - now in the camera the RGB histogram is not giving me any blowout warnings at all - its this a case that the histgram in my camera is not functioning correctly, or is there a standard editing feature in camera that I should adjust - currently I shoot in RAW so whilst they are not applied to the final image they are applied to the JPEG that is assessed.
Its a worry and a pain for me to have this happen in my work (esp when it happens to 12 stacked shots!)
 
Common sense would tell me that even if you don't have blowout in any of the 3 RGB channels, once you combined all the data for the 'composite' histogram you can get blown highlights. I don't know for sure. Can anybody confrim/infirm this?
 
its might be CZM I am not that good at using it yet - bt still even in the originals its boarderline overexposure I have also had a similar problem with sheep
 
The histogram shows what the settings would be after all adjustments including the final tonal curve being applied to the image. If you are shooting RAW then this curve is not applied and when you get in your editor you may find that nothing is clipped yet.
On top of that creating a histogram is non trivial so whatever function they use to get the RGB values may be different from the lightness value giving your discrepancy.

My advice is turn off the lightness histogram. It's useless anyway if you have access to the RGB one.
 
the thing is garbz I am finding the opposite- I get into RAW editing and large areas of that moth were showing up with overexposure warnings - dispite nothing of the sort in the incamera histogram
its leaving me rather confused and a little worried
 
What areas is the camera saying is overexposed. From looking at the moth, I'm assuming its the tips of the moth's head. As for why its not happening in camera - well that is something isn't it. I have never had this issue happen to me. Perhaps you could take a shot of the in camera historgram and a screen grab of the image editing histogram.
 
I haven't another camera to take a shot of the camera histogram with, but here is how it looks in RAW editing straight out of camera:
e.jpg


also I had another close look at the camera histogram and noticed that it is giving me a red line warning on the red channel chart - however its a single pixel wide and is not causing any overexposure flashes on the main image. So in anything but controld lighting and when I am looking really hard I just know I will miss this channel blowing out every time. It seems such a daft thing to me.

It might be correctable in editing and I am not having as much trouble with other shots from the set in stacking, but its still a pain.
 
From looking at your histogram, it looks like Camera Raw is telling you the reds are blown out. Which essentially means you have a COLOR SHIFT (and not an "overexposure): You still have detail on the moth (in those areas), but the color isn't right.

The fix is easy: simply take it into Photoshop, convert to LAB color space, add a curves adjustment layer, and in the "A" channel, move the Upper Right dot down vertically to take out some of that red. If you have CS4 an easier (and more accurate) method is to simply take the finger with the up/down arrow on it (in the upper left corner), place it over the areas you know have the abundance of red, and drag it down. This is a MUCH easier method to do this, but if you don't have CS4 the previous method works as well.
 
I don't think that elements has lab colourspace as an option :(
I do have Smart Curve which is a curves editing addon (Free) which will let me adjust the red channel only in RGB mode and has a L*A*B mode but then I just have lightness, a*, b* as options.
So would lowering the red line on the far right of the histogram in RGB in curves fix the problem>?
 
Before you even open it, can you eliminate it in CameraRAW? CameraRAW is the same as the in camera histogram. It represents the image after processing. That area may not actually be clipping RAW data. For instance, try taking the colour temperature way down. If it stops clipping the red then you haven't clipped the channel in the RAW and you can process around it.

But often this is nothing to worry about. All channels clipped are an issue. Or causing a visible colour shift is an issue (like in a jungle where green leaves start turning yellow when the green is clipped). Before you posted that screenshot I would have sworn that the clipping was isolated to the purely white areas.

The histogram in the end is just a tool that shows you details about an image. The moth looks excellent regardless of what the histogram says. I am going to guess that if you spend a lot of time processing the clipping out you will simply end up looking worse. But also think of the case of shooting into the sun. Ugly things about clipping are pure white areas with no detail, or unexplainable obvious colour shifts (skin going yellow before clipping). Clipping which does not fall into either of these categories is nothing to worry about.
 
Er, am I missing something, or would just punching up recovery not bring back some of that clipping? >.>
 
No he's not. If one channel is clipped then punching up the recovery will bring it back no questions asked.

The problem is it induces it's best guess at the colour shift. Sometimes it's a godsend, other times it can turn people's faces bright pink. The recovery slider will act on the whole image's bright areas as opposed to just the clipped area that needs fixing.

Ah, phew. My brain was a little addled looking for what could be happening besides colour shift. Perhaps some selective recovery on a selection of the image would lessen the problem of it colour shifting due to basing it's calculations on the entire image?

Still remains good practise to just avoid clipping in the first place, me thinks. Then there's no need for software to make a calculated guess.
 
Well selective recovery would be awesome, except I don't know if it can be done in CameraRAW.

While I am of your opinion that clipping is bad, single channel clipping is nothing to worry about until it creates a notable colour shift.
Looking at Overread's moth again: http://www.thephotoforum.com/forum/nature-wildlife/167945-moth-stacked.html#post1624007 would you know that orange bit on it's forehead is clipped if you weren't told? (good clipping)
Compare it to this one: http://farm3.static.flickr.com/2291/2416196878_ff82a8aca6.jpg Which I took a long time ago before I learnt how to process photos well. In this case the clipping of the red channel has caused a colour shift to yellow which was made worse by crappy post processing. (bad clipping)
 

Most reactions

New Topics

Back
Top