Question about star photography camera settings

Novelectro

TPF Noob!
Joined
May 18, 2016
Messages
20
Reaction score
0
Can others edit my Photos
Photos OK to edit
So it seems that most people recommend settings of around 15-30 second shutter speeds (depending on your focal length) with a wide open or nearly wide open aperture and am ISO of 1600 or 3200. But whenever I try settings in this ballpark, the image seems to be way too bright. Almost like it's daytime. Is this normal and you're just supposed to darken it in post? Or am I missing something?

If I just use an ISO of 100, the sky looks dark and I can see the stars. What gives?
 
If you use iso 100, depending on lighting conditions you will need a a longer shutter speed than 30 sec. You also probably don't want to use wide open aperature, you should use a smaller aperature which also would need longer than 30 sec. shutter (depending on lighting conditions). You will have to use the bulb setting at this point.
 
Maybe I should rephrase.

When I use the most commonly recommended camera settings for star photography, my images look like they are day time images. Is this what the unedited raw file should look like and common practice is to darken it in post? Or am I doing something wrong?
 
Sorry, my response wasn't really very good in regards to your question. There is probably someone else more familiar with star photography that can give you a better answer. However, my best guess is if the image is too bright go with a shorter exposure. I believe the point in the high iso is so you can keep your exposure time down and freeze the stars (no star trails). Was the moon out when you tried the shot? I'm wanting to try this as well when I can get to a good location without much light pollution.
 
How to photograph the milky way and/or star fields.

To get pinpoint stars, use the “500 rule,” which calls for you to divide 500 by the focal length of the lens you’re using. So, if you have a 24mm lens on a full-frame camera, you will set your shutter speed to 20 sec. (500/24 = 20.83). If you’re working with a crop sensor camera be sure to account for the crop factor (typically 1.5 for Nikon and Sony, 1.6 for Canon). As an example, using the same 24mm lens on a Nikon crop, you’d end up with an effective focal length of 36mm (24×1.5 = 36). Applying the 500 rule will yield a shutter speed of 13 sec. (500/36 = 13.89).
 
Sounds like you're on the right track. Wide open aperture is good. 1600-3200 ISO is good. If your images are coming out too bright try lowering your ISO and/or shutter speed. As for the 500 rule mentioned above, the goal is to get pinpoint stars. Since the stars are always moving and you're using longer shutter speeds, the longer your focal length, the more those pinpoints will appear as streaks. So shorter shutter speed = better pinpoint stars, lower ISO = less noise in image. Your image out of the camera should look as close as possible to your desired final result, not daytime. Post processing is a must.

In this one I didn't follow the 'rules'. I could have used a longer shutter speed. But you get the idea.

EDIT: I always feel very small and insignificant when I look at this one. It's a very small section of sky.

1 second @ f2.8
70mm
ISO 3200

UNEDITED

_MG_2416-3.jpg


EDITED

_MG_2416-2.jpg
 
Other than the above, It also all depends upon where you are trying to do it.

For instance there may be a lot of (a) air and (b) light pollution.

(b) Light pollution any light outside - such as from buildings, street lights, cars driving down the road, etc. Also, always make sure your viewfinder is closed or covered as that lets light to the sensor too.

Light pollution can add some or significant light to your sensor when doing night time photography. This can make stars just disappear as you can't get a good shot without to much exposure from the surrounding lights.

(a) Air pollution may be blocking stars too. You may not see anything but it's there.

Thus it's also recommended to go to a "dark park" if you ever get a chance. The view from those places is just amazing. Of course driving, say an hour away from a major city can have significant results too.

These factors can have some limitations on your exposure ability and what you can see versus from another area.
 
I use the following generic settings in South Florida, ymmv.

18mm effectively 27mm
18 seconds
Wide open
ISO 3200 if there is the slightest cloud cover over the city areas, if not I'll go 6400.

Check a website, www.lonelyspeck.com if you want some more info/tips.

Here's what I meant by cloud cover, this night there were heavy clouds to the East which amplifies the glow of the sodium lights creating the red glow.

812ff9b526bc4e5830b59ed5900bce51.jpg
 
In astrophotography there typically is an optimal ISO but it depends on the camera model. Increasing the ISO is effectively just an amplification process from the sensor. But this amplifies both the "signal" (data you want) and the "noise" (data you don't want). On my 60Da, the "optimal" ISO turns out to be ISO 1600. On my 5D II it turns out the optimal ISO is 1600. I haven't tested my 5D III (it may still be 1600 or it may be 3200). Regardless, you can use any ISO you want and sometimes the constraints of the shot will force you to use a different ISO.

If the camera is on a stationary tripod (not tracking) AND if you do not want star "trails" (elongation of the stars due to the diurnal motion of the Earth causing the stars to smear as the Earth spins) THEN you should divide 600 by the focal length of your lens if using a full frame camera. Otherwise divide 600 by your crop factor and then divide it by the focal length of your lens (e.g. a 1.6x crop factor works out to 375. A 1.5x crop factor works out to 400).

E.g. to use a 10mm lens on a Canon APS-C sensor camera body (1.6x crop factor) then you'd do 600 ÷ 1.6 = 375. 375 ÷ 10mm = 37.5 (seconds). So you can take a 37.5 second exposure and not have star trails. Some photographers will use a smaller value just to be safe (e.g. instead of 600, they might use 500 as the starting value.) You can quickly see how a short focal length lens gets you a longer exposure time possible... a long lens would be a problem. For example, with a 100mm lens you'd only get 3.75 seconds.

You can shoot MUCH MUCH longer if you have a "tracking" head. I use something called a Losmandy "StarLapse" ($695). You can get less expensive systems that are under $500. For example the iOptron "SkyTracker" is $299 or the Sky Watcher "Star Adventurer" is also $299, but I'd highly recommend also getting their equatorial wedge base ($65) and I'd also add the $30 counterweight bar -- bringing the total to about $400 (but it would be considerable better than the $299 SkyTracker or base-version of the Star Adventurer. Being able to "neutral balance" the camera & lens really helps take stress off the gears, reduces power consumption, and improves the result.

The tracking head is aligned to point to the Earth's celestial pole (you can point the camera in any direction... only the rotation axis on the mount has to be pointed at the pole). This way as the Earth spins from west to east, the tracking head spins from east to west at example the same rate... "fixing" the object you plan to photograph in the sky without it moving during a long exposure.

Here's an example... this was shot using a Canon 60Da ("a" is for "astronomy" and the camera is modified by Canon to be significantly more sensitive to red in the deep-space nebulae then a stock 60D (or any DSLR intended for terrestrial use)) and a 135mm f/2 lens and ISO 800. This image is the result of stacking several exposures -- the longest of which are 2 minutes in this particular shot... but I've gone 8 minutes with this same rig and had no tracking issues at all (no elongation of any stars).

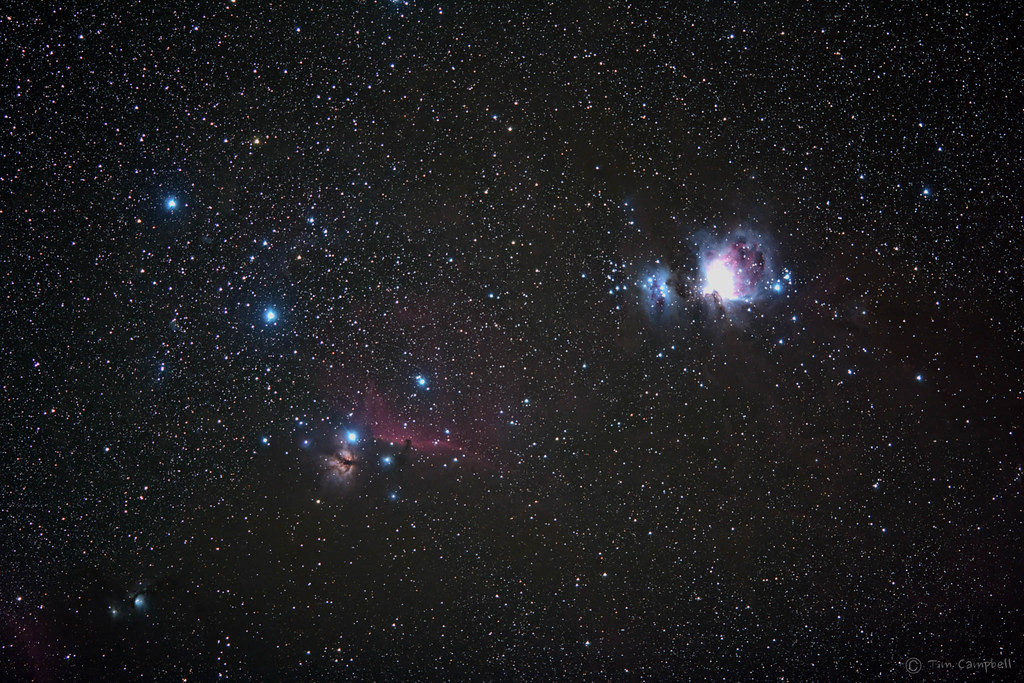
Lower Region of Orion by Tim Campbell, on Flickr

This image contains the Orion nebula (M42) the running-man nebula, the horse head nebula, the flame nebula, and a reflection nebula called M78 -- all located in the lower half of Orion.

When Orion comes back around next winter I plan to shoot more data at faster exposures so I can get better detail in the core of M42 (the exposures that are long enough to get everything else are too long for the core.)
 
I think you'd find that most stunning photos of the night sky looked a little bit overexposed out of the camera and then the blacks slider in lightroom was used to darken the sky.

this leaves very little noise in the dark sections while leaving the stars and other bright objects brilliant and produces awesome contrast.

It's sort of like "exposing to the right", you're always better off to be darkening in post than lightening (assuming you haven't blown anything out)
 

Most reactions

Back
Top