- Joined
- Jul 14, 2011
- Messages
- 4,173
- Reaction score
- 2,551
- Can others edit my Photos
- Photos OK to edit
I put this guide together for the purpose of helping those new to High Dynamic Range (HDR) photography.
I. Why HDR?
IV. HDR Odds and Ends
V. Conclusion
I. Why HDR?
Defining HDR
Using HDR allows you to capture the full dynamic range of a scene. High dynamic range (HDR) images enable photographers to record a greater range of tonal detail than a camera could capture in a single photo. High Dynamic Range Photography, CIC. In short, it allows you to capture a scene as you would see it. It allows you to capture highlight and shadow detail that simply would not be possible with one exposure.
"High dynamic range imaging (HDRI or HDR) is a set of methods used in image processing, computer graphics, and photography, to allow a greater dynamic range between the lightest and darkest areas of an image than current standard digital imaging methods or photographic methods. This wide dynamic range allows HDR images to represent more accurately the range of intensity levels found in real scenes, ranging from direct sunlight to faint starlight, and is often captured by way of a plurality of differently exposed pictures of the same subject matter." -- Wiki.
How camera sensors work, limitations
When people ask me why HDR is necessary and/or how it works, I simply have them pull out their phones and open their camera app. I have them point their camera directly at a light source. When they do, I point out how the camera sensor adjusts for the bright light, essentially making everything else in the scene dark. The opposite occurs when theres a bright source of light and youre exposing for the scene. I pulled out my cell phone camera (you can do the same) and pointed it directly at an overhead light above me to illustrate this concept:

As you can see, when the sensor is pointed directly at the light, the sensor exposes correctly to give detail in the light source, but the surrounding areas are completely dark with no detail.
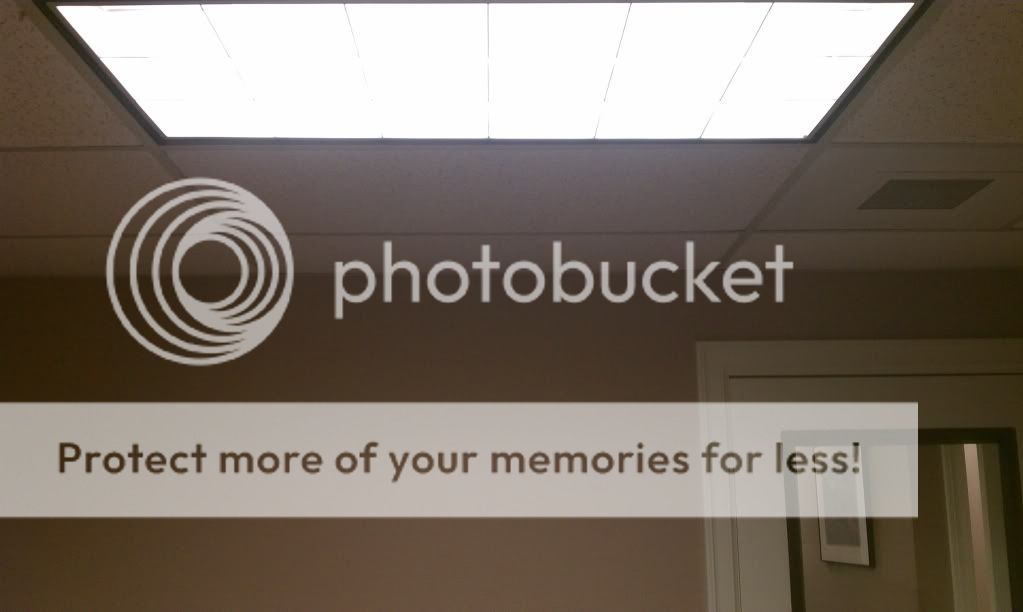
When exposing for the room and not specifically the light, the details of the light are lost. The area where the light is coming from is blown out entirely.
If you were standing in the room, your eyes would have no problem seeing all of this. Youd see all the detail in the overhead light, as well as the ambient light. The camera sensors dynamic range is much more limited than our eyes, which is why there is a need to use HDR to combine multiple exposures to recreate what the eye sees in a HDR image[SUP]1[/SUP].
How the human eye works
The human eye has the amazing ability to sort an incredibly huge dynamic range. In addition to straight-up light sensitivity the dynamic range of the human eye is absolutely astonishingJan Kamps, Pixiq.
Dynamic range* is one area where the eye is often seen as having a huge advantage. If we were to consider situations where our pupil opens and closes for different brightness regions, then yes, our eyes far surpass the capabilities of a single camera image (and can have a range exceeding 24 f-stops).-- Cameras vs. The Human Eye, CIC.
It is estimated that camera sensors are limited to about 8-11 fstops.
**1.) There are other methods for capturing the full dynamic range of a scene available such as ND Grad filters and the recent Nikon D800 (the DR king) which has amazing shadow recovery (up to 5 stops) see the photo and the TPF discussion.
II. What HDR program should you use?
The most frequently asked question in the HDR subsection on this forum is what HDR program is the best? There are many HDR programs out there and it can be a bit of a daunting task to figure out which one(s) to use. A lot of them handle HDR very well. Most of these programs use similar mathematical algorithms to combine exposures. What ultimately separates the good programs from the great is the ability for the user to have control over each step of the process giving them ultimate control of the resulting image.
PhotomatixThe best all around HDR program:
Ive personally used all the programs that Ill discuss here and have found the best program for unprecedented control over HDR images from start to finish is Photomatix by HDRsoft. Photomatix offers unique advantages to other software including advanced alignment, de-ghosting, useful sliders, and extensive compression/fusion/and tone mapping control.
Alignment
Photomatix alignment algorithms are exceptional. You have the option to auto-align by matching features, which is really nice if your tripod isnt sturdy or you shoot handheld. You can also choose to align vertically and horizontally, when shooting off a tripod.

Untitled by majeedbadizadegan, on Flickr
De-ghosting
Photomatix selective de-ghosting is the best Ive seen. Before the HDR file is created, you can select areas of a photo where theres ghosting (such as moving people, clouds, water) and you have the option to select which exposure to use for that area of the image. In the images below, I selected the water with a longer exposure to give the water a smooth look.
Before

Deghosting by majeedbadizadegan, on Flickr
After
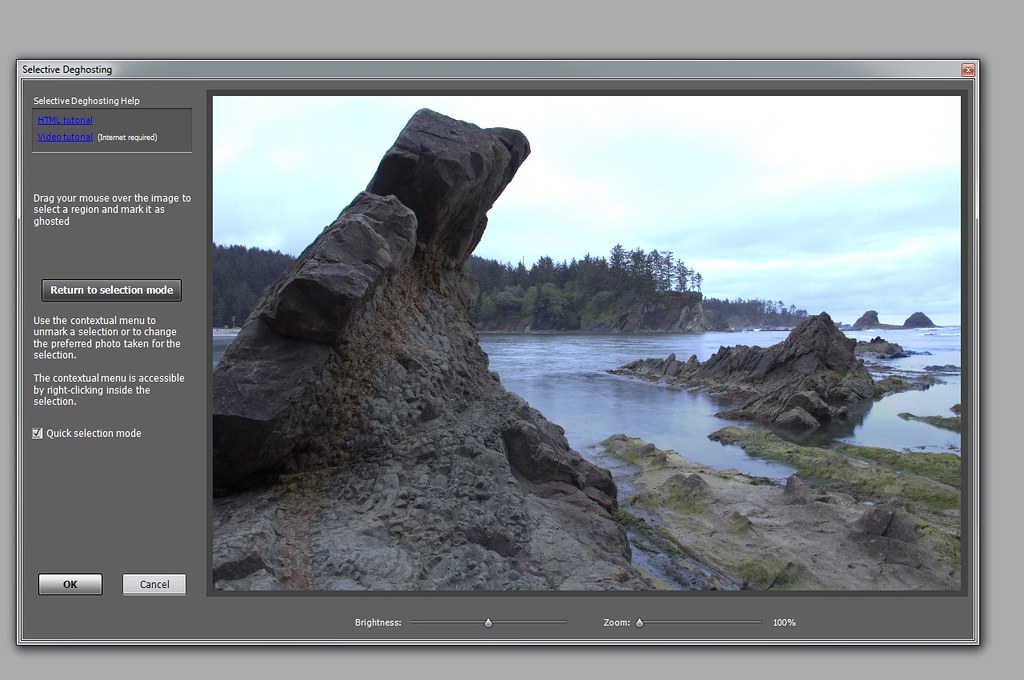
Deghosted by majeedbadizadegan, on Flickr
Advanced Sliders
There are a plethora of advanced sliders to help you achieve the look you are going for. This gives you creative license to do any number of things with your image once it is in the Photomatix adjustments phase.

Sliders and Options by majeedbadizadegan, on Flickr
You can drag and drop images directly into Photomatix for processing
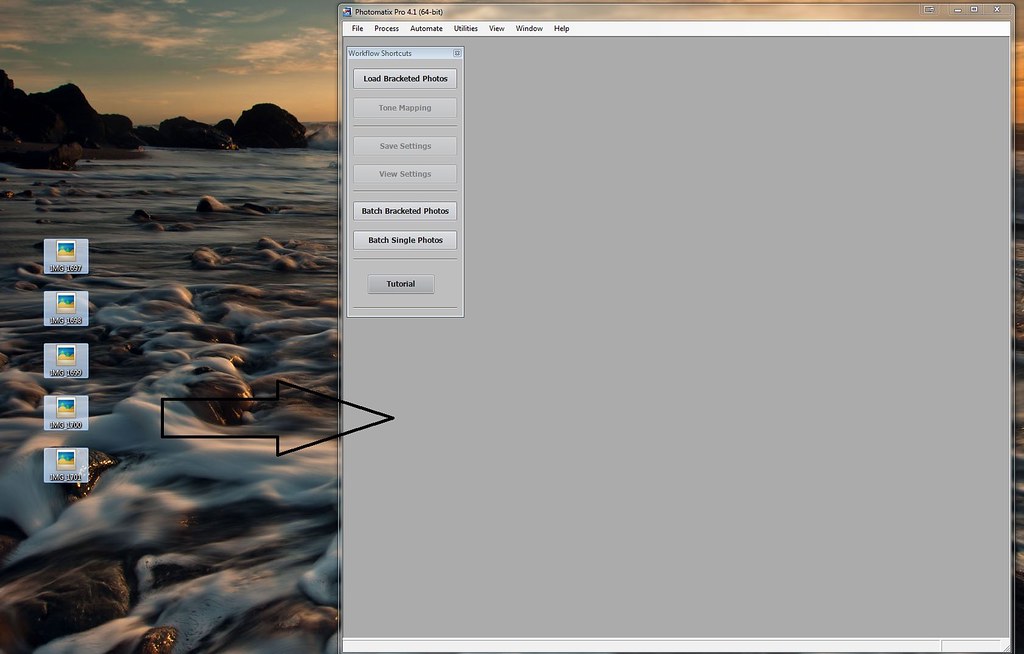
Drag and Drop by majeedbadizadegan, on Flickr
Adobe CS5 Merge to HDR Pro
Adobe has its own version of HDR merging software called Merge to HDR Pro which is built into CS5. Check out Cambridge in Color full tutorial on Merge to HDR Pro software here.
There are a number of differences between the programs. Photomatix is dedicated HDR software, whereas Merge to HDR Pro is software built into CS5 which is a convenient but lacking option for serious HDR shooters. It just isnt quite up to snuff in a lot of areas. I didnt mind using Merge to HDR Pro when I first started shooting HDR, but found the software lacking in its handling of ghosting, alignment and Halo-ing as compared to Photomatix. The sliders seem touchy as well, and even small shifts can create unwanted artifacts.
Initial Merging

Merget to HDR Pro by majeedbadizadegan, on Flickr
Resulting image with very few tweaks (notice halo-ing around the tip of the foreground rocks).
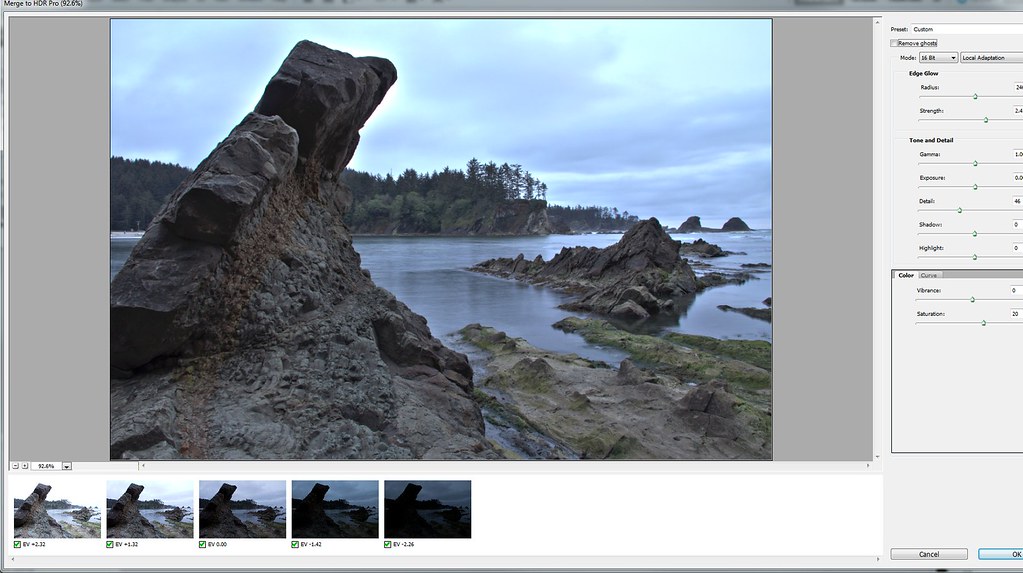
HDR Pro Merge by majeedbadizadegan, on Flickr
Also notice in the second image that there is a box to check for removing ghosting. That's it! A box to check. And trust me, checking that box does not always get the job done, especially if there's movement in the scene. Deghosting is nothing like Photomatix which gives you full control with selective de-ghosting.
Nik Software HDR Efex Pro.
I like lots of the software from Nik SoftwareI use Viveza 2, Color Efex Pro, and Silver Efex all the time. I highly recommend all of them. But I havent used HDR Efex pro enough to be good at it and figure out all its quirks. Heres the same HDR stack dumped into HDR Efex Pro I wasnt too pleased with the outcome, but again, havent used the program a ton and could probably get better results if I had more experience with the program:
Initial loading

HDR Efex Pro by majeedbadizadegan, on Flickr
Resulting default is dark and noisy with some banding in the sky

HDR Efex by majeedbadizadegan, on Flickr
I also noticed with HDR efex pro that you must manually select the EV spacing before the expsoures are aligned. Photomatix and Merge to HDR Pro automatically sorted the EV spacing.
Luminance HDR
For free HDR processing, theres Luminance HDR. I dumped the same images in. Ive never produced one usable image from Luminance, but I havent tried that hard either. I didnt like how it handled these exposures. But if youre on a budget and want to try something free, maybe you can get better results!

Luminance HDR by majeedbadizadegan, on Flickr
Really peculiar artifacting all over the image.

Luminance HDR by majeedbadizadegan, on Flickr
There are other notable paid programs such as machinery HDR.
III. How to capture HDR photos in your camera
Manual Mode
You can capture HDR with manual mode in your camera. It is best to use manual mode at scenes where you are shooting non-moving objects and you have a sturdy tripod.
Its important to take a couple precautionary steps when shooting HDR manually
Heres a theoretical example of my camera settings when I manually bracket at a scene with 7 stops of dynamic range. You bracket the shots by changing the shutter speed. I usually work in 1 stop increments
Auto Exposure Bracketing
Bracketing exposures is an incredibly handy feature for the HDR shooter. Being able to shoot of a deep bracket (7-9 stops) with one click of the shutter is an extremely convenient feature. Why? Deep bracketing is the difference between power windows and manual windows Both get the job done, but power windows are surrrrrrre nice.
To understand why deep AEB is critical to the HDR shooter, its important to look at the alternative to AEB: bracketing manually. There are two reasons why bracketing manually isnt always desirable.
How deep is the bracketing in your camera? Check here to find out. So you followed that link, and you've found your camera has AEB, and youd like to use it. Check your cameras manual to learn how to enable the feature. When setting up AEB, I keep my 0EV at the best compromise of the highlights and shadows. Its usually best practice to bracket in 1 stop increments, but if thats not adequate to capture the full dynamic range, you can always bracket the highlights and the shadows for 6 stops of total DR information. Ive also bracketed handheld at -2,0,+2. Its not best practice, but it can get the job done.
Most Canon cameras besides the 1D series and the 5d Mark III only allow for 3 stops of AEB. Conversely, many of the middle range to high end Nikon cameras allow for deeper bracketing. Here is a video of Trey Ratcliff shooting Crater Lake where he demonstrates the usefulness of bracketing and provides some good discussion of HDR in general.
IV. HDR Odds and Ends
Tone mapping vs. HDR
A lot of people confuse tone mapping with HDR. They are not the same thing. The confusion probably comes from the fact that tone mapping is a part of the HDR process, so tone mapped single exposure photos have the "HDR look" to them. However, a tone mapped photo is not an HDR photo. Tone mapping is a technique used in image processing and computer graphics to map one set of colors to another in order to approximate the appearance of high dynamic range images in a medium that has a more limited dynamic range. Wiki.
A single exposure of a tone mapped image does not have the dynamic range of an image with multiple exposures.
Creationist vs. Purists
HDR photographers usually fall somewhere in between the creationist (those who push HDR to create surreal and/or unrealistic images) and the purist (those who take a more subtle approach and whose photos yield more natural outcomes).
I gravitate towards the purist camp when it comes to HDR.
I use HDR mainly as a tool to capture the full dynamic range of a given scene, and typically gravitate more towards photo-realistic processing. However, I do see the benefit and enjoy the extra punch creative processing can give to a photograph, and will sometimes employ these methods in my own work.
V. Conclusion
No matter which side of the fence you fall on, whether you are a creationist or purist, its critical not to allow HDR to come before the other important fundamental concepts of photography such as exposure and composition. The old saying goes "Don't put the horse before the cart". Don't put HDR before your understanding of photography. HDR is a tool in your toolbox to enhance your photography, but it should not substitute for the basics of photography. After all, a poorly composed and exposed picture is still a poorly composed and exposed picture even after HDR treatment.
Thanks for reading. I hope you may find some of this information helpful on some level. HDR is an exciting branch of photography that opens up the ability for the photographer to capture photographs like never before. HDR allows you to capture the full dynamic range of a scene and emphasize textures, contrast, colors, depth, and light in a photo like never before. Most of all, it's fun!
I. Why HDR?
- Definition
- How camera sensors work, limitations
- How the human eye works
II. What HDR programs should you use?- How camera sensors work, limitations
- How the human eye works
- Photomatix: impressions, in-depth review of interface
- CS5 Merge to HDR pro: impressions, brief look at interface
- Nik Software HDR Efex Pro: impressions, brief look at interface
- Luminance HDR: a brief glance
III. How to capture HDR photos in your camera- CS5 Merge to HDR pro: impressions, brief look at interface
- Nik Software HDR Efex Pro: impressions, brief look at interface
- Luminance HDR: a brief glance
- Manual mode
- Auto Exposure Bracketing
- Auto Exposure Bracketing
IV. HDR Odds and Ends
- Tone mapping vs HDR
- Purists vs. Creationists
- Purists vs. Creationists
V. Conclusion
I. Why HDR?
Defining HDR
Using HDR allows you to capture the full dynamic range of a scene. High dynamic range (HDR) images enable photographers to record a greater range of tonal detail than a camera could capture in a single photo. High Dynamic Range Photography, CIC. In short, it allows you to capture a scene as you would see it. It allows you to capture highlight and shadow detail that simply would not be possible with one exposure.
"High dynamic range imaging (HDRI or HDR) is a set of methods used in image processing, computer graphics, and photography, to allow a greater dynamic range between the lightest and darkest areas of an image than current standard digital imaging methods or photographic methods. This wide dynamic range allows HDR images to represent more accurately the range of intensity levels found in real scenes, ranging from direct sunlight to faint starlight, and is often captured by way of a plurality of differently exposed pictures of the same subject matter." -- Wiki.
How camera sensors work, limitations
When people ask me why HDR is necessary and/or how it works, I simply have them pull out their phones and open their camera app. I have them point their camera directly at a light source. When they do, I point out how the camera sensor adjusts for the bright light, essentially making everything else in the scene dark. The opposite occurs when theres a bright source of light and youre exposing for the scene. I pulled out my cell phone camera (you can do the same) and pointed it directly at an overhead light above me to illustrate this concept:
As you can see, when the sensor is pointed directly at the light, the sensor exposes correctly to give detail in the light source, but the surrounding areas are completely dark with no detail.
When exposing for the room and not specifically the light, the details of the light are lost. The area where the light is coming from is blown out entirely.
If you were standing in the room, your eyes would have no problem seeing all of this. Youd see all the detail in the overhead light, as well as the ambient light. The camera sensors dynamic range is much more limited than our eyes, which is why there is a need to use HDR to combine multiple exposures to recreate what the eye sees in a HDR image[SUP]1[/SUP].
How the human eye works
The human eye has the amazing ability to sort an incredibly huge dynamic range. In addition to straight-up light sensitivity the dynamic range of the human eye is absolutely astonishingJan Kamps, Pixiq.
Dynamic range* is one area where the eye is often seen as having a huge advantage. If we were to consider situations where our pupil opens and closes for different brightness regions, then yes, our eyes far surpass the capabilities of a single camera image (and can have a range exceeding 24 f-stops).-- Cameras vs. The Human Eye, CIC.
It is estimated that camera sensors are limited to about 8-11 fstops.
**1.) There are other methods for capturing the full dynamic range of a scene available such as ND Grad filters and the recent Nikon D800 (the DR king) which has amazing shadow recovery (up to 5 stops) see the photo and the TPF discussion.
II. What HDR program should you use?
The most frequently asked question in the HDR subsection on this forum is what HDR program is the best? There are many HDR programs out there and it can be a bit of a daunting task to figure out which one(s) to use. A lot of them handle HDR very well. Most of these programs use similar mathematical algorithms to combine exposures. What ultimately separates the good programs from the great is the ability for the user to have control over each step of the process giving them ultimate control of the resulting image.
PhotomatixThe best all around HDR program:
Ive personally used all the programs that Ill discuss here and have found the best program for unprecedented control over HDR images from start to finish is Photomatix by HDRsoft. Photomatix offers unique advantages to other software including advanced alignment, de-ghosting, useful sliders, and extensive compression/fusion/and tone mapping control.
Alignment
Photomatix alignment algorithms are exceptional. You have the option to auto-align by matching features, which is really nice if your tripod isnt sturdy or you shoot handheld. You can also choose to align vertically and horizontally, when shooting off a tripod.
Untitled by majeedbadizadegan, on Flickr
De-ghosting
Photomatix selective de-ghosting is the best Ive seen. Before the HDR file is created, you can select areas of a photo where theres ghosting (such as moving people, clouds, water) and you have the option to select which exposure to use for that area of the image. In the images below, I selected the water with a longer exposure to give the water a smooth look.
Before
Deghosting by majeedbadizadegan, on Flickr
After
Deghosted by majeedbadizadegan, on Flickr
Advanced Sliders
There are a plethora of advanced sliders to help you achieve the look you are going for. This gives you creative license to do any number of things with your image once it is in the Photomatix adjustments phase.
Sliders and Options by majeedbadizadegan, on Flickr
You can drag and drop images directly into Photomatix for processing
Drag and Drop by majeedbadizadegan, on Flickr
Adobe CS5 Merge to HDR Pro
Adobe has its own version of HDR merging software called Merge to HDR Pro which is built into CS5. Check out Cambridge in Color full tutorial on Merge to HDR Pro software here.
There are a number of differences between the programs. Photomatix is dedicated HDR software, whereas Merge to HDR Pro is software built into CS5 which is a convenient but lacking option for serious HDR shooters. It just isnt quite up to snuff in a lot of areas. I didnt mind using Merge to HDR Pro when I first started shooting HDR, but found the software lacking in its handling of ghosting, alignment and Halo-ing as compared to Photomatix. The sliders seem touchy as well, and even small shifts can create unwanted artifacts.
Initial Merging
Merget to HDR Pro by majeedbadizadegan, on Flickr
Resulting image with very few tweaks (notice halo-ing around the tip of the foreground rocks).
HDR Pro Merge by majeedbadizadegan, on Flickr
Also notice in the second image that there is a box to check for removing ghosting. That's it! A box to check. And trust me, checking that box does not always get the job done, especially if there's movement in the scene. Deghosting is nothing like Photomatix which gives you full control with selective de-ghosting.
Nik Software HDR Efex Pro.
I like lots of the software from Nik SoftwareI use Viveza 2, Color Efex Pro, and Silver Efex all the time. I highly recommend all of them. But I havent used HDR Efex pro enough to be good at it and figure out all its quirks. Heres the same HDR stack dumped into HDR Efex Pro I wasnt too pleased with the outcome, but again, havent used the program a ton and could probably get better results if I had more experience with the program:
Initial loading
HDR Efex Pro by majeedbadizadegan, on Flickr
Resulting default is dark and noisy with some banding in the sky
HDR Efex by majeedbadizadegan, on Flickr
I also noticed with HDR efex pro that you must manually select the EV spacing before the expsoures are aligned. Photomatix and Merge to HDR Pro automatically sorted the EV spacing.
Luminance HDR
For free HDR processing, theres Luminance HDR. I dumped the same images in. Ive never produced one usable image from Luminance, but I havent tried that hard either. I didnt like how it handled these exposures. But if youre on a budget and want to try something free, maybe you can get better results!
Luminance HDR by majeedbadizadegan, on Flickr
Really peculiar artifacting all over the image.
Luminance HDR by majeedbadizadegan, on Flickr
There are other notable paid programs such as machinery HDR.
III. How to capture HDR photos in your camera
Manual Mode
You can capture HDR with manual mode in your camera. It is best to use manual mode at scenes where you are shooting non-moving objects and you have a sturdy tripod.
Its important to take a couple precautionary steps when shooting HDR manually
- Fix your aperture, and leave it alone. You dont want DOF to be changing between shots
- Lockup your mirror and/or use a self-timer for each shot so there is no unintentional shake that will blur your exposure. If you have one, use a remote shutter release
- Shoot off a sturdy tripod
- Shoot scenes that dont have large amount of movement
Heres a theoretical example of my camera settings when I manually bracket at a scene with 7 stops of dynamic range. You bracket the shots by changing the shutter speed. I usually work in 1 stop increments
EXP 1: Aperture f/8; Shutter speed 1/8; ISO: 100; +3EV; Exposing for the shadows (longest exposure)
EXP 2: Aperture f/8; Shutter speed 1/16; ISO: 100; +2EV
EXP 3: Aperture f/8; Shutter speed 1/30; ISO: 100; +1EV
EXP 4: Aperture f/8; Shutter speed 1/60; ISO: 100; 0EV; this is the middle of the bracket, the best compromise between shadows and highlights
EXP 5: Aperture f/8; Shutter speed 1/120; ISO: 100; -1EV
EXP 6: Aperture f/8; Shutter speed 1/240; ISO: 100; -2EV
EXP 7: Aperture f/8; Shutter speed 1/480; ISO: 100; Exposure for the brightest highlights.
Auto Exposure Bracketing
Bracketing exposures is an incredibly handy feature for the HDR shooter. Being able to shoot of a deep bracket (7-9 stops) with one click of the shutter is an extremely convenient feature. Why? Deep bracketing is the difference between power windows and manual windows Both get the job done, but power windows are surrrrrrre nice.
To understand why deep AEB is critical to the HDR shooter, its important to look at the alternative to AEB: bracketing manually. There are two reasons why bracketing manually isnt always desirable.
- you are adding duration between shots which can cause problematic ghosting for scenes with movement (water, people, clouds)
- you risk moving the camera which can cause alignment issues (especially if your tripod is not rock solid, or you have a tendency to bump your camera when fidgeting with dials like me)
How deep is the bracketing in your camera? Check here to find out. So you followed that link, and you've found your camera has AEB, and youd like to use it. Check your cameras manual to learn how to enable the feature. When setting up AEB, I keep my 0EV at the best compromise of the highlights and shadows. Its usually best practice to bracket in 1 stop increments, but if thats not adequate to capture the full dynamic range, you can always bracket the highlights and the shadows for 6 stops of total DR information. Ive also bracketed handheld at -2,0,+2. Its not best practice, but it can get the job done.
Most Canon cameras besides the 1D series and the 5d Mark III only allow for 3 stops of AEB. Conversely, many of the middle range to high end Nikon cameras allow for deeper bracketing. Here is a video of Trey Ratcliff shooting Crater Lake where he demonstrates the usefulness of bracketing and provides some good discussion of HDR in general.
IV. HDR Odds and Ends
Tone mapping vs. HDR
A lot of people confuse tone mapping with HDR. They are not the same thing. The confusion probably comes from the fact that tone mapping is a part of the HDR process, so tone mapped single exposure photos have the "HDR look" to them. However, a tone mapped photo is not an HDR photo. Tone mapping is a technique used in image processing and computer graphics to map one set of colors to another in order to approximate the appearance of high dynamic range images in a medium that has a more limited dynamic range. Wiki.
A single exposure of a tone mapped image does not have the dynamic range of an image with multiple exposures.
Creationist vs. Purists
HDR photographers usually fall somewhere in between the creationist (those who push HDR to create surreal and/or unrealistic images) and the purist (those who take a more subtle approach and whose photos yield more natural outcomes).
I gravitate towards the purist camp when it comes to HDR.
I use HDR mainly as a tool to capture the full dynamic range of a given scene, and typically gravitate more towards photo-realistic processing. However, I do see the benefit and enjoy the extra punch creative processing can give to a photograph, and will sometimes employ these methods in my own work.
V. Conclusion
No matter which side of the fence you fall on, whether you are a creationist or purist, its critical not to allow HDR to come before the other important fundamental concepts of photography such as exposure and composition. The old saying goes "Don't put the horse before the cart". Don't put HDR before your understanding of photography. HDR is a tool in your toolbox to enhance your photography, but it should not substitute for the basics of photography. After all, a poorly composed and exposed picture is still a poorly composed and exposed picture even after HDR treatment.
Thanks for reading. I hope you may find some of this information helpful on some level. HDR is an exciting branch of photography that opens up the ability for the photographer to capture photographs like never before. HDR allows you to capture the full dynamic range of a scene and emphasize textures, contrast, colors, depth, and light in a photo like never before. Most of all, it's fun!
Last edited by a moderator:
") You definitely captured the fine points of HDR; and your reviews of the tools available for it is really fantastic! I only just switched from Photoshop to Photomatix for my HDR processing and I couldn't agree more! Absolutely fantastic!
You definitely captured the fine points of HDR; and your reviews of the tools available for it is really fantastic! I only just switched from Photoshop to Photomatix for my HDR processing and I couldn't agree more! Absolutely fantastic!


