Navigation
Install the app
How to install the app on iOS
Follow along with the video below to see how to install our site as a web app on your home screen.

Note: This feature currently requires accessing the site using the built-in Safari browser.
More options
You are using an out of date browser. It may not display this or other websites correctly.
You should upgrade or use an alternative browser.
You should upgrade or use an alternative browser.
A Day at the Zoo!
- Thread starter Milo_Azar
- Start date


Jayms
TPF Noob!
- Joined
- May 10, 2010
- Messages
- 16
- Reaction score
- 0
- Location
- New York
- Can others edit my Photos
- Photos OK to edit
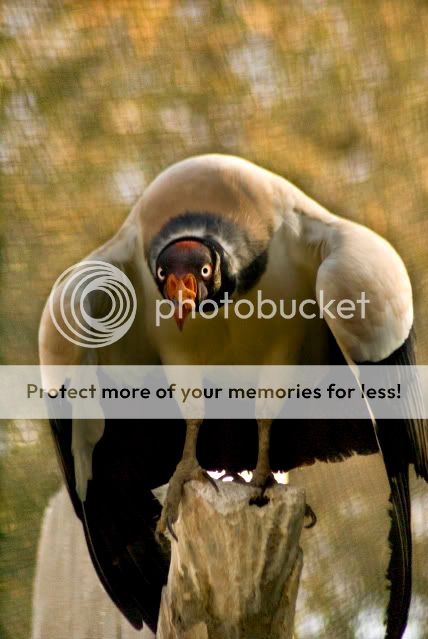
Wow...that first shot blew me away, the bird is dangerous") - followed by the lion! The textures are touchable, the colors are superb and the lighting is very dramatic, particularly on the lion. Great shoter.
- followed by the lion! The textures are touchable, the colors are superb and the lighting is very dramatic, particularly on the lion. Great shoter.
- followed by the lion! The textures are touchable, the colors are superb and the lighting is very dramatic, particularly on the lion. Great shoter.
OP
OP
Milo_Azar
TPF Noob!
- Joined
- May 9, 2010
- Messages
- 9
- Reaction score
- 0
- Location
- Arizona
- Can others edit my Photos
- Photos NOT OK to edit
Wow...that first shot blew me away, the bird is dangerous
Thank you Very much! I'm still learning how to touch up the photos what are some recommendations you can give for texture? I got pretty lucky with that first shot, got there right before he took off! Glad you enjoyed And Thank you!
Jason
- Joined
- May 1, 2008
- Messages
- 25,418
- Reaction score
- 4,999
- Location
- UK - England
- Website
- www.deviantart.com
- Can others edit my Photos
- Photos OK to edit
It looks like it was quite an overcast day (cloudy) as far as lighting went - this has meant that you get nice soft light and subjects like the tigers and birds are not showing bright glaring overexposed hotspots on their fur - however its also meant that you've had to up your ISO often to 800 to get a fast enough shutter speed - whilst also having your aperture wide open (f5.6 for a variable zoom at the long end which I what I assume you were using) which has left you with less depth to work with in each shot.
My first feeling though is that quite a few shots have a colour haze over them - I would attribute this to probably shooting through glass or general shooting. If you ever approach RAW processing and shooting adjusting the white balance yourself can help overcome this problem (unless you get a really god evening/morning sunny cast that you want to keep of course).
At it stands your best friend is going to be levels in editing. Even using a basic editing package you should have a levels tool option and using this you can lose the haze. You will have to open up the levels tool and then there should be 3 eyedrop tools somewhere on it - select the blacks dropper (often the one on the far left) and click a spot in teh shot that is supposed to be pure black. This might also darken the shot a bit.
I used this on the following two of your shots to get:
I also used a method called highpass sharpening to add some "punch" and contrast to both images.
In photoshop elements (or any editor that has an unsharpen mask) its the following:
Enhance (from the top bar menu) - Unsharpen mask
With the settings:
Amount : set to a level that you like based on its effect on the shot (this is the last setting you set and is really down to personal preference - I used low values of around 18ish for both these shots)
Radius - 250
Threshold - 4
I would also add the following two stages to the fullsized versions that you have (and that I didn't do to the above shots)
A noise reduction move:
Filters - noise - reduce noise
Strength 10
Preserve details 95%
Reduce Colour noise 24%
And finish with a regular sharpening (again on the fullsized images)
Unsharpen mask with the following settings
Amount - again you choose though do go higher to around 100% or greater = but keep an eye on the 100% crop view to make sure its not getting noisy/grainy
Radius - 0.8
Threshold - 4
Resize and then sharpen with the unsharpen mask again before uploading to the net (note you will end up using a smaller and different amount as you will need far less sharpening for this stage)
Note the above is a common set of values and processes that I follow and better understanding and use of each tool can deliver better results - this is a good starting point however.
OP
OP
Milo_Azar
TPF Noob!
- Joined
- May 9, 2010
- Messages
- 9
- Reaction score
- 0
- Location
- Arizona
- Can others edit my Photos
- Photos NOT OK to edit
Thank You so much for your feedback! I am new to this whole photo editing thing so any and all advice is greatly appreciated!
I am still working with adjusting the white balance in RAW, and using the Unsharpen mask, I have gotten a little better with doing photo editing in RAW format, but I am still really new to editing once they are in JPEG form.
I do like the settings that you used and will use those in the future!
Thank You Again!! I look forward to hearing back on what people and yourself say about my other pictures that I post!
Jason
- Joined
- May 1, 2008
- Messages
- 25,418
- Reaction score
- 4,999
- Location
- UK - England
- Website
- www.deviantart.com
- Can others edit my Photos
- Photos OK to edit
Ahh if you are shooting in RAW you can often fix the white balance easily without the need to adjust it in editing later - its one of the most powerfull parts of RAW. Use the temperature slide first - for the above I would recomend sliding it more toward cooler colours (the blue end). Not too far, but enough to render things pleasing/realistic. Then use the tint control to fine tune things a little. (often I just watch things like grass and adjust the tint till the grass looks about right).
After that you have the highpass sharpening (clarity slider which is like the amount slider in the above description I gave). As well as basic adjustments like contrast and brightness - do keep an eye on the histogram though to ensure that your editing is not blowing out larger areas of the shot.
Furthermore when you have to use high ISOs (and in shooting in general) you can always darken an area (provided you don't overexpose it) but if you brighten a dark area you introduce noise into that area. So you always want to expose as much as you can so that you have the most light data to work with in fine tuning the shot.
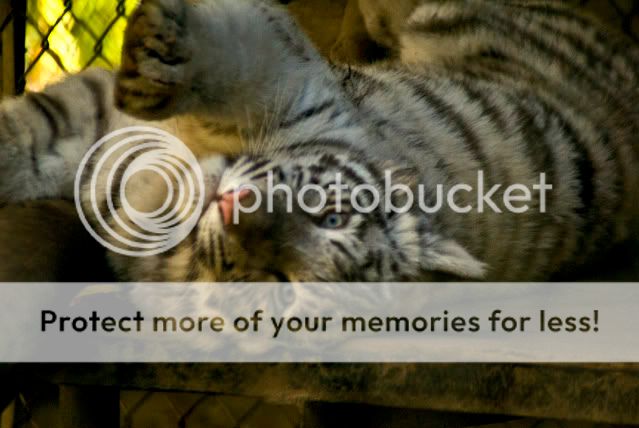
Also out of interest what focusing/shooting mode(s) were you using for the above shots? Shot 9 - the white tigers face - is showing that you caught his/her nose but missed the all important eyes (with wildlife if you can get nothing else get the eyes for they are what we as viewers, often identify and look to first).
After that you have the highpass sharpening (clarity slider which is like the amount slider in the above description I gave). As well as basic adjustments like contrast and brightness - do keep an eye on the histogram though to ensure that your editing is not blowing out larger areas of the shot.
Furthermore when you have to use high ISOs (and in shooting in general) you can always darken an area (provided you don't overexpose it) but if you brighten a dark area you introduce noise into that area. So you always want to expose as much as you can so that you have the most light data to work with in fine tuning the shot.
Also out of interest what focusing/shooting mode(s) were you using for the above shots? Shot 9 - the white tigers face - is showing that you caught his/her nose but missed the all important eyes (with wildlife if you can get nothing else get the eyes for they are what we as viewers, often identify and look to first).
Fraginator3000
TPF Noob!
- Joined
- May 4, 2010
- Messages
- 91
- Reaction score
- 0
- Location
- Malta
- Website
- frag-photography.webs.com
- Can others edit my Photos
- Photos NOT OK to edit
:O number 4 is really good! how close were u?
OP
OP
Milo_Azar
TPF Noob!
- Joined
- May 9, 2010
- Messages
- 9
- Reaction score
- 0
- Location
- Arizona
- Can others edit my Photos
- Photos NOT OK to edit
Yeah I was working with the Temperature settings in RAW, they initially turned out really blue, so I made (what I thought) them look more realistic. I'm still trying to figure out the most appropriate settings for the pictures. I still need to learn how to use the histogram more efficiently, and I didn't know that by darkening areas you introduce noise. (See I'm really new at this Photo Editing).
I was trying to focus on the face in general, but he was moving so much, and so was I to try to stay in front of him, I just snapped where I could.
Thank you again for your help!
I was trying to focus on the face in general, but he was moving so much, and so was I to try to stay in front of him, I just snapped where I could.
Thank you again for your help!
OP
OP
Milo_Azar
TPF Noob!
- Joined
- May 9, 2010
- Messages
- 9
- Reaction score
- 0
- Location
- Arizona
- Can others edit my Photos
- Photos NOT OK to edit
:O number 4 is really good! how close were u?
Thank You, roughly off hand I think we were about 100-150ft away.. roughly... I honestly don't remember I took that picture about 4 months ago.. I was using a 70-300 lens, and it was at 230mm, not sure what that equates to in feet.
Thank you, I'm glad you like it..
mimstrel
TPF Noob!
- Joined
- Jun 27, 2008
- Messages
- 121
- Reaction score
- 1
- Can others edit my Photos
- Photos OK to edit
I think my hands started bleeding looking at the King Vulture photos. I've worked with captive birds of prey, and vultures typically like to explore things... enthusiastically... with their beaks. I have a scar on my finger where a king vulture grabbed my (gloved) hand and chomped down.
And that first photo totally catches the King Vulture "watching you in case you have food or might do something interesting" look.
I love the pose on the last tiger shot. Too bad the light wasn't better, it's pretty soft focused.
And that first photo totally catches the King Vulture "watching you in case you have food or might do something interesting" look.
I love the pose on the last tiger shot. Too bad the light wasn't better, it's pretty soft focused.
magkelly
TPF Noob!
- Joined
- May 5, 2010
- Messages
- 270
- Reaction score
- 0
- Location
- USA
- Can others edit my Photos
- Photos NOT OK to edit
They're all nice, but I really like that last white tiger shot. He looks all cute and adorable just like my little cat does rolling over to get his belly scratched, laugh. I would imagine that cute is pretty hard to get with a full grown tiger but you managed it and I am impressed.
Most reactions
-
 428
428 -
 287
287 -
 282
282 -
 266
266 -
 222
222 -
 198
198 -
 182
182 -
 179
179 -
 164
164 -
 164
164 -
 150
150 -
 130
130 -
 120
120 -
 95
95 -
I
94
Similar threads
- Replies
- 5
- Views
- 435
![[No title]](/data/xfmg/thumbnail/38/38737-350089c7ae87f5c983c5362b9b78b671.jpg?1619738703)

![[No title]](/data/xfmg/thumbnail/30/30887-70db98f68651b2f6c62119e611f707c0.jpg?1619734499)
![[No title]](/data/xfmg/thumbnail/35/35666-9f404fab7b896e4ec114160079fa71c6.jpg?1619737090)