What's new

B&W Shootout No.1

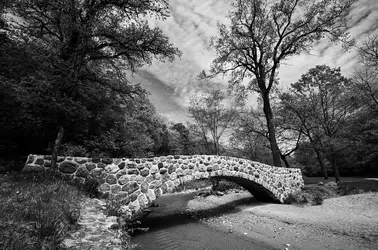
Here is another version of the original one I did. This time having some major fun in digital graphics.

Added fog around the bottom right.

Duplicated layer and added in the painting like style with various settings.

Added in glowing eyes to the left.

adjusted a little bit of other settings I forgot sorry..


D7K_3934 by VIPGraphX, on Flickr
 
Really nice job, everyone. I like the subtle differences in them all.

Okay here's mine.

0bwchallenge_zps4ce1667d.jpg


Process:
ScreenShot2014-02-10at82113AM_zpsd6d38cac.jpg


curves
levels
mask to suck out some highlights in sky
b&w--default with some tinkering on sliders
texture
burned a highlight on rt side
 
Here's my take on the picture, all edits were done in Lightroom 5

-17 Color
+24 Tint

+.24 Exposure
+50 Contrast
+12 High lights
-40 Shadow
+19 White
-17 Black
+40 Clarity

Curves
+14 Light
-11 Dark
-9 Shadow

Colors
-33 Red
-4 Orange
+7 Yellow
-2 Green
-27 Aqua
-11 Blue
+11 Purple
-31 Magenta

+50 Sharp

-5 Vignette

Graduated Filter - Middle of the filter is right at the limb in the middle of the screen, bottom bar right on top of the bridge.
-.75 Exposure
-5 Contrast
-55 High Lights
+14 Shadows
 

Attachments

  • $D7K_3934-2.webp
    $D7K_3934-2.webp
    367.3 KB · Views: 127
$D7K_3934.webp
Done in CS2. duplicated the image 4 times, added a blank layer on top and filled with black and changed the blend mode to color. Made different contrasts using levels and shadows and highlights on the 4 duplicate images and with layer masks, brushed away portions of the duplicates to reveal different effects on the layers. Flattened and touched up with dodge and burn
 
Perfect Effects 8 ->B&W Conversion with Chrome preset
Photoshop -> Tiffen DFX3 Difussion FX -> Adjustment layer, removed effect from bridge and stream.

$BW Bridge.webp
 
Last edited:
OK. I understand your point.

Certainly... what I posted doesn't mean you shouldn't participate at all....

Have some fun with the image and post an entry.
I can't the same way you guys do. I am not a digital, can only comment on final effects, not the process. Maybe after posting time is over. :)

A while ago before digital (shot film for many years), I would participate online by taking photos of my prints with a P&S and process them in GIMP. Then graduated to a cheap Epson scanner from a garage sale, then a primefilm negative u1800 scanner, and to the Epson v700. The computer+scanner was right in my darkroom and integrated into my process. It was fun. I highly recommend it. I did that with 135 and MF negatives for a while until life got busy and convenience necessitate for me to spend more time with digital starting with a used Canon D30 3.2mp and on. Even now, my film workflow consists of B&W negative, developed in the bathroom, scanned via the v700, and sent out for print as I no longer have access to a darkroom.

You have computer. You can save a copy of the shootout image. Load up GIMP (free) and have fun. Post. One person many years ago used a cellphone... he was homeless. The cellphone and service was "donated" and he used the library computer to post.

Just sayin... Much of our discussions are equipment driven ($$$) but I'd like to say you can do a lot with very little in photography.
 
In another shootout, we would start with full raw... After the crop, I was running out of image to work with.

Oops... didn't realize you can enlarge two levels on photobucket.. then save. That will give you a better quality image to start working with. I only enlarged it to the first level before saving the smallish image to work with.
 
Just another trying out a different process out of curiosity.

Completely done on my nexus 7.
Aviary editor.
Reduced brightness
Enhance HD filter
Effects metropolis filter twice.

Look ma no computer... Lol


$uploadfromtaptalk1392128563326.webp

Sent from my Nexus 7 using Tapatalk
 

Most reactions

New Topics

Back
Top Bottom