Background Effect - Post Process Help

RNBzie

TPF Noob!
Joined
Jan 1, 2008
Messages
11
Reaction score
0
Can others edit my Photos
Photos OK to edit
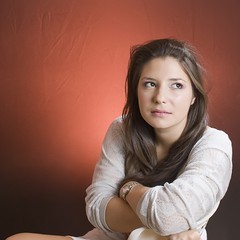
Hello...Im tryng to duplicate this effect:

DSC_7770eweb on Flickr - Photo Sharing!

I have tried with pretty crappy results...does anyone know how to achieve this background effect in CS4? I tried to google it, but didnt have any luck. :x
 
It looks to me that the creator added a gradient layer over the model and set the blending mode to "multiply"
 
The right way is to learn to control your lighting. All they did was place a flash behind the model and place a pink gel over the light... then blasted away at the background blowing out the center and fading out. :)

Medium grey background with a red gel over it.
3020165742_5ea880ca50_m.jpg


Same medium grey background with a blue gel over my flash.
3019334915_bc059c448a_m.jpg


Make sense?
 
Makes total sense, but how do you get the white center with the color?

I tried using the circle gradient tool on a colored background, but cant get the blending of white to color to look clean even with feathering...you can still see the hard outline of the circle.
 
Increase flash power. It doesn't matter what colour gel is on it... if it is high enough it will ALWAYS be white.
 
It looks to me that the creator added a gradient layer over the model and set the blending mode to "multiply"

... plus some "dodging" of the gradient layer (probably painting on a Layer Mask) around the face and hair to avoid the ugly tinting that can be seen on the feet and shoes.

The classic studio lighting method mentioned, and well illustrated with some very nice examples, by JerryPH will generally yield much more real looking results. No false halo around the head, like that seen in the OP's link. Getting a clean white center with this method does require some substantial flash units. The background light needs to be substantially brighter than those on the subject.
 
The one you posted was done with PP as a couple of people have mentioned.

They outlined the person with the pen tool (maybe layer mask, millions of ways to do this) then they adjusted the gradient so that the white lasted longer before being mixed with the other color.

It was a somewhat poor job though, for some reason her feet are behind the gradient? Yet her head is in front of it? Maybe that was the point, I'm not one to judge!
 
Still, as Jerry noted, the best way is just to learn to control your light. For the original shot, I suspect having the light behind a translucent material and shooting through that as the background toward the camera would produce better results. Ah well...
 
I do agree it is better to do lighting ahead of time, but personally I like to have the option of having my model against a pure white background so I can adjust the background at a later time if needed :)

This gives you the chance to have a lot more flexibility with older photos that you may want to re-purpose later on. Pen tool the figure once, have a model with no background for life!

I tend to look at things from a "How can I save my butt later if something goes wrong" - kind of light. If the client decides that instead of all those blue backgrounds we shot, they would much rather a nice yellow. Well I already have the cut out done, so I just have to adjust my colors.

There is no wrong way to achieve this, as always the question is what is your end goal?
 
Ah, I do believe shmne skewered me with his brilliant point. :lol:
 
Hehe I don't mean to skewer anyone :X

It is one of those - because we're able to - moments. Would I do that for every shot? Most of em, but in the end if I know what I want I have no reason to bother with PP.

It looks so much more natural when you just set the lights up properly.
 
I totally see the point with setting up the lights.

However, I am going for the model forever technique....cut out my subject and put them on different backgrounds. I wanted to use this technique for some pinup style work.

Even then, I need to light my subect right to make her fit in properly.

touche to both sides! :hugs:
 
I'm with shmne on this one. This was definitely not shot this way. You can see the rings in the gradient that would not be there if it had been created with light. Also, since it is a full body shot, I think there would be a distortion in the oval of the background where the seamless goes from horizontal to vertical.

You can do this on a white background or a green background.
 
I do agree it is better to do lighting ahead of time, but personally I like to have the option of having my model against a pure white background so I can adjust the background at a later time if needed :)

This gives you the chance to have a lot more flexibility with older photos that you may want to re-purpose later on. Pen tool the figure once, have a model with no background for life!

I can do that with anything.... I can take practically any subject and using Mask Pro pull it off any image, background is NOT important for this.

What I am against is starting off from bad technique or using methods that limit my creativity. There is nothing creative about standing 750 people in front of a white back drop. After doing it 100 times it is monotonous, boring, *always* the same. I got bored of it within 5 times of doing it, and that was with a studio that had $10,000 worth of equipment available for me to play with. Two speedlights, a dark alleyway and an alluring model will inspire me in ways that a studio backdrop with the most famous supermodel standing there for me ever would.


Take that photographer outside of that studio and they are lost... but the photographer that knows how to play with light and not depend on it is the one that will be the more versatile and IMHO, the one that will always end up with the better shots. :)
 
I'm thinking shot on greenscreen, subtracted, masked a gradient on it.
 

Most reactions

New Topics

Back
Top