What's new

Cheyenne1

Evertking

How do I turn this thing on?
Joined
Jun 25, 2016
Messages
688
Reaction score
783
Can others edit my Photos
Photos OK to edit
6d
50mm
Ad600 camera right 32 in octa
IMG_0106faceook.webp
 
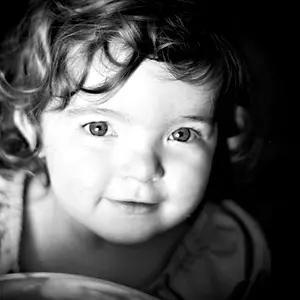
Lovely as always. Though not as bad I'm still seeing the gray skin tones especially on the forehead, viewing on tablet. Out of curiosity I loaded the image in Jeffrey Friedl's Image Metadata Viewer and immediately noticed there was no embedded color profile. Lacking a profile it's a toss up as to what a browser will display. Just a thought.
 
She looks like the weight on her shoulders is heavy.
Good, I'm glad it conveyed that to you. I asked her to think of something sad.

Lovely as always. Though not as bad I'm still seeing the gray skin tones especially on the forehead, viewing on tablet. Out of curiosity I loaded the image in Jeffrey Friedl's Image Metadata Viewer and immediately noticed there was no embedded color profile. Lacking a profile it's a toss up as to what a browser will display. Just a thought.

I did not know this. I will have to search and figure this out. So, if I understand correctly, I can attach a color profile on export that will fix this? Or is it a setting that I'm missing in Photoshop?
I know.. well I think anyway, that I set it to sRGB but I will have to check. Was it just the color profile or the metadata as a whole?
Thanks
 
@Evertking Both Work with Photoshop color profiles

There is a setting to assign, and one on export. None of the metadata is showing. That isn't as critical as the color profile. As I said earlier the browser first checks for an embedded profile. Not finding one the operating system starts guessing. Also when you do a lot of heavy editing it's a good idea to soft proof the image using the appropriate profile. I generally find soft proofing easier in LR but PS has the option as well
 
@Evertking Both Work with Photoshop color profiles

There is a setting to assign, and one on export. None of the metadata is showing. That isn't as critical as the color profile. As I said earlier the browser first checks for an embedded profile. Not finding one the operating system starts guessing. Also when you do a lot of heavy editing it's a good idea to soft proof the image using the appropriate profile. I generally find soft proofing easier in LR but PS has the option as well


Thank you so much!!
 
Really a lovely image! I agree with @smoke665 on the issue of colour profiles, but that's minor and easily resolved. Excellent quality of light here. I am still hoping for at least one image of this young lady actually smiling...
 
Pretty lady. I like the soft tone, nice catch lights. The arm looks strange as the hand is missing and it just seems stuck in there. Nice shot.
 
One other thing and this might be just preferences. The overall look being soft makes the sharpened eyes (and possibly the lips) in particular seem overly sharp and a little artificial. Would it be better to tone down the sharpening effect?
 
Lovely as always. Though not as bad I'm still seeing the gray skin tones especially on the forehead, viewing on tablet. Out of curiosity I loaded the image in Jeffrey Friedl's Image Metadata Viewer and immediately noticed there was no embedded color profile. Lacking a profile it's a toss up as to what a browser will display. Just a thought.
I posted a shot from today under the thread name "Scott" will you check that one for me with your fancy tool ;) i would be grateful.
When I export I go to Export >Save to web (I think this is right, I'm away from my computer) and I seen the box was unticked for embedded color profile but is now ticked. THANK YOU!!
When I finish an image I save the file at it's original size and then save a copy for Facebook or whatever. I change the long side to 2048.
Not sure if this is the best way, just how I have done it.
ANY advice or tips would be very welcome.
Again, thanks SO much.

 
Lovely as always. Though not as bad I'm still seeing the gray skin tones especially on the forehead, viewing on tablet. Out of curiosity I loaded the image in Jeffrey Friedl's Image Metadata Viewer and immediately noticed there was no embedded color profile. Lacking a profile it's a toss up as to what a browser will display. Just a thought.
I posted a shot from today under the thread name "Scott" will you check that one for me with your fancy tool ;) i would be grateful.
When I export I go to Export >Save to web (I think this is right, I'm away from my computer) and I seen the box was unticked for embedded color profile but is now ticked. THANK YOU!!
When I finish an image I save the file at it's original size and then save a copy for Facebook or whatever. I change the long side to 2048.
Not sure if this is the best way, just how I have done it.
ANY advice or tips would be very welcome.
Again, thanks SO much.

Yes it's now showing the sRGB IEC61966-2.1 profile imbedded, but no metadata or EXIF. I suspect that the web image more accurately reflects what you see on your monitor in Ps. I use a Samsung android tablet to double check myself ocassionaly, by viewing the web image posted against my monitor image.

I don't export much out of PS, preferring to save and then do file management functions, final tweaks, and soft proofing in LR. I've found soft proofing essential for preventing out of gamut colors (especially highly saturated) and proofing in Lr just seems quicker and easier.

It's my understanding that some web apps don't read XMP metadata, so if you save for web you need to pick an option for XMP in the export window, to save EXIF outside the XMP block.

SaveForWebMetadata_inline.webp


While it's a matter of choice as to the amount of information you include, since you mentioned social media posting at the very least I'd tick copyright and contact. I tick all.

For Web images I've found 1200 to 1500 on the long side and 85-90 on the quality to be more then enough. Just be aware that Facebook literally stomps the $$$$ out of your image to crush it down if you upload directly. You might want to experiment with uploading a PNG instead of a JPEG, or sharing a link from Flickr or other hosting site.
 
@Evertking a footnote to above comments, I downloaded the image above into Lr. The histogram showed about 1.30 stops under exposed, with very little data in the midtone or highlights. I mentioned this earlier in the post on the little boy "the gray skin phenomena on occasion, in processing, usually as a result of pushing an improper exposure to far", lacking data to render color, it will revert to neutral gray. Did you pull the exposure down in post?
 
@Evertking a footnote to above comments, I downloaded the image above into Lr. The histogram showed about 1.30 stops under exposed, with very little data in the midtone or highlights. I mentioned this earlier in the post on the little boy "the gray skin phenomena on occasion, in processing, usually as a result of pushing an improper exposure to far", lacking data to render color, it will revert to neutral gray. Did you pull the exposure down in post?
No, I usually never touch the exposure slider. I think I pulled down the highlights though.
The shots were dark but I noticed later that I had not changed metering mode and left it to spot metering. When I was setting up the shot. I set my camera to sync speed and took shots and adjusted my apreture till I got a black frame and with a handheld meter, I set my light to match my apreture.
Im not sure if leaving my camera on spot metering would cause issues or not.
But that is the process I used. And any help or advice is welcome.
Thank you
 
No, I usually never touch the exposure slider. I think I pulled down the highlights though.
The shots were dark but I noticed later that I had not changed metering mode and left it to spot metering. When I was setting up the shot. I set my camera to sync speed and took shots and adjusted my apreture till I got a black frame and with a handheld meter, I set my light to match my apreture.
Im not sure if leaving my camera on spot metering would cause issues or not.
But that is the process I used. And any help or advice is welcome.
Thank you

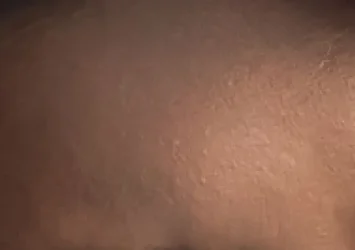
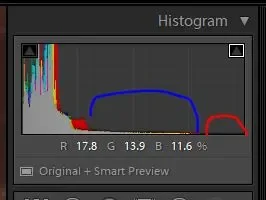
Here's a sample from the forehead on the original and the histogram of same.
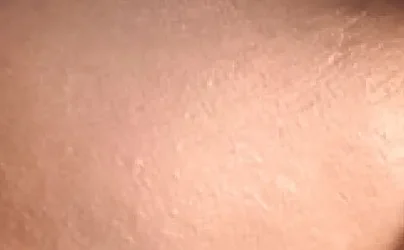
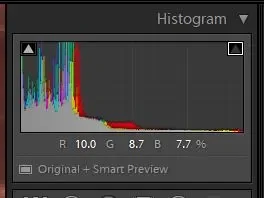
13.webp12.webp Notice the blue area where midtones (skin) doesn't have a lot of detail and nothing in the highlights. Now compare to below where the exposure was bumped by 1.3 stops in post
14.webp 15.webp
From the original raw you can bump exposure to a point and raise the shadow/midtone, but there's a limit.

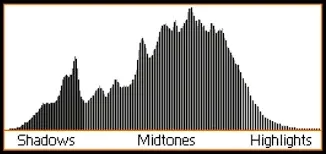
I know there are some out there that advocate exposing left and raising the shadows post, but IMO the transitions between tones is not as smooth and there's more noise in the darker areas than the image that was exposed correctly or one to the right. Ideally you would want a histogram something similar to this
index.webp but bearing in mind that in the real world, this isn't always possible. So you shoot for maximum data. Going dark and moody low key, I'd likely expose right, with maximum data your then free to edit the file as you please.
 

Create an account or login to comment

You must be a member in order to leave a comment

Create account

Create an account on our community. It's easy!

Log in

Already have an account? Log in here.

Back
Top Bottom