Child portraits - Learning lighting

adamhiram

No longer a newbie, moving up!
Joined
Feb 6, 2015
Messages
858
Reaction score
576
Can others edit my Photos
Photos OK to edit
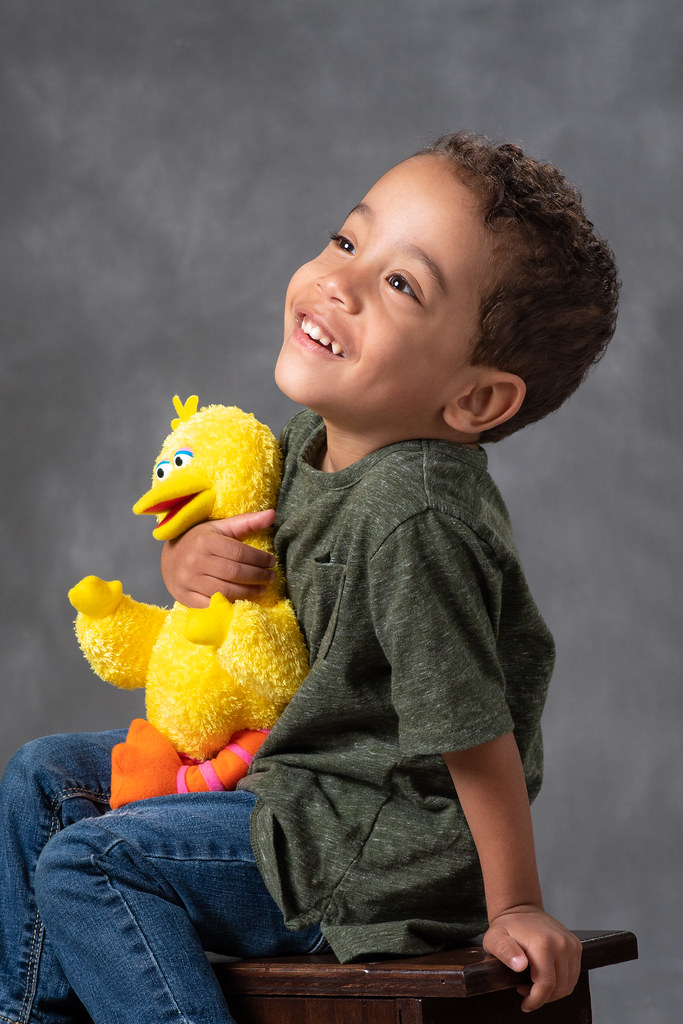
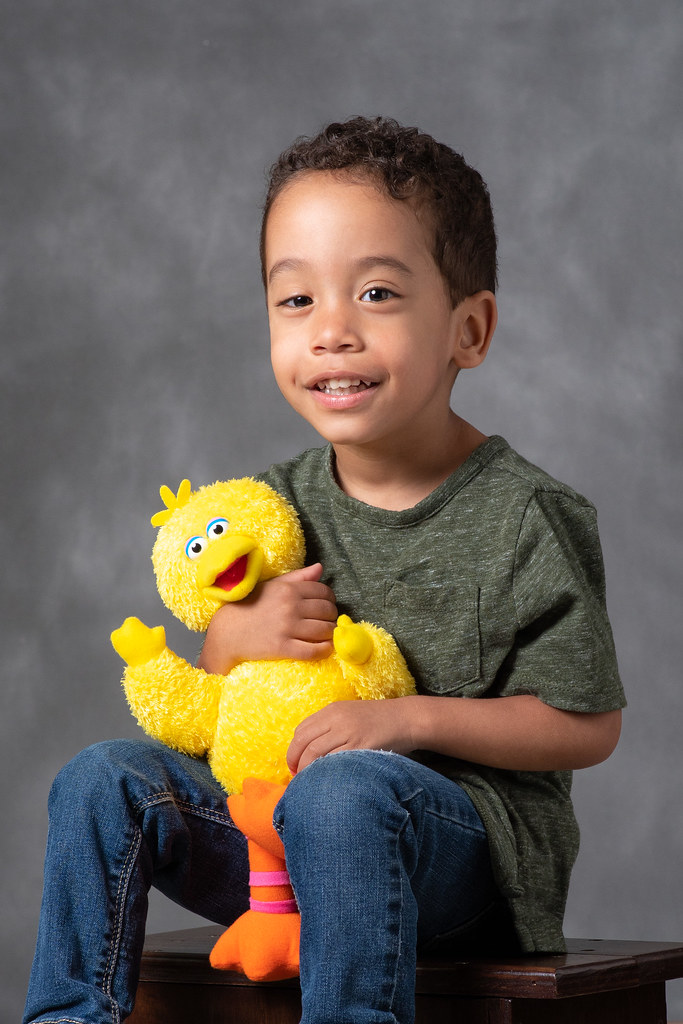
One of my goals in learning more about lighting and portrait photography is to take better school portraits of my son. The ones they currently take typically use flat lighting on a green screen, so the bar is set pretty low.

Here are a few shots I took over the weekend - 40 minutes to setup, 20 minutes to break down, and about 10 seconds of cooperation before he decided he didn’t want to do pictures today.

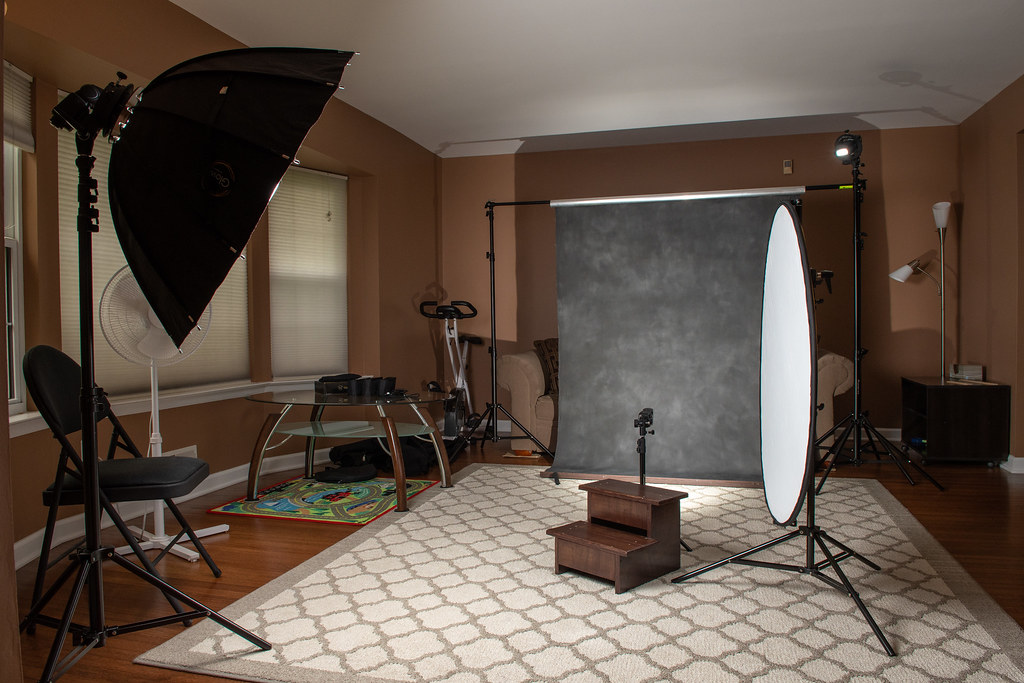
Lighting setup is shown below. Octobox about 30 degrees off axis for key light, white reflector for fill with a 4:1 key/fill ratio, hair light with gridded snoot above and camera right, and a background light behind the subject for a broad even wash across a canvas backdrop. All shots taken with a D500 at 85mm, 1/125s. f/8, ISO 400.


20180610-DSC_8094a
by adamhiram, on Flickr


20180610-DSC_8099a
by adamhiram, on Flickr


20180610-DSC_8108a
by adamhiram, on Flickr

Some observations & questions
  • 3 year olds move around a lot, which meant the background light stand didn’t stay hidden in most shots. I think I may move this back to a boom arm overhead to keep it out of the frame.
  • I don’t have a lot of experience working with hair lights, and with him moving around so much, it was hit or miss with a narrow grid on a snoot. Is there a way to have a broader spread to light the hair even if he moves around, but without too much spill? Do I need to worry about too much light on the shoulders from a broader spread?
  • I have a lot to learn with posing, and I don’t think the step stool I used was ideal. It seems to work for a full body shot, but then I start seeing the bottom of the backdrop and including the rug. For a half body shot, it seems like the lower step is pushing his knees up too high into the frame. I have a short bar stool I can use that let his legs hang down more naturally out of the frame, but then I feel like I’m cropping off the hands for a half body shot. Any recommendations here?
 
Oh man he's gonna have some girls chasing him.

I'm surprised you got 10 seconds of shooting. LOL With granddaughter I use a large stuffed animal that is about her size to set the lights close. Once they're close then I plop her in place and shoot. I try to use age appropriate sizes sets, a low coffee table with a covering over it that she can stand on or sit on, or a chair with arms. The idea being to corral her briefly. It may sound silly but I use an X of tape where she needs to sit or stand so DW knows where to direct her to. I explain the setup to DW before we place her so she has an understanding of pose and location, then it's a matter of waiting and watching for her to move into position. We have a deal she does what I ask and then she can make a silly face (little bit not DW). We also buy an assortment of new small toys to keep on hand as bribes, and if all else fails a staple gun works well :allteeth:

For a three light setup you did extremely well. One thing I noted on the shots are the hot spots on the bird. I noted it because I've had the same problems with stuffed animals, especially the highly reflective bright colors or the dark saturated colors. If they're on the key side, its usually impossible to expose them or the face properly. I try to avoid them or else put them in the shadow. I'd say overall you did really well, don't beat yourself up over the small stuff, that's part of photographing little ones. Have fun and they will also.
 
Last edited:
Oh man he's gonna have some girls chasing him.
Thanks! I agree, although to paraphrase you, I'm a bit biased.

I'm surprised you got 10 seconds of shooting.
Honestly, it's about all I expected. Sometimes he's fascinated by the big lights and will sit for a while, but this time he just wanted to hide behind the new canvas backdrop and try to yank it down. I definitely made a note of your great tips! I figured using a stool would keep him where he needs to be, but I'll try making a game of a masking tape mark next time and see how it works out.

For a three light setup you did extremely well. One thing I noted on the shots are the hot spots on the bird.
Thanks! It's all about progression. Not much I can do about the placement of the stuffed animal, other than maybe using an adjustment brush to burn down the exposure or kill the highlights, but it was still better than the reflections from the firetruck and race car in some other shots. I still need to play around with the hair light and/or rim light to see if I can get more consistent results, but I'm pretty happy with these.

Thanks for the great feedback as always.
 
Last edited:
Hair light...a narrow grid on a snoot...not a very easy-to-use combination of light shapers. First off, I am not a fan of snoots, and adding a tight grid makes them even worse. I think the far better choice is a 50 or 65 degree beam-spread reflector with a 10 or 20 or 35 degree honeycomb grid,one or two thicknesses of mylar diffusion material, and then a two-way (or 4-way) barn door set. This is easy to position higher up, off to the side of the background, on a plain stand, or a roller stand, or on a boom, or mounted with a clamp and spigot onto the background paper support auto-poles,etc..

The key is the addition of the mylar diffusion material along with the honeycomb grid, and the barn doors allow you to control the spread AND to alleviate lens flaring, by shielding the lens from the light that is coming toward the lens. Look at the Speedotron accessories section, to see their mylar diffusers; these can be stacked, and I often use one, or two, sometimes even three (bald-headed guys), on their 11.5-inch, 50-degree metal reflector, with their 20-degree grid, and their two-leaf barn doors.

THIS setup as described above can also be used with the 35-degree grid to mimic a strip box...but it is much smaller.

Hair light: the thing is, if the subject-to-camera angle is "glancing", the light gets very hot, very specular. This is why the mylar diffusion helps. it also softens the light from a small metal reflector, and makes it match more-closely a modifier like an umbrella or softbox.

There are a lot of hair light techniques...overhead panel, bounce off a ceiling, bounce off a foamcore board, overhead softbox,etc.

I personally think that snoots are very difficult to deploy with ease (LOL! right?)...I own a bunch and think they suck...almost never, ever have used them...once I started pairing the grids with the Speedotron frosted mylar diffusers, I have never used a snoot, so it's been 15 years since I deployed a snoot.

I've also used a 16- and 20-inch Speedotron metal reflector + grid + mylars + barndoors, but find that for most times, I prefer the 11/5 inch 50-degree reflector...it's smaller, and easy to pack.
 
There are a lot of hair light techniques...overhead panel, bounce off a ceiling, bounce off a foamcore board, overhead softbox,etc.

As you say there are many ways, and thanks to your comments I have some more to try. I've used snoots off axis both single and one on each side, and your right, it does create challenges with a little one. Sometimes I can leave on the modeling lights and wait for them to move into position. Sometimes I've used a snoot on axis fired at the back of the head which seems more forgiving of movement. I've also used 7" reflectors with 10 degree grids and barn doors off axis and flags so I can be sure of getting enough coverage but preventing flare. I use fabric diffusion, but I need to look into the Mylar material you mentioned. One trick I learned recently is making the snoot longer with a packing tube, to decrease the size of the spot and using tape to create a slit of light with very defined edges.

Thanks! It's all about progression. Not much I can do about the placement of the stuffed animal

Actually you can. Anytime you place a highly reflective accessory between your subject and the key you will have hot spots on the accessory or under expose the subject. I find it's easier to move the accessory to either the fill side or in front of the subject so the face and accessory are equal distance from the key. If you look at the challenge page Weekly challenge 6/9 - 6/15 That’s Odd! on page one there is a picture of the duck I use to set up lights. It makes it visually easier for me to set my lights and place accessories to prevent hot spots.
 
Last edited:
I think the far better choice is a 50 or 65 degree beam-spread reflector with a 10 or 20 or 35 degree honeycomb grid,one or two thicknesses of mylar diffusion material, and then a two-way (or 4-way) barn door set.
Any thoughts on using that type of modifier with a speedlight? I've had good experiences using Bowens-mount modifiers with a speedlight mounted in a Glow/Godox speed light bracket, but I wonder if a metal reflector will work as expected without a bare bulb flash. Then again they're cheap enough, so it's easy enough to find out.

I find it's easier to move the accessory to either the fill side or in front of the subject
I wish it was that easy! I think you underestimate the stubbornness of some 3 year olds... Those 10 seconds of shooting spanned about 15 minutes of trying to get him to sit on the stool long enough to get a single shot before he ran off. I learned long ago that if he wants to hold something, to just let it be! I have a halloween decoration that's about his size that I use to position the lights ahead of time, although that's a whole other bag of worms if I forget to put that away before he sees it.
 
I wish it was that easy! I think you underestimate the stubbornness of some 3 year olds... Those 10 seconds of shooting spanned about 15 minutes of trying to get him to sit on the stool long enough to get a single shot before he ran off.

Nope, they can be a challenge. Each child is a little different, I've shot several of friends and families children. Sometimes they can be stubborn, sometimes wild, sometimes meek, it's who they are. I may have a slight advantage though, we've had Brittany Spaniels for years. You learn quickly with a Britt that you have to be more interesting than a gazillion other things if you expect them to do what you want. LOL Kids are the same if one thing doesn't get their attention wait a few minutes and try something else, if you try to force it they will dig in the heels and refuse. There have been times when we had to quit for lack of cooperation, it happens. Like setting the lights, camera, pose, it's a process, learn to deal with it and you'll be blessed with some fantastic shots.
 
I think the far better choice is a 50 or 65 degree beam-spread reflector with a 10 or 20 or 35 degree honeycomb grid,one or two thicknesses of mylar diffusion material, and then a two-way (or 4-way) barn door set.
Before going out and picking up additional gear, I thought I would experiment with the Rogue Grid I am currently using to see what kind of spread I can get from it. Technically it is a gridded snoot, but with different inserts the spread can be varied from 16º to 45º, which might be more workable. It turns out with the 16º grid I was using, the spread is limited to about 20" wide at a distance of 8', with pretty rapid fall-off. Just going a little wider to 25º, it's up to a 32" spread, and at 45º the spread was already wider than the frame. I'll give the 25º grid a try next time and see how I faire. Otherwise, a budget reflector and grid will run around $35, and sounds like something that will be pretty useful to have around. Thanks for the tips!
 

Most reactions

Back
Top