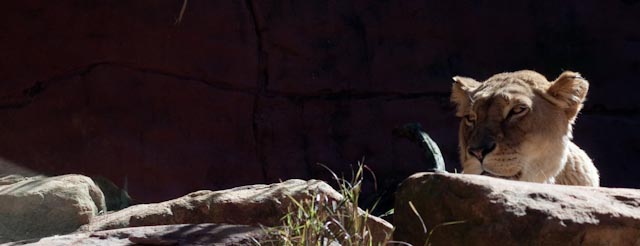
The lighting looks tricky where you were, the main presented image of hte cat being in shadow, whilst getting strong highlights of the sun on the otherside of the cats face. This is never easy to expose for since unless you can either boost the shadowed side lighting (a reflector or flash) or reduce the sunlight (a diffuser between sun and cat) then your going to get blown highlights and/or very dark shadows.
Also whilst the zooglass has had a softening effect on the shots, with some sharpening via the unsharpen tool you can pull more sharpness out of the shots. If you do this early on on teh fullsized version and then again sharpen the resized image for the net , then you sould get improved sharpness overall.
I did a little edit below - only done in photoshop elements 6 with a layermask addon
Creat new layer, a duplicate of the original shot.
Then on the new layer perform:
Enhance - adjust lighting - shadows and highlights
lighten shadows - 13%
Darken highlights - 8%
Midtone contrast - 0%
Enhance Unsharpen mask
Amount - 90%
Radius - 0.8 pixels
Threshold - 3 levels
Burn tool
Opacity - 7%
Applied on all the brigthest hotspots on the shot, sometimes brushing over a few times depending on the intensity of the hotspot. Note that if a mouse click is used for each new layer of the effect then the undo command can be used to take a step back if needed.
Also use the layer masking tool to remove the effect from the dark background areas, leaving the foreground and cat affected.
Quick selection wand also used to select the main area of the cats eye; then the edge being set to feather (right click whilst having the quick selection wand tool in use and in the popup menu go down to feather- set to 5 pixels). Then a brightness layer was opened and set to +22% brightness to bring the eye out more on the shot.







![[No title]](/data/xfmg/thumbnail/32/32004-4455324f0b4b5cc318dd35877147ac47.jpg?1734160793)

![[No title]](/data/xfmg/thumbnail/33/33339-c5b461af62b32f6b6529f1b334d818ba.jpg?1734163231)
![[No title]](/data/xfmg/thumbnail/33/33338-4ae29c5eff506820d8b986c033234764.jpg?1734163228)