kkamin
TPF Noob!
- Joined
- Aug 25, 2009
- Messages
- 515
- Reaction score
- 17
- Location
- Minneapolis
- Website
- www.kevinkaminphoto.com
- Can others edit my Photos
- Photos OK to edit
What I understand is that when printing, you want to set the white point to 95% brightness and the black point to 5% brightness. This allows details to remain in the lightest and darkest areas--so that parts of the image are not just the white paper or solid black ink. What an instructor in school also told me (at least 7 years ago when digital photography was assertively taking over darkrooms) was that: "in darkroom printing you would never have pure white on the paper since a small amount of light would still reach the white areas. So by setting the output brightness down a touch, you mimic the native aesthetic of darkroom printing; and that is what people are used to seeing."
My questions surround printing to chromogenic prints. I use White House Custom Color where they use light printers to make traditional chemical prints.
1. Do I need to worry about the above issues? They seem like they might be only native to printers that spread ink. Are the light printers "tight" enough to allow pure white to exist in a print?
2. If they do have the same issues, does anyone have any tips to make the prints not look like sh*t. I've had to adjust the white point on many prints to WHCC to create seperation, because I've wanted a pure white border, and the background of the print was a (255,255,255) white. But when I adjust the white point, the print loses contrast; I can never get it looking as good as it was before the white point adjustment. I never bother with the black point, maybe that's an issue, but it doesn't seem like it would be.
3. I'd appreciate any other tips for printing to chromogenic.
Thanks, everyone.
Kevin
-------
I feel like I don't contribute enough here, but ask a lot of questions. So if anyone reading this is wondering how to find and set the white point and black point in PS, here it is:

Use the 'Threshold' adjust layer, and move the slider to '0' to find black and
'255' to find white. With the eye dropper tool, hold down the 'shift' key to set down markers.
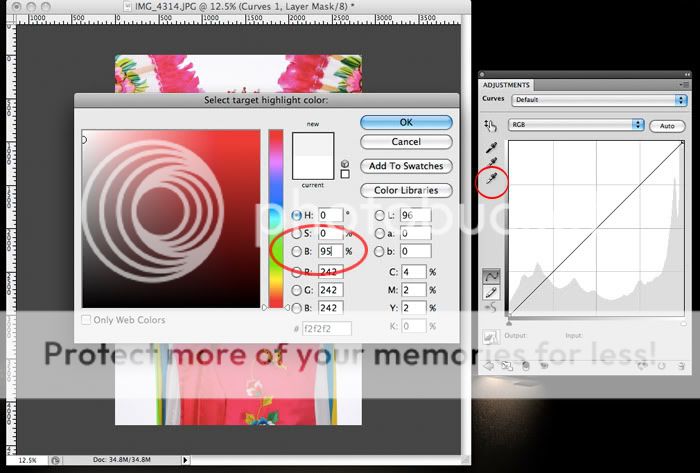
Erase the Threshold layer. Create a 'Curves' adjustment layer and double click the white eye dropper. This will bring up the dialog box that is hovering over the canvas in the above example. Set the 'B' or brightness to '95' (percent) then click on the marker that you set in a white area. Now do the same with the black eye dropper but instead set the 'B' to 5 and click the marker you set in a black area.
I've also seen this technique use to color balance photos by taking an extra step and setting the gray eyedropper to a midtone neutral point in the image.
My questions surround printing to chromogenic prints. I use White House Custom Color where they use light printers to make traditional chemical prints.
1. Do I need to worry about the above issues? They seem like they might be only native to printers that spread ink. Are the light printers "tight" enough to allow pure white to exist in a print?
2. If they do have the same issues, does anyone have any tips to make the prints not look like sh*t. I've had to adjust the white point on many prints to WHCC to create seperation, because I've wanted a pure white border, and the background of the print was a (255,255,255) white. But when I adjust the white point, the print loses contrast; I can never get it looking as good as it was before the white point adjustment. I never bother with the black point, maybe that's an issue, but it doesn't seem like it would be.
3. I'd appreciate any other tips for printing to chromogenic.
Thanks, everyone.
Kevin
-------
I feel like I don't contribute enough here, but ask a lot of questions. So if anyone reading this is wondering how to find and set the white point and black point in PS, here it is:
Use the 'Threshold' adjust layer, and move the slider to '0' to find black and
'255' to find white. With the eye dropper tool, hold down the 'shift' key to set down markers.
Erase the Threshold layer. Create a 'Curves' adjustment layer and double click the white eye dropper. This will bring up the dialog box that is hovering over the canvas in the above example. Set the 'B' or brightness to '95' (percent) then click on the marker that you set in a white area. Now do the same with the black eye dropper but instead set the 'B' to 5 and click the marker you set in a black area.
I've also seen this technique use to color balance photos by taking an extra step and setting the gray eyedropper to a midtone neutral point in the image.
Last edited:
![[No title]](/data/xfmg/thumbnail/34/34040-14af4007923299ad46d35fc110d0faad.jpg?1619736250)

![[No title]](/data/xfmg/thumbnail/36/36099-feb952513e45dbf9f061ab28c1dc1121.jpg?1619737342)

![[No title]](/data/xfmg/thumbnail/31/31013-b871f1d295c83b831c1423028e1ce5dc.jpg?1619734568)