Proper way to photograph a white object

gossamer

TPF Noob!
Joined
Dec 24, 2013
Messages
234
Reaction score
23
Location
New Jersey
Can others edit my Photos
Photos OK to edit
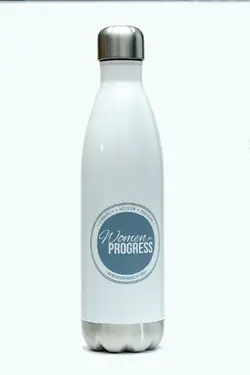
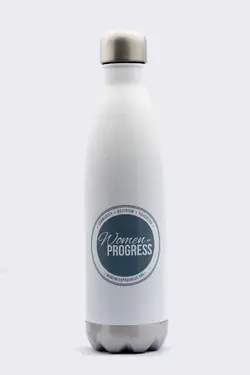
Hi, the picture below was shot using my D500 with my 24-70mm using two XPLOR 600s at about 1/32nd power, each with a 38" octobox positioned from above, but the item appears to get lost in the background. The background is inside a light tent with a muslin background. The background is a little wrinkled, so I used the light to overtake (if that's the right word) the wrinkles. I've set the white balance using my lastolite pop-up gray card.

Looking at the image here, I see the background still needs some work, but some guidance on the best approach would be appreciated.

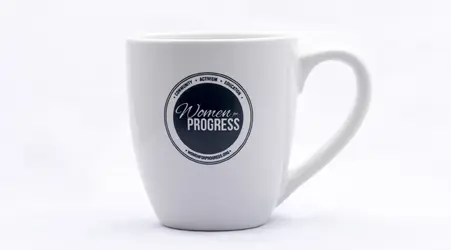
I've also included a mug that I think is a little better, but it's also somewhat lost in the background.

What's the proper way to do this?

Is it better to just use a different colored background?

This was really difficult :)
DSC6450-bottle-40.jpg wfp-mug-40.jpg
 
The better way is to light the object, rather than the background. When you positioned the light box ABOVE the object, you lighted the TOP of the object fairly well, but NOT the FRONT.

1. Position the light to light the object.

2. Position the object at some distance from the background.

3. Let the background light fall off.

Easy-Peasy.
 
As Designer mentioned above, the subjects in both of the photos shown need more frontal lighting...the background is lighted more so than the objects, to a brighter level, but there's not any interesting light on the frontal planes of either the bottle,or the cup.

If you were to move one light (the Main light AKA the 'key" light) around to the front or front/side of the objects, they would be brighter, and the backdrop would render as darker, due to light fall-off. If you added a second light, AKA a "background light", you could make the background bright as well, or medium bright, or whatever.

There are at least one dozen ways these objects could be photographed, to start, and many,many possible refinements of those dozen basic ways would also exist.

There is no, one, single "proper way to photograph a white object"...there are MANY possible ways, including white on white, white on black, white on gray, white on red,and so on and so on.
Thanks, guys. Derrel, I believe you had recommended to me a ring light (Bolt VM-160 LED) about three weeks ago. I took it out of the box for this, and realized it doesn't fit my 82mm lens :) It's on its way back to B&H.

Would a ring light be more appropriate for something like this? This one's quite a bit more expensive than the Bolt VM-160, but looks pretty good:
https://www.amazon.com/R-300S-Bi-Color-Photo-Video-Carrying/dp/B06XJ3219W/

I'm still looking, but do you believe this would be a good option? Do you have other recommendations? This sure looks like an easier solution than bringing out the XPLOR 600s every time.
 
As an Amazon Associate we earn from qualifying purchases.
I think you're mistaken on who recommended a macro ring light to you; I do not recommend them to anyone. I looked at the Bolt a few minutes ago, and had never seen it before, but have seen similar units over the years. The second link, to a $279 multi-LED ringlight, was a surprise, and I think that unit is vastly over-priced and looks terrible for still photo use, but might be okay for video shooters. Still...I am not a fan of ringlights, and the multi-LED one looks like it would be horrible on reflective objects; too many point light sources.

I dunno...I am not a fan of ringlights for small products, or for macro use. Flat, almost totally shadowless lighting. However...a similar effect can be achieved by taping or rubber-banding a speedlight right onto the side of one's lens barrel. Seriously. Not kidding. Look it up on Strobist.com.

I think softboxes and diffusion panels (scrims) are a vastly better choice for small products. You already own two higher-grade lights, so I'd look into a gridded softbox for one light option, at the minimum. A light tent is a rather boring light as well, and has limitations. I think you should avoid any and all ringlights. If you want to have good lighting, bringing out the real lights is the easiest way to achieve that.
 
Derrel, thank you, I completely agree.

I was also hoping the light tent would help to block some of the outside light, but it really doesn't. I'll try again with my existing higher-grade lights and follow up soon.
 
Derrel, thank you, I completely agree.

I was also hoping the light tent would help to block some of the outside light, but it really doesn't. I'll try again with my existing higher-grade lights and follow up soon.
I think that is a very odd reason to use a light tent. Usually, we use a light tent to ADD light, and preferably all around the subject, but not to block light.

To minimize the effects of stray light coming from outside sources, you can block them at their source, or simply increase your shutter speed to the point that they are no longer contributing much light.

Since you are using flash, you should not be overly concerned with other light sources.
I was using the light tent to not just diffuse the natural light in the room, but also the light from my strobes. I'm not sure I've yet figured out how to expose properly except for trial-and-error in situations like this.

I also thought the light tent was helpful to provide a white background.
 
Is this better? This is with both strobes almost directly in front of the bottle, but it looks like it's resulted in it creating a reflection, even with the octoboxes set up on both strobes.

It also appears gray, with the bottle itself the correct color of white. This is with setting the white balance using the white side of a gray card. The background itself is actually white. It also appears a little off-center.

This is at about 65mm f/4 ISO 100 and 1/500th with the strobes set to 1/16th.

DSC6471-bottle-30.jpg
 
Hi, the picture below was shot using my D500 with my 24-70mm using two XPLOR 600s at about 1/32nd power, each with a 38" octobox positioned from above, but the item appears to get lost in the background. The background is inside a light tent with a muslin background. The background is a little wrinkled, so I used the light to overtake (if that's the right word) the wrinkles. I've set the white balance using my lastolite pop-up gray card.
Looking at the image here, I see the background still needs some work, but some guidance on the best approach would be appreciated.

I've also included a mug that I think is a little better, but it's also somewhat lost in the background.

What's the proper way to do this?

Is it better to just use a different colored background?

This was really difficult
Welcome to the OCD world of product photography, LOL. I've been doing this for a few decades and it takes a certain personality to do it well, one must be very particular about very tiny details and have a special knack for seeing light and shade.

If you really want to learn how to shoot product, start by doing some reading, there are a number of books on this subject. Another way to learn is to look at images of product photography and study how they were lit.

However, for the sake of your dilemma I can offer some suggestions. You need to define what look you are after before you start lighting the subject, did you want white on white or would a darker background work? Ask yourself what is important and what is less important about the product vs the background, that discovery will guide you to the best approach.

Your products are reflective, think about what they are reflecting back into the lens and is that what you want? If the surface is fabric and you want it to be perfectly flat, choose a different surface like a small piece of white laminate. If you are skilled in PhotoShop shoot for the product then plop any background in you want.

Before any suggestions can help you, you need to say what you want the product to look like, I doubt shiny hot spots on the front label are your goal.
 
Welcome to the OCD world of product photography, LOL. I've been doing this for a few decades and it takes a certain personality to do it well, one must be very particular about very tiny details and have a special knack for seeing light and shade.

If you really want to learn how to shoot product, start by doing some reading, there are a number of books on this subject. Another way to learn is to look at images of product photography and study how they were lit.
I need to learn more about how to use light in general.

However, for the sake of your dilemma I can offer some suggestions. You need to define what look you are after before you start lighting the subject, did you want white on white or would a darker background work? Ask yourself what is important and what is less important about the product vs the background, that discovery will guide you to the best approach.
I could probably do this more easily by just using a colored background, but I want it to be consistent with my other pictures for this project and do it with a white background, as I've attempted to do here.

I want it to look like what I've done currently, only better :) I'd like it to be fully white, with just slight shadows from the subject itself providing an outline.

Your products are reflective, think about what they are reflecting back into the lens and is that what you want? If the surface is fabric and you want it to be perfectly flat, choose a different surface like a small piece of white laminate. If you are skilled in PhotoShop shoot for the product then plop any background in you want.
I do also have some black shirts that need to be shot. I was thinking of laying them out on a white laminate (foam board from Michael's) but haven't yet figured out how to suspend the camera directly above.

Before any suggestions can help you, you need to say what you want the product to look like, I doubt shiny hot spots on the front label are your goal.
Yes, certainly not, and I don't appear to be able to overpower those reflections with the flash.
 
I'm curious if you think this is better? It looks like the outline of the bottle is somewhat blurry - perhaps f/3.5 wasn't enough DoF or the 1/200th wasn't enough to avoid camera shake? It's also a tiny bit off-center. I also used the bucket tool to make the white more consistent.

The problem I was having (or still) is the bottle getting lost in the background because it's also white. I was hoping the right shadows would solve the problem.

I'm also seeing the white balance is off a bit (it looks more blue than it should) but the bottle itself is very close to actual white (or at least the same white as the foam core behind it) that it makes it very difficult.

Of course I could use a blue or red background, but I want to keep the white consistent with other products from this series.

DSC6512-bottle-30.jpg
 
Forgive the rather crude lighting diagram but I hope it gives you an idea.

lighting-diagram.gif

Octaboxes are not ideal for product work since they don't have an edge where you can determine falloff along the entire front or back of the product. Essentially your main light is an overhead modifier with enough spill to illuminate the background if your desire is white and a bit of overlap on the front in order to cast some light in front of the product. This overlap is critical, since any amount can spill on the shoulder of the bottle and create a hot spot as in your latest(shot #3) example, fore and aft movement of the product can get you in the ideal position where no hot spot is seen.

A white reflector bouncing light from the main light back into the product front will lighten up the text and give you more logo readability.

Not shown in this diagram are white bounce cards along both sides of the product. Again position is critical as you want to create shoulder definition to the bottle rather than vertical stripes like in your previous front lit example(shot #2). You will notice in shot #3 there is a gap in the shaded shoulder highlight and the actual outer edge of the shoulder, this should be avoided, the shaded shoulder should be a thin line right on the edge of the bottle. Black card stock cut into narrow strips and placed on the background leading away from the base of the bottle will do this.

The polished stainless top is going to be a problem for you, rather than spill some trade secrets and get it right in camera LOL, you would be best to do it in post by shooting a few exposures and combining them in PS.

It looks like you have some external illumination hitting the bottle front and the cap, best to do this in a completely dark environment or at least add some black V flats to kill any spill.

Anyway that is a good start, you will be training your eye to look from the lens position and see what your lighting is doing. I developed this over many years starting back in the large format film days. You will either like this sort of thing or you would rather make sand out of rocks, you'll know soon enough.
 
Last edited:

Most reactions

New Topics

Back
Top