What's new

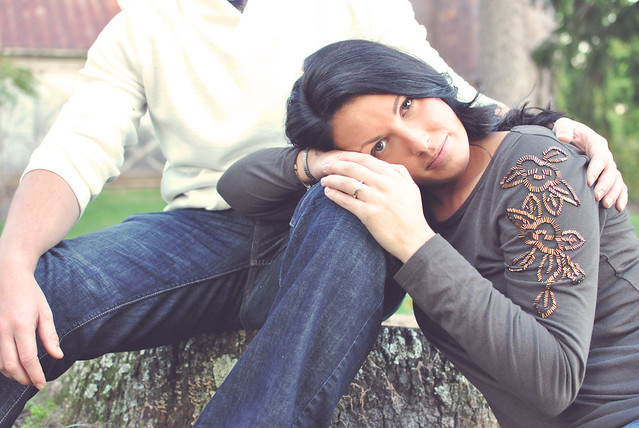
Recent engagement shoot...

I like the first one but maybe bit tighter crop but... I'm no expert so don't take what I say to seriously lol
 
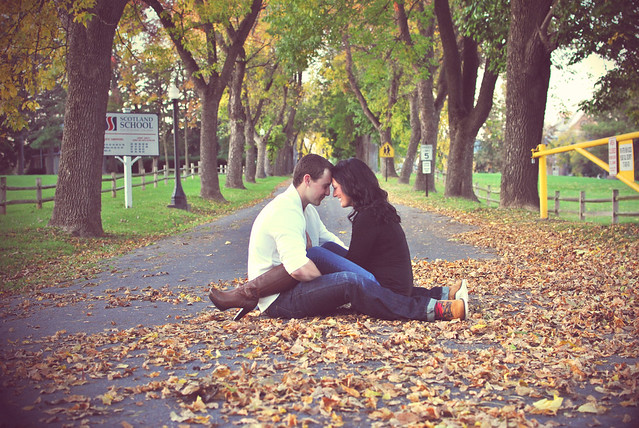
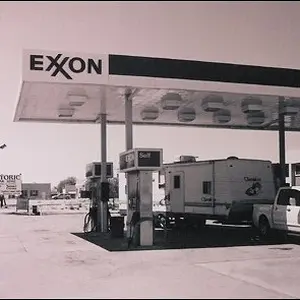
And the yellow gate in no 3 catches my eye too much maybe try crop that too...
 
And the yellow gate in no 3 catches my eye too much maybe try crop that too...

There are multiple distracting objects in number 3. In addition to the yellow gate there are several distracting signs.

However I don't think crops g the yellow gate out is the best decision. I would try and remove the distracting objects using photoshop. The content aware tools work wonders.
 
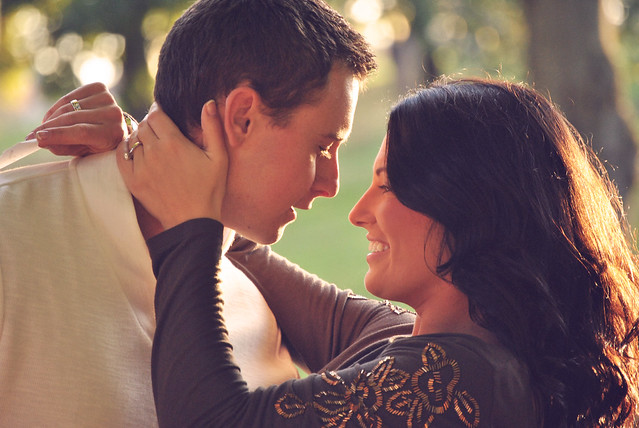
overall, I like subtle, soft tonal processing - but I think that these could use a black point, especially #4, not so much to loose detail, just enough to give some depth.

Also, how were these exposed? For this kind of treatment, I would over expose them and bring down the hilights. It looks to me that the shadows were pretty close to clipping, and were brought back up?

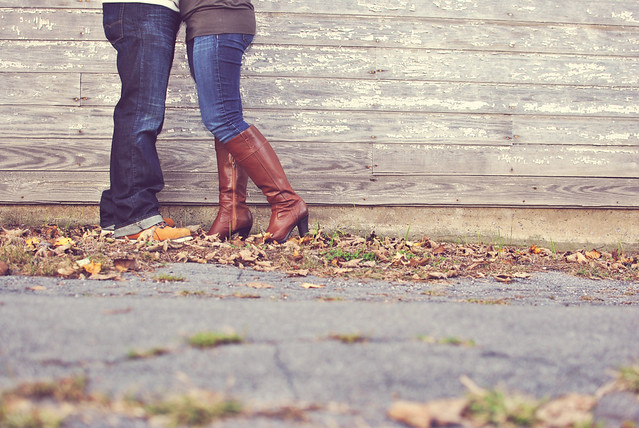
Overall though, I do like them - well, except for #3; but I loath boot shots.
 
These are VERY good for a first e-shoot.

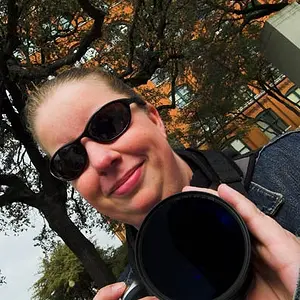
My only meaningful C&C is for #4:

As has been mentioned, there are lots of distracting elements in the BG. I really wish you'd have composed the shot so that your camera was lined up so that their heads align with the vanishing point on the road. The image is very symmetrical, and it's close to the right place already. As it is now, it seems a bit sloppy. Also, I second Unpopular's suggestion for a bump in contrast AKA a levels adjustment. It may also be a good idea to nudge the Gamma slider (midtone contrast) a bit as well.

Overall, these are a strong set for brand new emerging pro. Much better than my first paid gig, for sure. :thumbsup:
 
And the yellow gate in no 3 catches my eye too much maybe try crop that too...

There are multiple distracting objects in number 3. In addition to the yellow gate there are several distracting signs.

However I don't think crops g the yellow gate out is the best decision. I would try and remove the distracting objects using photoshop. The content aware tools work wonders.

I agree with what you are saying. Once I opened the photo in PS I realized all the signs and yellow pole. I wish I would have moved a little more back the road but I think I would have lost the depth of the line of trees. I'm not sure I am to the point where I could execute removing those objects with PS. Need more practice in that area.

overall, I like subtle, soft tonal processing - but I think that these could use a black point, especially #4, not so much to loose detail, just enough to give some depth.

Also, how were these exposed? For this kind of treatment, I would over expose them and bring down the hilights. It looks to me that the shadows were pretty close to clipping, and were brought back up?

Overall though, I do like them - well, except for #3; but I loath boot shots.

I normally start off by upping the contrast and then move to the levels. I will look into what you suggested. Thanks!

These are VERY good for a first e-shoot.

My only meaningful C&C is for #4:

As has been mentioned, there are lots of distracting elements in the BG. I really wish you'd have composed the shot so that your camera was lined up so that their heads align with the vanishing point on the road. The image is very symmetrical, and it's close to the right place already. As it is now, it seems a bit sloppy. Also, I second Unpopular's suggestion for a bump in contrast AKA a levels adjustment. It may also be a good idea to nudge the Gamma slider (midtone contrast) a bit as well.

Overall, these are a strong set for brand new emerging pro. Much better than my first paid gig, for sure. :thumbsup:

Thanks a lot! When you say line up the heads with the vanishing point are you basically suggesting maybe shoot from a little higher perspective? I will indeed take a look at bumping the contrast level up.
 
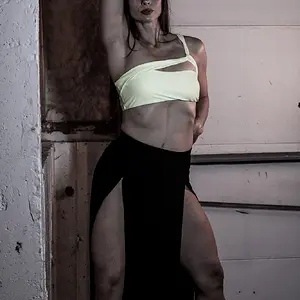
There is nothing wrong with long-deep shadows, but flatness is a problem with there is no black point, it gives it a hazy, vague look. You can have your cake and eat it, too. For example in #2 the black point here could be be in the shadow behind her hand.

Looking back, also in #2, the hilights are pretty clipped on the shirt. If I were shooting this frame I'd use a technique I like to call "hilight referencing", which is really nothing new - and is how we used to shoot slide film all the time. What you do is spot meter the brightest point that you want to record detail in, and increase exposure to the outer limits of latitude without clipping. Because everything in the scene is darker than the metered reference, everything else will be recorded. Any shadows that do clip out couldn't be brought back up without clipping hilights. Typically you end up with a far ETTR image (occasional in low contrast settings "too far") with deep shadows and full hilight detail which will need further processing; but all the detail you *can* get will be there. I've played with ways to compensate the over exposure by measuring and recording the shadows and adjusting gamma in specific ways, but these techniques I've found to be too bulky to use in the real world.

At any rate ... in this image I'd expose for the sweater and increase exposure by around three and one third stops, knowing that going much above this the hilights will start clipping. In reality, it's hard to determine the absolute brightest area within 1/3EV, so I'll expose 1/3 stop under to give a little leeway.

 
My only suggestion is to work harder at getting the right moment -- she basically looks like she wants to kill the photographer in the first two. This is, to be fair, partly her face. She's lovely, but has a very determined and serious sort of face. These would be better with a softer expression on her face, and that's all about working with the subjects. I don't know how to do it, and have no suggestions for actually implementing this ;)

Good luck!
 
My only suggestion is to work harder at getting the right moment -- she basically looks like she wants to kill the photographer in the first two. This is, to be fair, partly her face. She's lovely, but has a very determined and serious sort of face. These would be better with a softer expression on her face, and that's all about working with the subjects. I don't know how to do it, and have no suggestions for actually implementing this ;)

Good luck!

I was actually going for some more serious shots in some. I do have pictures from the shoot with a lot happy emotion etc. but for some reason I seemed to post only serious ones. I do agree I need to work on interaction with clients. It was easy with this couple as they are good friends of mine.
 
There is nothing wrong with long-deep shadows, but flatness is a problem with there is no black point, it gives it a hazy, vague look. You can have your cake and eat it, too. For example in #2 the black point here could be be in the shadow behind her hand.

Looking back, also in #2, the hilights are pretty clipped on the shirt. If I were shooting this frame I'd use a technique I like to call "hilight referencing", which is really nothing new - and is how we used to shoot slide film all the time. What you do is spot meter the brightest point that you want to record detail in, and increase exposure to the outer limits of latitude without clipping. Because everything in the scene is darker than the metered reference, everything else will be recorded. Any shadows that do clip out couldn't be brought back up without clipping hilights. Typically you end up with a far ETTR image (occasional in low contrast settings "too far") with deep shadows and full hilight detail which will need further processing; but all the detail you *can* get will be there. I've played with ways to compensate the over exposure by measuring and recording the shadows and adjusting gamma in specific ways, but these techniques I've found to be too bulky to use in the real world.

At any rate ... in this image I'd expose for the sweater and increase exposure by around three and one third stops, knowing that going much above this the hilights will start clipping. In reality, it's hard to determine the absolute brightest area within 1/3EV, so I'll expose 1/3 stop under to give a little leeway.

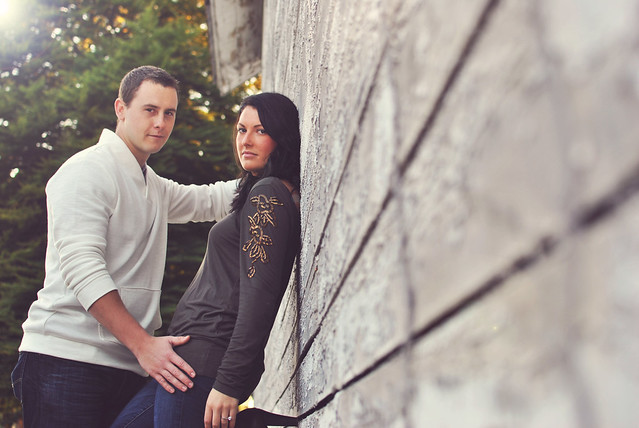
Any chance you can either dumb it down some or actually perform what you are explaining on the photo. I am more of a visual learning and think it would be easier to replicate that way.
 
hmmmm. I can't really show you without being there, but I pretty much shoot everything this way.

Basically, you just find the brightest part of the scene, spot meter and compensate the exposure until you're just below clipping. So if my meter says 1/500 I'll expose three values brighter at 1/60. If I don't compensate, then the image would be under exposed and where I metered at middle grey.
 
hmmmm. I can't really show you without being there, but I pretty much shoot everything this way.

Basically, you just find the brightest part of the scene, spot meter and compensate the exposure until you're just below clipping. So if my meter says 1/500 I'll expose three values brighter at 1/60. If I don't compensate, then the image would be under exposed and where I metered at middle grey.

ahhh I understand what you are saying now! Thanks!
 

Create an account or login to comment

You must be a member in order to leave a comment

Create account

Create an account on our community. It's easy!

Log in

Already have an account? Log in here.

New Topics

Back
Top Bottom