Self Portrait - Learning Lighting

adamhiram

No longer a newbie, moving up!
Joined
Feb 6, 2015
Messages
858
Reaction score
576
Can others edit my Photos
Photos OK to edit
Up until now, I've relied on a single flash in an umbrella or softbox, often with a reflector for fill. This lent itself well to loop/rembrandt lighting, but I didn't have a lot of control over fill, and background lighting was mostly a matter of controlling spill from the main light.

I've recently made the jump to 3 lights and have been learning how to use them, but would love some feedback and tips on how I can improve. The photo below is a self-portrait with loop lighting done with 3 lights:
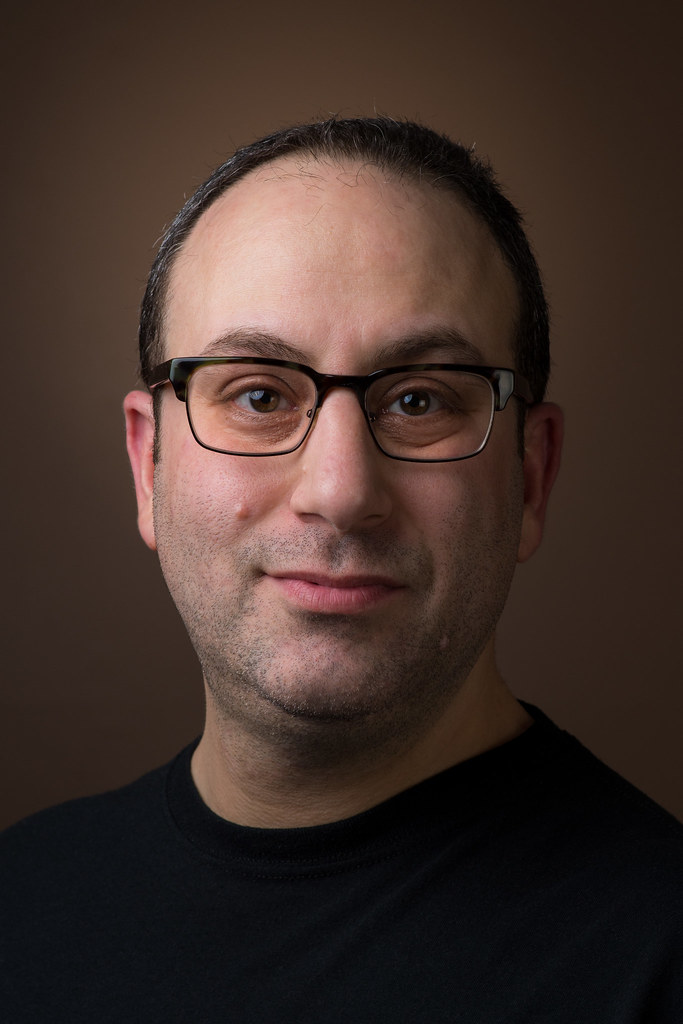
  • Key light = 38" octobox above and camera left
  • Fill light = 31" square softbox slightly below and camera right
  • Background is lit with a 16 degree gridded snoot on a bare wall
Any constructive feedback on what I did right, what I did wrong, and how I can improve?


20180213-DSC_5728a
by adamhiram, on Flickr

Nikon D500, 85mm, f/8, ISO 100
 
I think the key light is too close to you, and is causing a forehead hotspot and too rapid of a fall-off of the light, due to the inverse square law. You shirt is under-lighted, mainly due to how close the key light was to the forehead....to get the forehead not burned out, everything else that's even a few inches farther away goes dark,fast. The shirt being detail-free and inky black is a net negative, IMO.

Selfies are _very challenging_ as learning tools...impossible to see the catchlight placement and shape.

A few things to notice: fill light's catchlight on camera left does not show up much, right side eye shows a big fill-light catchlight. My feeling? Place the fill light much closer to the camera axis, like, almost touching the camera itself! That way, you'll have equalized fill catchlights. Your shadow-side ear is too bright, IMHO, for a classical portrait lighting setup, which is what this is supposed to be.

I dunno...selfies, again, so,so,soooo hard to set the lights "just so". Do you want more or less identically-positioned catchlights from the key light and the fill light?

Posing: I would lean forward from the waist, and jut the chin out, project forward the chin, and raise the camera a slight bit, and those things together will improve the face/neck rendering on-camera. I don't especially agree with the head tilted toward the high shoulder.

Overall, okay, but has a number of small issues that could be improved upon, but the _most_ obvious to me is that the key light is simply TOO CLOSE to you; this causes a staggering rate of light fall-off in intensity: from borderline burn-out on the forehead where it is closest to the key light, to a T-shirt that is, despite a key + fill light, almost totally devoid of detail. The shirt needs more detail...the forehead is too bright...so move the key light a bit farther away from the face, and the light will be more-even in its fall-off rate.

Background? WONDERFULLY lighted. Niiiice! Super use of the gridded light!
 
Thanks, @Derrel, exactly the type of feedback I was hoping for!

Key light position - You're spot on with the key light being too close. It's still strange to me seeing 2 catch lights in each eye and I was thinking closer key light meant bigger main catchlight, softer light overall, and the fill light would take care of the rapid fall-off. But that's not how the inverse square law works, which should have been apparent when I had to kill the highlights by -50 while editing. I'll try again with the key light further back at a more reasonable distance for less dramatic fall-off.

Fill light position - Again, thinking about a 2nd catchlight is new to me, I've always used a reflector which creates a subtle highlight rather than a full catch light. I'll try moving it on axis and see how that looks.

Posing - Being both the photographer and subject while also trying to figure out lighting, I guess I forgot to think about pose. I'll definitely keep these tips in mind.

Background - Thanks! I finally pulled the trigger on a Rogue Flash Grid instead of using DIY posterboard / paper towel tube snoot, and boy did it make a difference.

Thanks for the great feedback!
 
Your response to my comments is one of the most mature, calm, and respectful I've seen here on TPF. With that type of attitude, you will go far. And I agree 100%: being both the photographer and the subject (selfie shoots!) is very challenging. Very difficult!

The Rogue flash grid did a fantastic job on the background illumination task.
 
@Derrel pretty much nailed this C&C.

Love the Octabox as the main light. It gives a very nice catch light in the eyes.

My first reaction looking at the fill light is that it is a little dark, so I would suggest maybe adding just a little to the fill to bring up the shadows and soften the transition just a hair more.

Placement may help with that somewhat or it may be a fact that you were wanting to produce a more moody portrait.

As I practice with my three light set-up, I have the issue of the fill having too much power even on it's lowest setting.
 
Thanks Ron! I appreciate the recommendation on the Parapop soft box - it's been my favorite modifier since I got it last year. Good observation on the fill being a bit dark, i'll try bumping that up 1/3 or 2/3 stop and see how it looks. I was going for more of a moody portrait here since it is a lighting pattern I am somewhat familiar with, and wanted to focus on one lighting pattern at a time. As I continue working through my copy of Light Science & Magic, I hope to improve with other lighting patterns with a better understanding of how and when to use them.
 
Short of having a convenient patient non-complaining subject, a mannequin might help you.
Then you can see the lighting on the mannequin, rather than guess how it may look on you.

But the rubber surface of the mannequin does not reflect light like the human skin.
And the rubber eye does not reflect light. However that can be fixed.
A eye trick that I was taught. Blacken the pupil of the eye, then put a couple coats of CLEAR nail polish on the eye. That way the eye reflects light more like a human eye.​
 
@ac12, I watched a youtube video with Tony Corbell and he got a head like that from a store that was grey and he uses that to teach. The suggestions that was given there was to get one of the styrofoam heads from a store and spray paint it with a flat grey paint. I did this and have a wig that I got for cheap and use that on a light stand to help me try lighting.

I will have to get out the black paint and clear nail polish from the wife to try this for the eyes.

Ron,
I never thought to spray paint one of those styrofoam heads. Good idea.

Interesting thought.
With a white eye + colored iris + small pupil, the eye is only looking in ONE direction.
With an all black eye, the eye would look odd (maybe spooky), but the catch light would probably be easier to see from any direction.
 
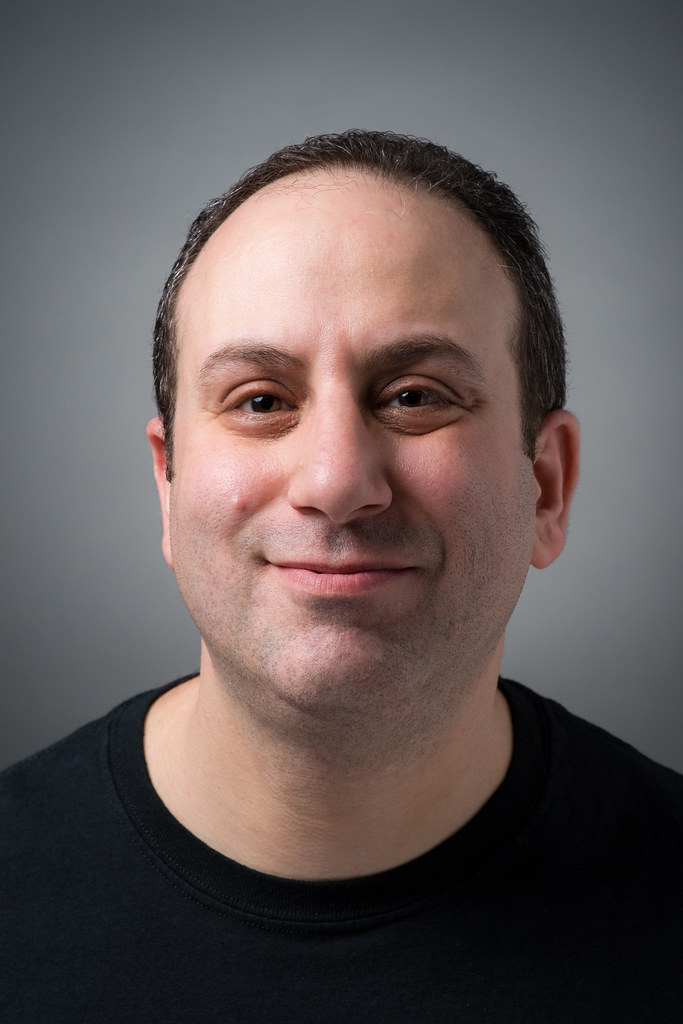
Reshot with a few changes:
  • Key light moved farther back for more even lighting, gradual fall-off
  • Fill light moved closer to camera axis for more symmetric catch lights
  • Raised power of fill light for less "moody" feel
  • Posing - leaned forward and jutted chin out, per Derrel's recommendation
  • Swapped out the brown wall for a gray seamless background
  • Added a styrofoam sheet fill card under the chin to further reduce dark shadows
  • Removed glasses for one less thing to worry about
Here is the final shot with the above setup. The 2nd catch light in the right eye from the fill light looks like it may have been partially blocked by the fill card, which would be easy enough to avoid in the future. It still looks odd to me to see 2 catch lights in each eye, especially of different shapes (round key, square fill), but I guess there's really no way around that with multiple light sources within the family of angles.

20180223-DSC_5797a
by adamhiram, on Flickr

This is another shot with the fill light swapped out for a large white reflector camera right of the subject. Although this doesn't give as much control over fill light, I definitely prefer the single catch light with subtle highlights to the double catch lights in the prior shot. I took another shot using a silver reflector, which created brighter fill, but also resulted in a noticeable 2nd catch light.

20180223-DSC_5812a
by adamhiram, on Flickr
 
I watched a youtube video with Tony Corbell and he got a head like that from a store that was grey and he uses that to teach. The suggestions that was given there was to get one of the styrofoam heads from a store and spray paint it with a flat grey paint. I did this and have a wig that I got for cheap and use that on a light stand to help me try lighting.

Make sure the paint is latex otherwise your styrofoam head will be mellllltttttiiiinnnnngggg. LOL
 
@adamhiram I've been following your progress with interest, thank you for not only posting the results but the steps. It's been helpful for me.

In the last set, I can see and prefer the more even fill of the first shot. Just a personal observation but the key appears just a tad hot (the forehead camera left and tip of nose). I agree with you on the double catch lights, they bug me as well. I've never found a way to eliminate them short of cloning out in post.

While admittedly there is no right or wrong on ratios, my personal preference would be the second. I've found this to be helpful while trying to understand ratios.
Lighting Ratios to Make or Break your Portrait

Lastly is focus, I'm a little anal on eyes, and I know from personal experience how difficult it is to get a sharp focus on the eyes on a selfie. Move even a bit and your focus has changed. I've compensated by using a higher aperture to increase my DOF. However most adult males have pores, whiskers, etc that end up looking a little to intense with sharp focus. Not nearly as difficult to overcome when you can remain behind the camera.

Looking forward to more entries on your progress.
 
In the last set, I can see and prefer the more even fill of the first shot. Just a personal observation but the key appears just a tad hot (the forehead camera left and tip of nose).
I think you're right - I reduced exposure in Lightroom by about 1/2 stop and the exposure looks much better. I suppose that's the downside to working without a light meter. However I was careful not to clip the highlights, and the specular reflections on the forehead and nose are still there after re-editing. Any suggestions on how to avoid this in the future? My light sources are pretty large and soft, so perhaps it was just shiny skin?

While admittedly there is no right or wrong on ratios, my personal preference would be the second. I've found this to be helpful while trying to understand ratios.
Lighting Ratios to Make or Break your Portrait
Awesome link, thank you for sharing! I'm pretty sure I read the prior article from that author, as the photos look very familiar. I was going for more of a 2:1 ratio with this lighting, which I think I achieved with the white reflector, while the shot taken with a silver reflector (not shown) is pretty close to 1:1 and just just looked too flat to me (and also created another catch light). I agree with the fill light being more even with the soft box for fill, albeit a little brighter than intended, but I still want to figure out how to make a 2nd catch light look less "alien".

Lastly is focus, I'm a little anal on eyes, and I know from personal experience how difficult it is to get a sharp focus on the eyes on a selfie.
Hmm, I didn't realize I missed focus, but it was likely for the obvious reason you mentioned. I shot at f/8 @ 85mm, so that should still should have given me a few inches of DoF, but without being able to look through the viewfinder, there's a good chance the focus point was on a brow or nose. Not much I can do about that, except step down further or find another subject!

Thanks for the great feedback! It is definitely appreciated, and I'm excited to keep learning.
 
Any suggestions on how to avoid this in the future? My light sources are pretty large and soft, so perhaps it was just shiny skin?

Yes. Buy a good meter. You don't have to spend a fortune. I picked up a decent Sekonics L-308S used one off Ebay, for around $75. So simple to operate, and so much faster than the shoot, look, adjust, shoot, look, adjust method. With multiple lights it's pretty much a necessity.

I was going for more of a 2:1 ratio with this lighting, which I think I achieved with the white reflector, while the shot taken with a silver reflector (not shown) is pretty close to 1:1 and just just looked too flat to me (and also created another catch light).

I strive for somewhere between 2:1 and 4:1 but again that's a personal preference, unless I'm going for a low key or high key shot. Also I have a large collapsible white, silver, gold reflector (you know the kind that takes 14 arms to fold back up LOL). Most of the time I stay with white, as I find it easier to control the light. The silver as you found will move a lot of light, and I'll use it at times for that reason or if I want to take out some of the reds in a face. It seems to neutralize them. Frankly I've never got the hang of the gold. I went crazy for awhile during my "golden days", everything I shot looked like it was being illuminated by some sort of "heavenly" light. It wasn't necessarily attractive.

The double catchlights I've learned to either live with or clone them out.

but without being able to look through the viewfinder,

Yup, it's virtually impossible to figure out to place your nose in the exact same spot repeatedly. I even rigged up a bar and card with a circle to place my nose in, then bumped it out of the way when I was ready to shoot (I have a remote). It is sssoooooo much easier to be just the photographer and I also find it easier to give others directions, less arguments :02.47-tranquillity:

I'm not sure that increasing your DOF is the answer. At one time I was fascinated with extreme detail, but sometimes there are things in a face that aren't attractive in ultra sharp detail. I've been experimenting with wider apertures, following the outstanding examples of some here on the forum. However that requires even greater care in making sure you have the eye in focus. Like all problems, solving them is a series of steps. Using yourself as a model will let you work out lighting details, but to pull it all together you need a model other than yourself.
 
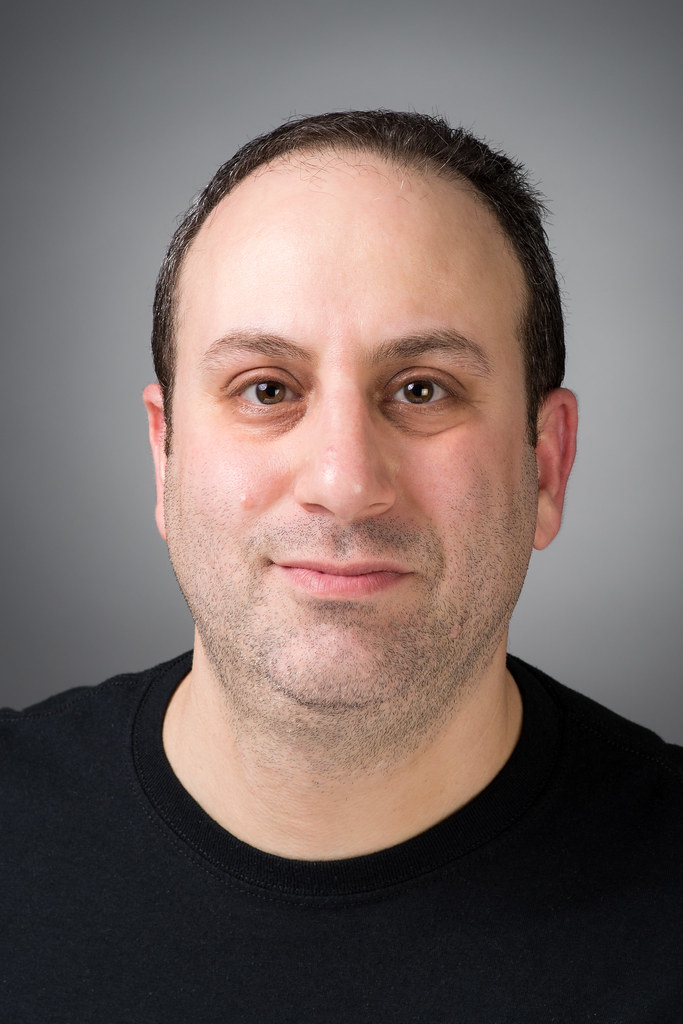
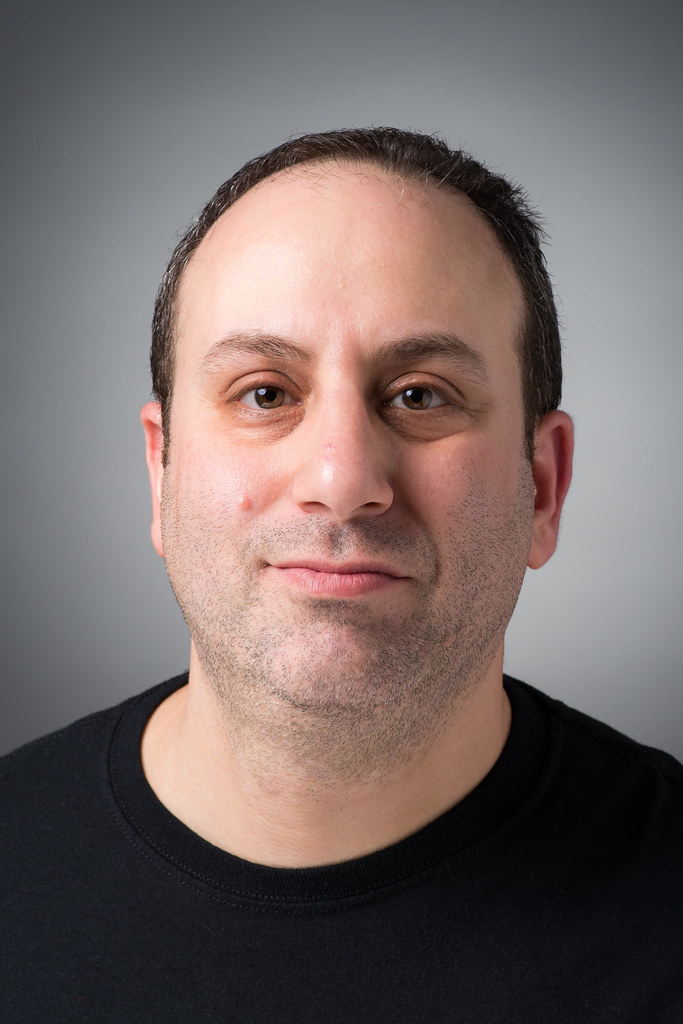
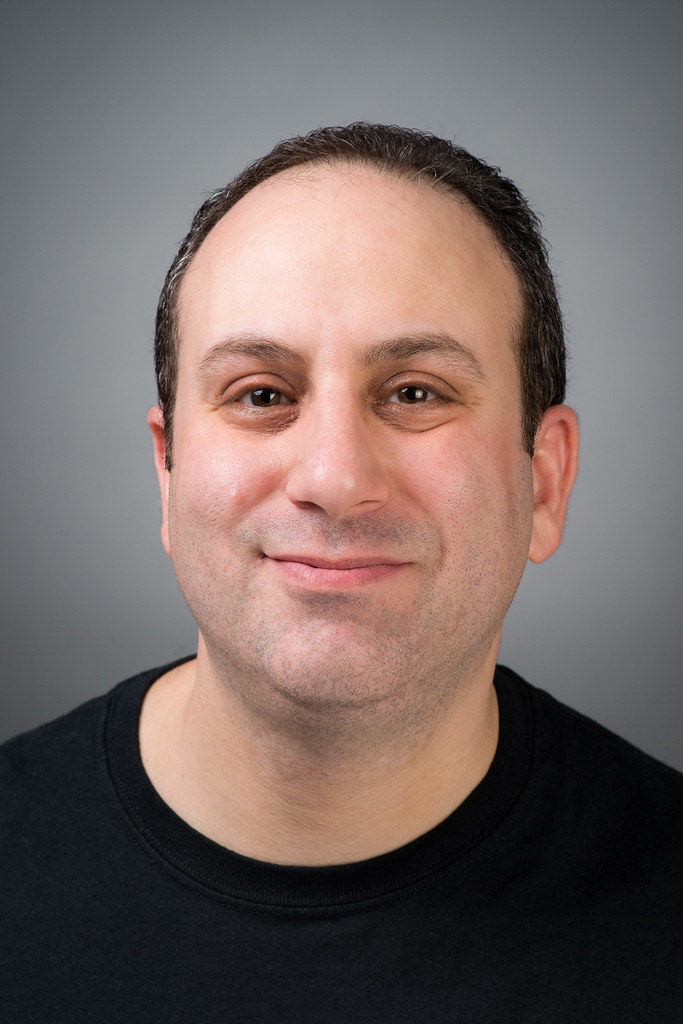
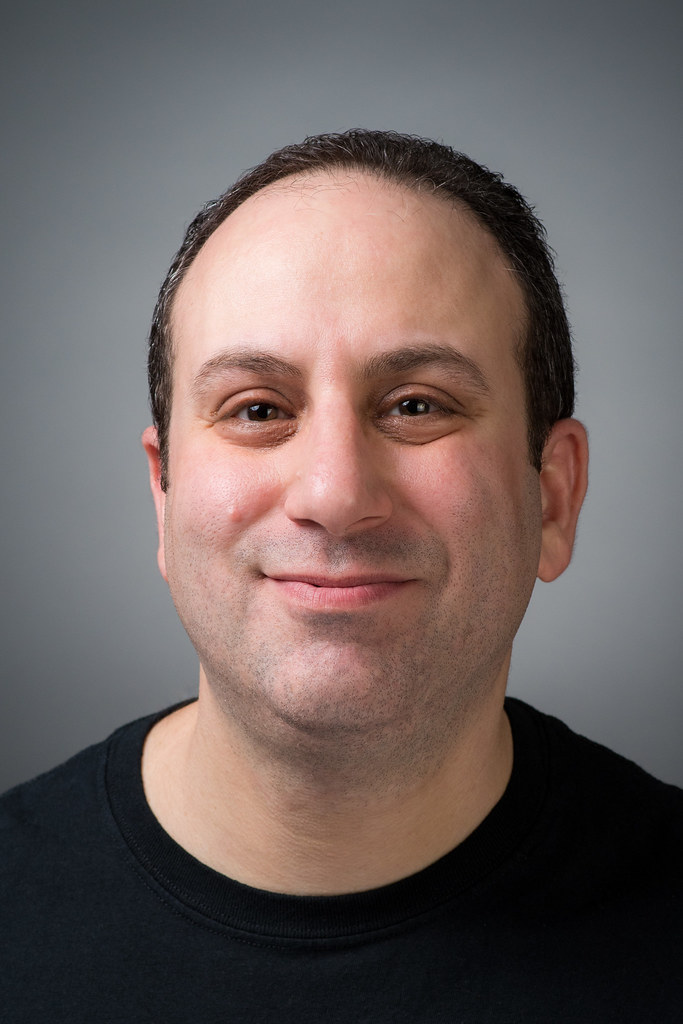
3rd round... Sticking with the same setup, but I made a few changes based on @smoke665's recommendations.
  • I picked up a Sekonic L-308S-U light meter to get a more accurate exposure, as well as play around with key/fill ratios
  • Lowered the styrofoam fill card under the chin to lap level - some fill from beneath is nice, but I wanted to leave some shadow
  • Raised my ISO to 400 - for the sake of learning, I really don't need to burn through so many batteries firing my strobes at half or full power
This was shot with a 2:1 key/fill ratio. The key light still looks a bit hot to me, but according to the light meter, this was the correct exposure.

20180302-DSC_5908a
by adamhiram, on Flickr

Here's the same setup with a 4:1 key/fill ratio.

20180302-DSC_5920a
by adamhiram, on Flickr

Similar to last time, I swapped out the fill light for a white reflector for fill without a 2nd catch light. This also metered as a 4:1 key/fill ratio, but the quality of light is quite different from the previous shot, which could just be the result of slightly different positioning of the fill source.

20180302-DSC_5932a
by adamhiram, on Flickr
 

Most reactions

New Topics

Back
Top