Sometime you have to post process.

Grandpa Ron

Been spending a lot of time on here!
Joined
Aug 9, 2018
Messages
1,156
Reaction score
703
Can others edit my Photos
Photos OK to edit
I will be the first to admit I have an "as shot bias". Perhaps I grew up at a time when B&W was the norm and color was new. So documentary type photography is as ingrained it my psyche as the 50"s and 60's rock and roll music I grew up with.

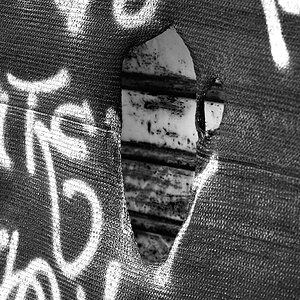
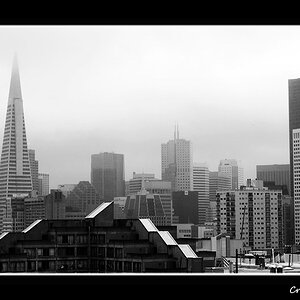
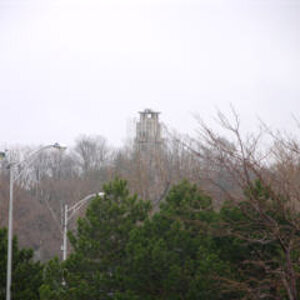
Nonetheless, Monochrome is a hard task master. I was quite disappointed with the black bird on the trellis I photographed. The bird was a black blob. So with courage born of ignorance I stepped into the world of GIMP post processing.

I had used Gimp before to adjust exposure and contrast but here a was treading into the world of filters and hues. The first figure is "as shot". The bird is lost in the background. The second shot is after a bit of diddling with post process hues and filters. I seems a bit stark to me but the bird stands out which was my intent. Also, I do have a healthier respect for those who post process.

I am curious if a green filter on the lens would have done the same?

black bird 3.jpg black bird filtered.jpg
 
I am curious if a green filter on the lens would have done the same?
I don't think so, unless you are using a digital camera that has been physically converted to monochrome only. For us who used filters with film, we would naturally assume the effect would be the same with digital, but there is more to the story.

A professional conversion process removes the color array from the surface of the sensor. Since you (probably) still have the color array intact, placing filter on the lens would not enhance contrast, as it would with B&W film, but would introduce a color cast that might be difficult to remove in post.

Digital manipulation (editing) includes "filter effects" that very nearly mimic the old film filters, and that is about as close as we can get with an unaltered digital camera.
 
Designer, thanks for the information. I usually shoot in color then convert to monochrome.

I have read about the converting cameras to monochrome by removing the color array but that is not going to happen unless I upgrade to a second camera. I just started experimenting with the filter effects in the monochrome setting in my camera.

My goal is to gain a better understanding of filters. If I can do this with the camera's filter option, I will save me a lot of time and money shooting B&W film.
 
I like the shot and prefer the version before processing... The bird has more detail but I see artifacts of the PP especially in the BG
This particular shot is a black bird with a bright surrounding. It's a HDR scene. Black (or white)birds are usually a choice in exposure where you can expose for the scene or expose for the bird.
If I were post processing I might bump the overall exposure as far as the whites would let me, then lift the blacks to bring more feather detail.
 
If I can do this with the camera's filter option, I will save me a lot of time and money shooting B&W film.
I take that to mean you will save a lot of time and money by NOT shooting B&W film.

Me, too.

I was fairly active in B&W film in the 70's, and had a darkroom which was big enough for two enlargers, but have since simplified my life by discontinuing that part of the hobby.

Would I ever want a dedicated B&W digital camera? Perhaps, but only if I had plenty of money and time to give it a worthwhile try. Meanwhile, I make so few B&W photos these days that the edited digital version works o.k. for me.
 
I guess I should clarify a couple of points.

Though I was a big camera buff in the 70's and 80's my interest expanded into many other areas. Wilderness canoeing, Colonial re-enactment, family travels and such; these photo-rich opportunities were passed over for simple family snapshots. While I have dozens of photo albums with treasured family photos. Things like composition, cropping, exposure simply were not a consideration, it was "say cheese" and shoot. Even with the first high dollar 3.2 megapixel digital camera I bought, images where simply downloaded to the computer, pictures were viewed as shot.

A couple of years ago when I decided to return to photography, It did not take to long to discover post processing. It seemed that you could take a photo and manipulate it any way you want. Since I was a fan of B&W with both film and digital photos, post processing was really handy for correcting exposure, contrast and cropping. Except for my developing tanks, my darkroom equipment was long gone.

After reading some books on digital processing, I diddled around to try to separate the bird from the background. I was able to do that but I introduced a lot of other unknown to me variables. In the end my interest seems to be with the use of the camera more than the photo. That is to say, I find coupling it to a telescope, shooting night scenes by ambient light and sky glow, the moon through the clouds behind trees, close ups of insects and flowers, more to my liking; rather than sitting if front of a monitor screen trying to optimize an as shot picture. I tip my hat to those who are good at it.

As for the black bird photo, there will be other black birds and perhaps I will have gotten better at reading the black and white results before I shoot, so I do not have to judge from the small view of a camera screen.

I love this hobby.
 
The old black-and-white film maxim was "a filter tends to lighten its own color."

my black-and-white filter use was limited to a very select few filters, mainly the K2 which was the standard yellowish filter, a red 25 for making blue sky dark and white clouds appear very White, and an orange filter, which was a great contrast enhancer.

i'm really not sure what to say about whether a green filter would have given you the effect you desired. I can tell you however that I am a huge fan of Lightroom and its various "black-and-white effects", and also their "color filter effects."

Compared to using the channel mixer in Photoshop, I think that Lightroom has a much better way of previewing effects, and leads in general to better results as a result of the countless hours of design work that went into developing the black and white conversion routines used in Lightroom. The old-fashioned way of using the channel mixer in Photoshop is,in my opinion,a very outmoded 1990s way of doing things.

It has never been as easy as it is right now to edit digital color images and make fabulous black-and-white images.

The idea that sometimes you need to post process is slightly misguided. I think the times where post processing is needed is more than "sometimes "
 
Last edited:
I will just say this: if you are not using Lightroom, but there still stuck using Photoshop, Then you don't know what you're missing in terms of speed, ease, and efficiency. After about 20 years of using nothing but Photoshop I was first exposed to Lightroom around 2012.

within a month, I was firmly committed to using Lightroom, and it has been about seven years since I have regularly used Photoshop.

Photoshop was developed years ago, and using it seems a lot like being stuck in the last century to me. If you want to spend a lot less time futzing around with your pictures, then I would encourage you to learn how to effectively use Lightroom. Many things which I see people describe doing in Photoshop the old way have been reduced to simple actions and better tools in Lightroom.
 
I think I have a green filter somewhere... so that tells you how often I (don't) use it. I'm not sure shooting B&W film what it does, but I think a red filter blocks red/orangish colors and enhances blues so a green filter would probably block greens and let in more reds. Not sure if that would have made any difference since it might have further blocked the greens which were probably very light from the bright sun anyway.

With the contrast with the bright sun on the leaves and the dark bird, if it was in the (wet) darkroom I'd probably dodge out some detail on the bird and see if I needed to burn in the leafy background.

I'm always going for a proper exposure and figure that must make a difference because I don't do much editing. That and I've done sports and events and it was only ever a sideline, not like working in sports these days where they have a photo on a team website before the game's over! but still there's a need to get shots efficiently and shoot them the way you want them. I sometimes don't do any more than open a photo in Photoshop and go okay, looks good, if it prints well I'm done! I may need to adjust contrast and that's about it. Shooting digitally to get a B&W image I use Remove Color and adjust contrast as needed.

I'm not sure why the camera or software refers to it as Monochrome because that's inaccurate; I've done cyanotypes which are blue ranging to white, and any one color images are considered monochromatic. B&W is an absence of color leaving just the dark and light tones.

This photo is one that's probably in mixed lighting and may be a bit more challenging to edit. I'd say if you want to minimize editing then go for a proper exposure and frame shots the way you want them.
 
Hmm, this reminds me of shooting XP2 and looking at muddy prints on colour paper.

I have never been happy with just straight digital conversion to monochrome ... I have always done PP to make it look like the B&W prints I used to make from B&W film.
I think the Leica M Monochrom would be pretty good SOOC in comparison.

... and to add to @vintagesnaps point ... I look at colour filters (on camera) as subtractive, so a green filter would have more affect on red wavelengths in the image.
 
Ps is still the heavy hitters when it comes to editing, but as Derrel mentioned above Lr is a good way to quickly process. Since the addition of "Profiles" you can quickly convert and add filters at the same time seeing a preview in real time. The opacity slider on profiles lets you adjust the effect to taste. Another feature that's quick and easy to use is the Radial Filter, which in your example would have let you adjust the bird or the background independently of the other. Unlike adjustment brushes in Lr radial filters don't slow down your processor.
 
I do not have a real problem with adjustment brushes slowing down my processor in Lightroom. Yes the previous effect in Lightroom is one of the biggest timesavers Colon just pulled a mouse passed a whole Row of presets and instantly get a quick look at how an image might be best adjusted… This is something that Photoshop cannot do.
 
As I understand Lr, the slow down with lots of adjustment brush edits is due to the nondestructive nature of the program. Since it never touches the original and never write a new file (unless exported), it has to re-render the intire image at every edit since applying an edit on top of an edit is a cumulative action. Radial filters do the same but since they cover a larger area and the adjustments are global for that filter, it doesn't take as long to render. Working with a few brushes here and ther on a single image won't be noticeable in the later versions, but start working on several images with a lot of brushes and you'll notice it. Increasing your cache, and clearing history can help.

The nice thing about profiles is that unlike presets, they don't change any of your develop module sliders or tone curve. They're also nondestructive, can be changed with the click of a mouse, the opacity slider on the profile gives you the ability to fine tune the effect. After Lr added profiles I rarely found a need to use Nik, eventually doing away with it entirely.
 

Most reactions

New Topics

Back
Top