Those Moments

itsjustbreality

No longer a newbie, moving up!
Joined
Jan 14, 2017
Messages
125
Reaction score
63
Location
Somewhere in NY
Can others edit my Photos
Photos OK to edit
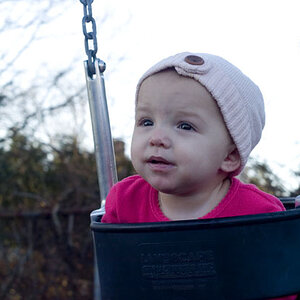
This is from an anniversary shoot this last weekend. After post, I went to flag all of my favorites, and realized most of them were in black and white! These two just do b&w so well!

Of course, critique is welcomed.

The second picture I wish I had been at a slightly higher angle, or had her upper body/head tilted more towards me.

The first one I feel the snow patches in the upper quadrants could be cloned out, but I'm still working on perfecting that without making it look like something has obviously been cloned out. [emoji4]

5D Mkiii
Cannon 24-70 f4
For both- ISO 400, 1/400


1490887387671.jpg

1490887219485.jpg


Sent from my SAMSUNG-SM-N910A using ThePhotoForum.com mobile app
 
Cloning out the snow is a possibility, but the snow accurately reflects the reality of the season. Second shot looks just a bit too dim, but shows good posing, good passion, nice ring placements.
 
Cloning out the snow is a possibility, but the snow accurately reflects the reality of the season. Second shot looks just a bit too dim, but shows good posing, good passion, nice ring placements.
Thank you for your feedback! I brightened the second up a stop. [emoji4]

1490904228314.jpg


Sent from my SAMSUNG-SM-N910A using ThePhotoForum.com mobile app
 
It does not look anppreciably brighter to me; perhaps you brightened it up only 0 .1 EV (1/10th stop?), or accidentally uploaded the same file? Regardless, I LIKE the way the diagonal feeling of their bodies/torsos creates tension, a feeling of passion, which is totally NOT what would happen with static, straight-up-and-down body positions. There are hands at the upper left and lower right corners, her sleeve leads to her hand which is on his head, all in all just a nice pose.
 
Sorry, but IMO, I would start from scratch with these with the processing.
You need to correct the tone problems before conversion to BW
There are blanched spots on faces and her hand.
The shadows are blocked up and without detail.
Note the dramatic difference in tone on his/her faces as they go from light too dark.
There are no true blacks and the dark areas have no detail.

I suggest going back to the raw and reprocessing them because, as is, these will print terribly.

upload_2017-3-30_16-33-59.png
 
It does not look anppreciably brighter to me; perhaps you brightened it up only 0 .1 EV (1/10th stop?), or accidentally uploaded the same file? Regardless, I LIKE the way the diagonal feeling of their bodies/torsos creates tension, a feeling of passion, which is totally NOT what would happen with static, straight-up-and-down body positions. There are hands at the upper left and lower right corners, her sleeve leads to her hand which is on his head, all in all just a nice pose.
I think I uploaded the same picture! Thank you for your comments!

Sent from my SAMSUNG-SM-N910A using ThePhotoForum.com mobile app
 
Sorry, but IMO, I would start from scratch with these with the processing.
You need to correct the tone problems before conversion to BW
There are blanched spots on faces and her hand.
The shadows are blocked up and without detail.
Note the dramatic difference in tone on his/her faces as they go from light too dark.
There are no true blacks and the dark areas have no detail.

I suggest going back to the raw and reprocessing them because, as is, these will print terribly.

View attachment 137315
No sorry needed! I appreciate your honest feedback. I went back into processing and I am trying to figure out the best way to fix those issues. Would dodge/burning be the best method? I've attached the image basicallySOOC below. Any suggestions you can provide would be great.

Context- it was a very overcast day, so there wasn't any sharp shadows from the sun. Is this issue something that could have been prevented initially in-camera?

1490909062817.jpg


Sent from my SAMSUNG-SM-N910A using ThePhotoForum.com mobile app
 
There are always some parts of the body or head or arms that will pick up a lighter tone, no matter what the light is; those light spots are depth and shape cues, that the visual system picks up on. See this article for examples of why light spots on the face or skin are not always a bad thing: A Makeup Tip I Wish Someone Had Told Me When I Started Photography | Fstoppers

And yes, dodging and burning are valid ways to do it. MY experience is to darken the image, quite a bit, and to then use the Dodge tool in Lightroom to "lift up" small areas first, with a SMALL brush. Areas like say, the cheeks, the chin, the bridge of the nose in some shots, the forehead,etc.. Then, after initial, small brightening through dodging, take a much BIGGER brush, and lighten-up the larger areas of the shot, using three separate passes. When you begin, it might take a few tries to get this process down acceptably.

Try this: darken the whole frame to Minus 4.0 EV. First, do the small dodges with a very small brush, perhaps 30 pixels diameter, at like say + 0.4 EV, on say hands, cheeks, forehead. Then, set the Dodge tool to +1.3 EV,and dodge the entire figures, both the man and the woman. Then do it again. Then do it again. By working in three passes, it's easier to get it "right" and looking more natural.

As you can see, 1.3 EV x 3 passes equals almost back to the original value of Minus 4.0. The +0.4 EV tiny dodges will become highlighted areas of emphasis and interest. This technique can create very interesting,almost painterly light...I like to work this way against gray backdrops, but it will work on other types of backgrounds. This is hand work, not one-click or slider work, so it looks more painterly, more organic, than simple, routine ways of working.
 
Last edited:
There are always some parts of the body or head or arms that will pick up a lighter tone, no matter what the light is; those light spots are depth and shape cues, that the visual system picks up on. See this article for examples of why light spots on the face or skin are not always a bad thing: A Makeup Tip I Wish Someone Had Told Me When I Started Photography | Fstoppers

And yes, dodging and burning are valid ways to do it. MY experience is to darken the image, quite a bit, and to then use the Dodge tool in Lightroom to "lift up" small areas first, with a SMALL brush. Areas like say, the cheeks, the chin, the bridge of the nose in some shots, the forehead,etc.. Then, after initial, small brightening through dodging, take a much BIGGER brush, and lighten-up the larger areas of the shot, using three separate passes. When you begin, it might take a few tries to get this process down acceptably.

Try this: darken the whole frame to Minus 4.0 EV. First, do the small dodges with a very small brush, perhaps 30 pixels diameter, at like say + 0.4 EV, on say hands, cheeks, forehead. Then, set the Dodge tool to +1.3 EV,and dodge the entire figures, both the man and the woman. Then do it again. Then do it again. By working in three passes, it's easier to get it "right" and looking more natural.

As you can see, 1.3 EV x 3 passes equals almost back to the original value of Minus 4.0. The +0.4 EV tiny dodges will become highlighted areas of emphasis and interest. This technique can create very interesting,almost painterly light...I like to work this way against gray backdrops, but it will work on other types of backgrounds. This is hand work, not one-click or slider work, so it looks more painterly, more organic, than simple, routine ways of working.

Thank you so much! I'll try my hand at this.


Do you have ps or just LR?

Can you post larger image or link to full res image?

I have both, but my ps knowledge is....not that great. I uploaded the picture to my Gdrive: Lam sooc-100-2.jpg
 
Sorry, this is a bit ovrsharpened.
I didn't see it until I'd put a few more layers in and just too tired to go back.
The neat thing about PS is that there's a lot of sort of diagnostic stuff that one can do to understand what is going on.
The original was way cold and when I warmed it up, the floridness of his cheeks was obvious so I took most of that off.
Also did a bit of sharpening

With a full res original, you could use luminance masks to tone down the bright areas with much more control but this was quick for a demo.
With a full res image, you could brighten his eye sockets, manage his face complexion better but.......

upload_2017-3-30_19-24-53.png
 
Thank you so much for taking the time to work on it! The skin looks much better! Photoshop is definitely on my to-learn list. I'm having a difficult time making sense of it!

Sent from my SAMSUNG-SM-N910A using ThePhotoForum.com mobile app
 
For what it's worth, I like the images from first post. Yes, it's slightly under exposed, so what. I don't need to see his jacket fabric.
 
You got the raw materiel to work with, that's the main thing. Processing can be learned, getting THE shot is a talent. :)

TIP: Sometimes cloning isn't the answer to remove things, in some cases cutting and pasting over works better. I think that would work with your snow in this case, if you really think it needs to go. It works for me and no-one has ever noticed that I recall. ;)
 

Most reactions

New Topics

Back
Top