bw tones confused.

There really isn't any way of increasing midrange tones in bw is there? kind of trying to understand this. I thought maybe if I adjust the white balance toward one side and then use a tint in post I would increase tones. But that really doesn't increase tones because I started with gray I will end up with gray. Just a different look of the grayscale. Thought of maybe a filter, but that would again change all the tones.
you cant really increase tones just bring them more to the front or make what is there more contrast right? Because if you slide to one side of the scale, you drop of the other side, you slide the other way you decrease on the far side. so you never actually increase tones but just try to find the center of the gray scale if you want the most midrange?

Clarity slider. Tone curve adjustment.

A great method that I and many other people use is to apply Unsharp Mask at a small percentage, like 10 to 18%, and then a ridiculosly high 150-250 pixels, at a threshold of precisely ZERO. Yes, you read that correctly: try 10 Percent, 150 pixels, Threshold 0. This will greatly boost local contrast. If it's too much, apply Fade>Unsharp Mask>40%. You can also apply the above settings, Fade to 40%, and then RE-APPLY the same settings, and Fade to whatever looks good.
 
peaks represent how much of a particular tone is in the photo. if the histogram is flat, then the image has the exactly same amount of tones throughout the iamge. A black to white graident will have a flat histogram.

oh. I was looking at this "The above image is an example which contains a very broad tonal range, with markers to illustrate where regions in the scene map to brightness levels on the histogram" In your link with the image. (very helpful btw) so I thought if It started low on one side raised slightly upward to a hill rounding in the middle and dropped off the other I hit the entire range, with the highest point in the middle so in theory should have the most even tones and most midtones. kind of like color but, well grayscale. For a more fluid photograph wide ranging and with lots of midtones..
and compared to the light, and my thoughts on diffusing light for more tones it made sense I guess. im probably still missing the boat here.

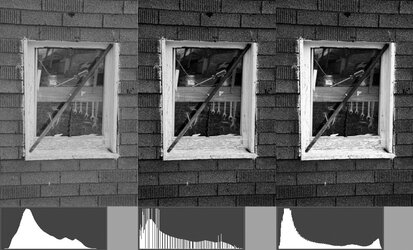
I may be able to help. I was working on an example for my class this afternoon concerning exposure and the photos I took may shed some light on what you're wrestling with here. Right now here's the photos along with their histograms.

View attachment 68991

The left photo is a different exposure while the middle and right photos are two versions of the same exposure; the photos were taken less than a minute apart. Your concern has to do with tone response and the tone response in these three photos is very different one to the next. As Braineack noted in an 8 bit JPEG you have a fixed range of 256 steps from black at 0 and white at 255. If you look at the histograms you'll see that the left photo extends across the full range as does the right photo. The middle photo however falls a little short of the left (black) corner.

It's late and I'm calling it a night but in the meantime if you see this before I check back in the morning you can consider the differences you see between the three photos and I can elaborate then.

Joe
That's funny. I was looking at the same thing yesterday pulling grams from my own photos. I just hadn't quite figured it out. looking at the drastic differences in areas of the frame where snow covers and tone is lost and the grams. Trying to wrap my head around that.

OK, all the way back to your original question: you can't add in additional data. The midtones you have, the shadows you have, the highlights you have are all data. They're going to fit inside that range of 0 (black) to 255 (white) and you can't alter that. There's no data at -10 or 270. Once you've created your RGB photo that's the data you've got. What you can do is manipulate that existing data. You can alter the relationship of one area to another and, WARNING: you can lose data which is a bad idea.

You asked if you could increase midtones. Once you have the RGB photo you can push and pull the data around which can certainly look like you're increasing midtones, but there's an element of slight of hand at work there -- looking like you've done something may work and may be worth doing but it's not really the same thing as doing something.

In that first set of photos I posted the middle photo clips the highlights and blows out the sky. That's the SOOC JPEG for that exposure. Once that RGB photo is created if there's missing data (sky) you really don't have any editing options that will fix it. The third photo is the same exposure but hand converted from the raw file by me. The point being: make sure in the process of creating the RGB photo that you have as much data as possible cause you're not going to get more.

Here's another illustration:

$tone_gaps.jpg

This is three versions of one single photo. On the left is the photo deliberately converted from the raw file by me to have insufficient data -- no whites and no blacks. Note the histogram. The middle photo is an edited version of the left photo trying to correct the faults in the left photo -- no whites and no blacks and not enough contrast. It's slight of hand. Note the histogram and the gaps that show in the histogram. Photoshop displays the histogram with those gaps to make the point that there wasn't enough data and it's been stretched out and it no longer fully fills in. I couldn't really add more tone, but by manipulating what I did have I can fool most of the people most of the time. The third photo was converted separately from the raw file to have as much data as possible. It is a better version of the photo and better than the middle photo can ever become because the middle photo started out with a data deficit. Does the middle photo have a better overall tone response than the left photo? Absolutely. The data is better distributed and our eyes forgive the gaps that are there after the data was stretched out. But it is a cheap fix.

Joe
 
I really appreciate you taking the time. And yes, that was very helpful. im really not a huge fan of post process anyway. sure don't want to do it with less data. And that was along the lines of what I was trying to wrap my head around. I new the scale, but wasn't sure how I could really make sure I was getting as many tones in it (and correct) as possible. And as you stated, once the photo is taken, data is there that is going to be there, I cant go back in time and add more. I better keep working on taking the photo correct when I hit the shutter release..
Thankyou.

Once the RGB photo is created the amount of data is fixed. But that RGB photo is a reduction from the amount of available data in a raw file. That's the point of the first set of photo -- the backlit river. The raw file contains a huge amount of data and far more data than will eventually fit into the final RGB photo. We need to get to the final RGB photo one way or another. In that backlit river scene the camera software couldn't do a reasonable job of that -- I had to do it. That photo is an extreme case -- direct backlight.

Normally the camera will do better, but still the camera jumps straight to an 8 bit JPEG so getting the camera to get that right becomes very critical. From a raw file you can work your way down to that 8 bit RGB final photo in stages. Raw conversion to 16 bit RGB and then tweak that down to the final 8 bit RGB. It's a process of reduction down from the raw capture which starts with more data than we can use. To get the most out of it you need to manage that reduction process.

Joe
 
I really appreciate you taking the time. And yes, that was very helpful. im really not a huge fan of post process anyway. sure don't want to do it with less data. And that was along the lines of what I was trying to wrap my head around. I new the scale, but wasn't sure how I could really make sure I was getting as many tones in it (and correct) as possible. And as you stated, once the photo is taken, data is there that is going to be there, I cant go back in time and add more. I better keep working on taking the photo correct when I hit the shutter release..
Thankyou.

Once the RGB photo is created the amount of data is fixed. But that RGB photo is a reduction from the amount of available data in a raw file. That's the point of the first set of photo -- the backlit river. The raw file contains a huge amount of data and far more data than will eventually fit into the final RGB photo. We need to get to the final RGB photo one way or another. In that backlit river scene the camera software couldn't do a reasonable job of that -- I had to do it. That photo is an extreme case -- direct backlight.

Normally the camera will do better, but still the camera jumps straight to an 8 bit JPEG so getting the camera to get that right becomes very critical. From a raw file you can work your way down to that 8 bit RGB final photo in stages. Raw conversion to 16 bit RGB and then tweak that down to the final 8 bit RGB. It's a process of reduction down from the raw capture which starts with more data than we can use. To get the most out of it you need to manage that reduction process.

Joe

well im shooting in jpeg + raw on the dlsr and just jpeg on my bridge camera. usually I use the bridge but anything more serious shoot with the dslr but still use the jpeg unless It needs some drastic change. I've had the backlight issue. I couldn't fix it. it killed that entire section. Seems to happen with the jpegs..
not quite sure what you are talking about with "manage that reduction process".
im thinking you mean the processing and clicking the conversion box and start in my program.

Manage the reduction process: This entire photo process is still bottom line print targeted. In other words you start with whatever you're photographing and when the process ends you have a print to nail up on the wall. Many of us now stop before we get to the print but the print is still implied and it continues to determine the target characteristics. This is important because:

The range from black to white in a print is a fixed range and it's not really all that much. The 8 bit RGB data structure that a JPEG for example conforms to is a good match to that target print. And so the limits of that 8 bit RGB data container are our end target.

Do this: Lay a one foot ruler on the table in front of you. Let's call that the total, real, physical range of dark to light that's possible in a print -- better yet let's call it an 8 bit RGB photo. Next lay a yardstick on the table above the ruler. That's the total range of dark to light that the sensor in your camera can record. It's almost a fair analogy. Depending on your specific camera the sensor can capture a tonal range that's between double to triple the range you can squeeze onto a print or stuff into an 8 bit RGB data structure.

Next get a carpenter's tape measure and pull it open to 4 feet. That's a backlit scene and it could go to 5 feet. The fun thing about the carpenter's tape measure is that it's variable. It can also contract to 2 feet. It expands and contracts all the time. That's the lighting contrast out there in the real world.

The trick to photography then is to evaluate the carpenter's tape measure. Make sure the right segment of that tape measure is recorded on the yard stick and then squeeze the content captured with the yard stick onto the ruler so that when you're done you have a good photo. That's a process of reduction. Consider the first set of photos I posted of the backlit river. Again the middle and right photos are the same exposure. The camera software attempted that process and failed in disgrace by blowing out the highlights. I attempted that same process and did much better; my version at least has a blue sky. The blue sky really was there (carpenter's tape measure). The sensor really did record it (yard stick) and I managed the reduction process to retain it (ruler).

Joe

This is probably one of the best explanations (in a way I can understand) I have ever had in photography. And yes, I totally relate to the tape measure yardstick ruler analogy I get this.
 

Most reactions

Back
Top