Navigation
Install the app
How to install the app on iOS
Follow along with the video below to see how to install our site as a web app on your home screen.

Note: This feature currently requires accessing the site using the built-in Safari browser.
More options
You are using an out of date browser. It may not display this or other websites correctly.
You should upgrade or use an alternative browser.
You should upgrade or use an alternative browser.
Help with this image
- Thread starter Evertking
- Start date
- Joined
- Apr 9, 2009
- Messages
- 41,401
- Reaction score
- 5,706
- Location
- Iowa
- Website
- kharrodphotography.blogspot.com
- Can others edit my Photos
- Photos OK to edit
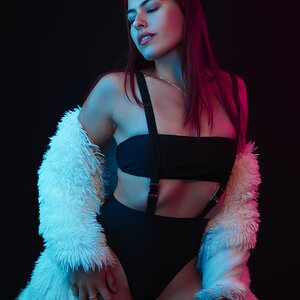
Add noise after selecting the background.
It's called posterization
Tip - Shoot Raw files, convert the Raw files to a broad color space like ProPhoto RGB, make sure you edit in 16-bit mode, and use Adjustment Layers as much as possible.
Oh! Ya! Lightroom doesn't have very accurate selection tools, and doesn't let you make any of those other Tip choices, though Lr's Develop module is a version of the ProPhoto RGB color space known as Melissa RGB.
Photoshop Camera Raw lets you set the color bit depth and the color space. You can set 16-bit mode in Photoshop: Image > 16 bit.
Last edited:
- Joined
- Mar 29, 2016
- Messages
- 14,857
- Reaction score
- 8,313
- Can others edit my Photos
- Photos NOT OK to edit
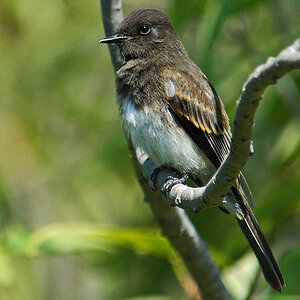
Since you have a nice clean image against a plain background. I'd open a new canvas and fill it with the background color of your choice, then select the subject and place as a layer on the new canvas.
OP
OP
- Joined
- Jun 25, 2016
- Messages
- 688
- Reaction score
- 783
- Can others edit my Photos
- Photos OK to edit
Ok, I'm looking at it now and it's set to sRGB ICE### so, I need to set it to ProPhoto RGB?Add noise after selecting the background.
It's called posterization
Tip - Shoot Raw files, convert the Raw files to a broad color space like ProPhoto RGB, make sure you edit in 16-bit mode, and use Adjustment Layers as much as possible.
Oh! Ya! Lightroom doesn't have very accurate selection tools, and doesn't let you make any of those other Tip choices, though Lr's Develop module is a version of the ProPhoto RGB color space known as Melissa RGB.
Photoshop Camera Raw lets you set the color bit depth and the color space. You can set 16-bit mode in Photoshop: Image > 16 bit.
- Joined
- Mar 29, 2016
- Messages
- 14,857
- Reaction score
- 8,313
- Can others edit my Photos
- Photos NOT OK to edit
@Evertking do you only have LR, I thought you had PS also? The color banding around the subject makes it looks sort of like you might have burned down the background on a layer copy of the image rather than using a 50% gray layer.
OP
OP
- Joined
- Jun 25, 2016
- Messages
- 688
- Reaction score
- 783
- Can others edit my Photos
- Photos OK to edit
Well, this will tell ya how green I am. I have been using Photoshop in 8 bit. I set it to 32 now. I do shoot in RAW. So.. Im no Photoshop wizard but I do know that there is a gigantic difference in 8 bit vs 32.
I may just re edit the picture..lol
I may just re edit the picture..lol
- Joined
- Apr 9, 2009
- Messages
- 41,401
- Reaction score
- 5,706
- Location
- Iowa
- Website
- kharrodphotography.blogspot.com
- Can others edit my Photos
- Photos OK to edit
Looking at it where?Ok, I'm looking at it now and it's set to sRGB ICE### so, I need to set it to ProPhoto RGB?
Use 32 bit for HDR. Use 16-bit for regular images.
32-bit mode will degrade performance:
Optimize performance Photoshop CC
Last edited:
OP
OP
- Joined
- Jun 25, 2016
- Messages
- 688
- Reaction score
- 783
- Can others edit my Photos
- Photos OK to edit
Do you mean do a selection of him? I not sure about the pen tool yet but I am ok with the quick selection brush. If you don't mind could you explain to me how?Since you have a nice clean image against a plain background. I'd open a new canvas and fill it with the background color of your choice, then select the subject and place as a layer on the new canvas.
orf
No longer a newbie, moving up!
- Joined
- Nov 20, 2017
- Messages
- 152
- Reaction score
- 48
- Can others edit my Photos
- Photos NOT OK to edit
Well, this will tell ya how green I am. I have been using Photoshop in 8 bit. I set it to 32 now. I do shoot in RAW. So.. Im no Photoshop wizard but I do know that there is a gigantic difference in 8 bit vs 32.
I may just re edit the picture..lol
No one who's any good ever stops learning
")
- Joined
- Mar 29, 2016
- Messages
- 14,857
- Reaction score
- 8,313
- Can others edit my Photos
- Photos NOT OK to edit
Do you mean do a selection of him? I not sure about the pen tool yet but I am ok with the quick selection brush. If you don't mind could you explain to me how?Since you have a nice clean image against a plain background. I'd open a new canvas and fill it with the background color of your choice, then select the subject and place as a layer on the new canvas.
Yes. Select and Mask using the refine edge workspace Learn how to use the dedicated Select And Mask workspace in Photoshop CC.
Save your selection as a new layer. then open a new canvas same size as your image, fill it with the color of your choice. Select the layer you put the cut out on and paste it to the background.
- Joined
- Mar 29, 2016
- Messages
- 14,857
- Reaction score
- 8,313
- Can others edit my Photos
- Photos NOT OK to edit
Okay, quicker way to fix.

- Open in PS. The Ctrl J, to copy image as a new layer
- Use Quick Selection tool to select your subject. Don't worry about getting exact you'll refine it in the next step
- Click on SELECT AND MASK box (top tool bar) The select and mask workspace will open.
- Right side top set opacity to about 30% on overlay. Color red, > color overlay indicates selected area. Set edge detection to 2, feather 2, shift edge -.10.
- Top left select very top brush, make sure the "+" sign is checked on the top tool bar.
- Increase your brush size to a suitable working size, now just brush in the remainder of your mask.
- When done go back to right side toward the bottom click on INVERT
- Further down, on the right OUTPUT to new layer with layer mask. Click OK
- In layers, select the new layer with mask.
- Go to Filter>Blur>Surface Blur
- Set Radius to 42 Set threshold to 15 click ok
- With the same layer selected, go to Filter>Camera Raw
- When new workspace opens, go to top select adjustment brush (third from left) set your exposure to about -.50, shadows, -.5 and select a large brush. Brush over the remaining light areas of the background, don't worry about getting on the subject as the mask you created will prevent it from getting on the subject.
- When satisfied, click ok.
- You're done.
Most reactions
-
 419
419 -
 313
313 -
 286
286 -
 270
270 -
 261
261 -
 228
228 -
 196
196 -
 181
181 -
 167
167 -
 163
163 -
 143
143 -
 136
136 -
 135
135 -
 123
123 -
 103
103
Similar threads
- Replies
- 0
- Views
- 186
![[No title]](/data/xfmg/thumbnail/35/35264-5ade32b7036391926536661aeb7491c3.jpg?1619736969)
![[No title]](/data/xfmg/thumbnail/38/38261-db20f6f92ee8f0d4c5cf1536e308638b.jpg?1619738546)

![[No title]](/data/xfmg/thumbnail/35/35265-c9ea3efd2c618a57ea136e63ad106880.jpg?1619736970)

![[No title]](/data/xfmg/thumbnail/35/35669-485de67e98a042d63d728593720828a0.jpg?1619737091)