Ya'll are gonna get tired of looking at me.

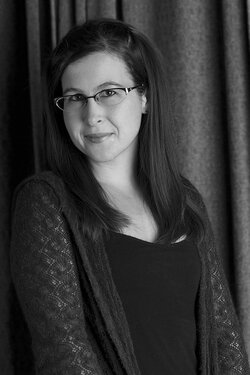
Agree with the shadow comment, I'd also like to see this same shot with the softbox camera left and reflector camera right.

I'll have to find a new room for that setup. My bed is in the way and this soft box it MASSIVE.

Maybe tomorrow!

You will have to get on the bed in your skimpies and use it as a prop :eek:

Sent from my GT-I9100P using Tapatalk 2
 
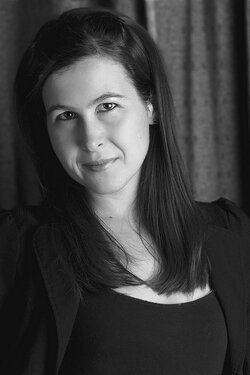
I like the second one much better, but I would bring up the exposure just a little.
 
What are the dimensions of the soft box, and the reflector? Did you have a particular lighting style in mind when you set up? Short, split, broad, loop, etc? Notice how bright your forward forearm is compared the upper arm. Also notice how your rear hand and camera left cheek are lit. Many new to photographic lighting using strobes, light modifiers, and reflectors place the lights and reflectors to far away from where they want the light to fall. Most of the time you will want the light modifiers just outside the image frame, just about as close to the subject as possible. That makes the light modifiers as apparently large as possible, which softens the light and makes shadow edges as diffuse as possible for that size modifier/reflector.
56x42 I think and 42 inch round. Both very close to me.
Edit to add:
Honestly, I was more concerned with posing than lighting. The lights only fit a certain way in that room so I went with it. This was mostly for me to have something to use for photoshop practice.

Your poses look great, have you done any modeling?

Anyhow, I agree with needing more spacing from the background. You maybe able to help this a little by upping the total exposure as mentioned above.
 
I like the second one. I think the exposure is fine, your blacks have detail. My only suggestion would be to raise the light box higher. I guess it's just my style choice, but I'd like the shadows better from a higher angle. A nice image none-the-less.
 
I'm a little concerned that you have new lights and you are asking/talking about CS6.

Your goal (or at least, a goal), especially when using studio lights, should be to get as close to the final product as you can, through your use of lighting & exposure. Don't start off with the mentality that you have to fix or enhance everything with Photoshop. Since you pretty much have control over the lighting, you shouldn't have to make any adjustments to exposure, shadows, background brightness etc...as these are things that can be controlled with proper lighting.

Of course, it's not just that easy, especially with only two lights and a small space, but I just want to emphasize my point that you should be concentrating more on the 'before the shot' stuff, rather than the 'after the shot' stuff. It will pay off, I promise.

As for the shots, plenty of good things and certainly room for improvement. The one thing that stands out to me, for possible improvement (or at least a different option) would be to use 'short' lighting instead of 'broad' lighting, like you have.

With short lighting, the subject's face is toward the main/key light. This lights up the front of the face and puts the rest of the head into shadow. They way you've done it, you are facing away from the main light, so it's lighting up your head and only part of the face.

Both ways are a valid style of lighting, but short lighting is often preferable.
 
I'm a little concerned that you have new lights and you are asking/talking about CS6. Your goal (or at least, a goal), especially when using studio lights, should be to get as close to the final product as you can, through your use of lighting & exposure. Don't start off with the mentality that you have to fix or enhance everything with Photoshop. Since you pretty much have control over the lighting, you shouldn't have to make any adjustments to exposure, shadows, background brightness etc...as these are things that can be controlled with proper lighting. Of course, it's not just that easy, especially with only two lights and a small space, but I just want to emphasize my point that you should be concentrating more on the 'before the shot' stuff, rather than the 'after the shot' stuff. It will pay off, I promise. As for the shots, plenty of good things and certainly room for improvement. The one thing that stands out to me, for possible improvement (or at least a different option) would be to use 'short' lighting instead of 'broad' lighting, like you have. With short lighting, the subject's face is toward the main/key light. This lights up the front of the face and puts the rest of the head into shadow. They way you've done it, you are facing away from the main light, so it's lighting up your head and only part of the face. Both ways are a valid style of lighting, but short lighting is often preferable.

Thanks for chiming in! As you can see from my setup photo, my soft box and camera were pretty much stuck in one spot. The bed is a little heavy to move ;-) and I was trying to shoot my "good side" so broad lighting was really my only option in this scenario. I will definitely play with some other light setups mentioned when I have more space for my lights. I think I might be able to attempt some butterfly lighting with my umbrella in the space. And perhaps if I just use one curtain pulled taught it will make a slightly more pleasing backdrop.

As for your concern about lights and photoshop- my goal with these pictures WAS to have something new to practice photoshop with. I hate editing pictures and I do prefer to get it right in camera, but I didn't just buy a new program to let it sit there untouched, I've got to learn it somehow so when I DO need it, I am able to work with it. :) I posted a "decent" photo earlier yesterday and everyone said it didn't need photoshop and I should take a bad picture to work with. :giggle:
 
Okay, here is try number 2…..

I tried to blur out the backdrop, and no 1990 glamour hands anywhere in sight.

So…is the skin too "photoshopped"? And how my cutout job on the curtains?View attachment 64393

The posing in this one is better. In the first you black shirt blends into the shadows too much.
 
As for your concern about lights and photoshop- my goal with these pictures WAS to have something new to practice photoshop with.

O.K., try lightening it up some overall, and particularly the darker portions more.
 
Your poses look great, have you done any modeling? Anyhow, I agree with needing more spacing from the background. You maybe able to help this a little by upping the total exposure as mentioned above.

Somehow I just caught this comment.
Thanks for the complement. I've never done any modeling other than for my selfies. I spent yesterday studying poses though and thought I would give some a try.

I know that everything has to come together to make a picture, but I find if I focus on one thing at a time it becomes a better learning experience instead of trying to think of everything all at once. Then when it "counts" I will hopefully have an easier time putting it all inplace.

The posing in this one is better. In the first you black shirt blends into the shadows too much.

I definitely agree with. The blacks being too dark comment. In fact, I had to throw several out because I lost the entire lower camera left corner. I really need to bring in my other light for fill but I'm not sure it will fit in that space.

I guess I need to learn to stay up after the kids go to bed to do this in a larger space.
 
One of the tricky things in using a softbox is knowing how to "aim" it when it's coming in from the side. And that's the issue mostly; what you created was a big Easterly Wave of light...perhaps moving the soft6box three feet more "south-east" would have given a less raking, more of a 3/4 angle of light coming in.

And also, the exact placement of a reflector is pretty important. My opinion, based on how big that reflector is, and how dark the shadows are, is that the reflector was not "catching the wave" of light emanating from the softbox, or if it was catching the wave, it was not reflecting it into the shadows. Learning how to light things in a cramped location, using one's self as the subject, is a tedious process I would imagine. It's a LOT EASIER to light another person, so you can quite literally SEE how light placement changes manifest themselves.

It is definitely tedious! and very hit and miss. However, my stuffed teddy bear was making for some pretty boring practice sessions! lol. Ive got some friends willing to model, but I am hoping to get enough practice that I am not completely flying blind when I actually Do have a proper model.

Im sure you are right about the reflector not catching the light properly. I tried moving the reflector a few times. I can't remember which shots that was for though, my black attire wasn't helping things either. Here is one where I am not wearing black, and while I know I still didn't nail the lighting placement it appears to me at least that I achieved a better ratio. I think part of the problem is that I didn't place my soft box high enough and had it coming straight from the side instead of coming from above. Honestly, I wanted to put it higher but I was concerned with my light stand falling over! I need to figure out a weight system until I can purchase some offical sandbags. $11950418233_72fd1a2b8e_c.jpg
 
the first posted photo is pretty much shot when it comes to the shadows. I was able to bring back some detail as suggested in this one though. I also brought up the exposure a touch. $11951268326_ab6eb3d15b_c.jpg
 
Shadows aren't a bad thing, they add depth and emotion to a photo. But they can also drastically change the look of a person. They key is to find the best lighting to convey your intended purpose, be it beauty, emotion or symbolism.

Here is a fun video
 
Last edited by a moderator:
Your poses look great, have you done any modeling? Anyhow, I agree with needing more spacing from the background. You maybe able to help this a little by upping the total exposure as mentioned above.

Somehow I just caught this comment.
Thanks for the complement. I've never done any modeling other than for my selfies. I spent yesterday studying poses though and thought I would give some a try.

I know that everything has to come together to make a picture, but I find if I focus on one thing at a time it becomes a better learning experience instead of trying to think of everything all at once. Then when it "counts" I will hopefully have an easier time putting it all inplace.

The posing in this one is better. In the first you black shirt blends into the shadows too much.

I definitely agree with. The blacks being too dark comment. In fact, I had to throw several out because I lost the entire lower camera left corner. I really need to bring in my other light for fill but I'm not sure it will fit in that space.

I guess I need to learn to stay up after the kids go to bed to do this in a larger space.

A larger space would help. Also dont wear black. Something dark like gray or blue will work better, it wont throw the contrast off so much. And if you get more distance between you and the background you will get nicer bokeh.

Distance is bokeh best friend.


sarah and david cross processed by DiskoJoe, on Flickr

The more aperture blades you have the better too. Mine has 9 blades.


james (jfre81) by DiskoJoe, on Flickr
 
Last edited:

Most reactions

New Topics

Back
Top