2 Newbie questions this time!

magicmonkey

TPF Noob!
Joined
Feb 11, 2006
Messages
579
Reaction score
0
Location
Bristol, UK
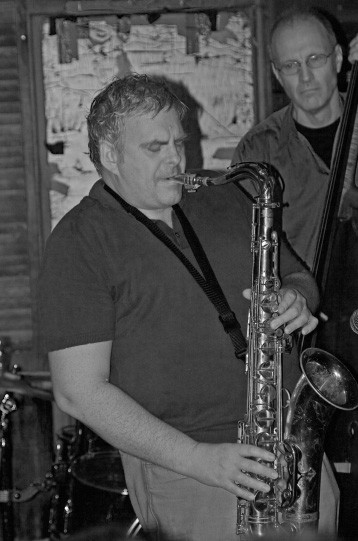
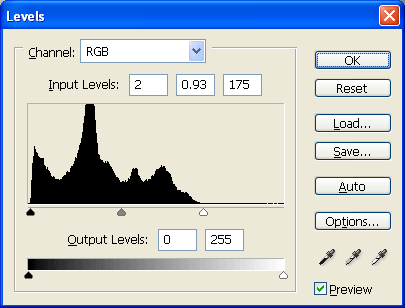
I was out at a jazz night last night and wanted to take a few shots without flash so as not to wash out the highlights and blind the band in the process, didn't happen! There just wasn't enough light in there to get a decent shot so I had to resport to the flash in the end (I did ask the band of it was ok though). Thing is that now a lot of the highlights are gone and there are only about 5 good shots from the whole night, and that was after a LOT of playing around in photoshop. what can I do in this situation where I have no control over lighting and don't want to use a flash?

Also, related to the same band, I processed my shots into B+W ad found that a lot of detail dissapeared, is there any way to stop this?

The pics are here if anyone fancies a look :blushing:
 
You can use high ISO film such as TMAX 3200. This will enable you to freeze the action without flash and hand-hold at long telephoto lengths. There is a catch - it's grainy.

Rob
 
To give you an idea, here's t-Max 3200 pushed to 6400. It's pretty grainy, but it works. Even at that extreme, it wasn't enough to freeze my hand shake in this extremely low light at 85mm f1.8.

What lens are you using? You'll want to use a prime so that you can have a very wide aperture.

Looking that those pics, the first thing you are going to want to do before anything else is set your white and black points using a levels adjustment to boost your contrast.

http://www.sketchpad.net/photoshop-levels-1a.htm

You might have to follow up with some curves adjustments.
 
Thanks for the feedback guys, I'm using a 350D so the ISO will only go up to 1600 but there isn't much grain fortunately.

I've tried having a play around with the white balance, curves, filters, shadow/highlight etc. on all those pictures and that was about the best I could come up with, I'm at a bit of a dead end on this one which is a real shame as they'd be great pics if I could just rescue them propperly!
 
I'd love it if you would! I'm still pretty new with the whole photoshop thing and I'm finding the learning curve a bit of a pain, having said that I've got a lot better in the last few weeks! I will however harass you about what you did to it so I can try it out myself :)

If you would preffer I could post a decent sized file on the site rather than the scaled down ones that are there at the moment, wouldn't be until later tonight though as I'm at work...
 
I think it's quite easy to rescue these with a bit of know how. In most cases from a quick look, the faces are washed out with the rest of the scene looking ok. That means you'll have to use layers of adjustment and mask just the faces for one effect and the rest for another.

I tried it with one here you go -

jazzsinger.jpg


I did this quickly so it's a bit sloppy. But they can be saved.
 
Thanks Daniel! So do you just select the face, then apply shadow/highlight etc and it will only affect the face? Then invert selection and do the same for the rest of the shot?

I found that if I took the temperature way down and changed the tint to give the image a greenish tinge in Camera RAW that the B+W came out a little better, is this a technique that's used and is there some way of improving on it?

Sorry to hassle you all with so many questions all the time!!

I'm quickly starting to think that the pictures really didn't capture how damned good the music was, I suppose it's pretty imposible to do with a camera but nevermind, you have to try these things don't you!
 
This image

Sax-Bass-2.jpg


with this levels adjustment

Sax-Bass-2-levels.jpg


becomes this

Sax-Bass-2-mid.jpg


I moved the black point in a little and the white point in to where the ramp falls off flat. I then moved the mid grey to where it looked good to me. I think this should be your first edit before anything else. You can then play with curves or selective masks to bring out certain parts.
 
Yep thats pretty much what I did. However make sure you use Adjustment layers rather than doing it sttraight on the picture. You can change the settings of the Adjustments you apply and remove them all together without having to press undo X number of times losing anything else you did.

You can finesse it a bit by making the selection less intense. one you have the selection go to Select>Feather then feather by a reasonable amount, after a while you get a feel for what that is. It depends on the size of the selection.

I don't use shadow highlight, it is basically curves but made easier by removing many variables. These scheme of usability and control goes like this I think:

Easy to use>>------------->>------------->>Control

Brightness/Contrast < Shadow/Highlight < Levels < Curves

These essentially do the same thing in most especially in black and white. However they do them to varying degrees of success. i beleive you should start from the left and advance right learning how to use the next feature until you can use them all then you can combine to get great effects.
 
WOW! I can tell that I've got a lot of learning to do here.I'm not at home at the moment (working on my week oof, fool that I am) but once I get back I'll be playing around with this plenty.

Is the rule of thumb to try the white point where the histogram flattens out?

You might have noticed in these photos that the bass player and the sax player don't seem to like eachother very much!
 
magicmonkey said:
Is the rule of thumb to try the white point where the histogram flattens out?
Yes, and the same for the black. In this case, the ramp came up near the left side, so I didn't move it much. As you move the sliders in, you block up the highlights and shadows. Light grey becomes white and dark grey becomes black. The trick is to move them to the point just as this starts to happen. That way you don't lose information. If you hold down the ALT key while you move the sliders, the image turns black and then highlights in white where things start to convert. You may have to block up one or the other just a touch to get a good balance. Once you get good at curves, you won't need to, as curves can do the same thing, but as Daniel said, with more control. Since this is so simple, I like to make it my first step (actually second, as I convert from color to b&w with channel mixer first). Since I do curves after, I don't have to try and get it perfect with levels. In some images, this is all it needs.

That ramp you see is a histogram, and the oprimum would be for it to start at the lower left, ramp up, and then ramp back down to the lower right. Most don't, which is why I think this is a mandatory step. So many images that are left untouched could be improved with this simple step.
 
well guys, as always you've been incredibly helpful, I'll play around with this when I get home and upload the new pics to the website. I'll pop a note on here to let you know it's done if you're interested in seeing how well (or badly!) I've done :hail: :hail: :hail:
 
markc said:
This image

<------ Snipped Image our of quote----->

with this levels adjustment

Sax-Bass-2-levels.jpg


becomes this

<---- Snipped Image out of quote ---->

I moved the black point in a little and the white point in to where the ramp falls off flat. I then moved the mid grey to where it looked good to me. I think this should be your first edit before anything else. You can then play with curves or selective masks to bring out certain parts.

Mark,

Thanks so very much for displaying the levels histogram illustrating what you did. I have been playing with the levels function in photoshop for a very long time and have yet to get it to do what I want. This has opened a whole new world for me and I appreciate it greatly.
 

Most reactions

New Topics

Back
Top