A little pupil help?

DrongoPhoto

TPF Noob!
Joined
May 27, 2010
Messages
61
Reaction score
1
Location
Los Angeles, CA
Website
drongophoto.com
Can others edit my Photos
Photos NOT OK to edit
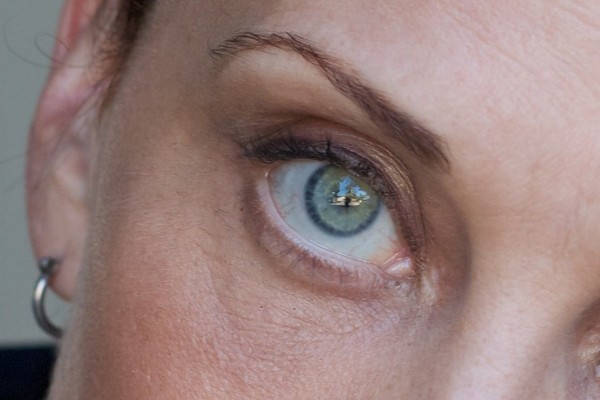
I have a bit of an issue. I'm trying to black out the pupils in some of my shots and I haven't really been successful. I've been googling and I can't find an answer, so...

How would you guys black out the pupils in this untouched crop? Is there something in Aperture 3 or CS5 that would be great for this?

Any help is greatly appreciated.

Thank you.

1021921525_fdL5D-M.jpg
13921375_RYieX
 
I would start by adding a layer
- Paint black over the pupil with a soft edge brush
- probably I would multiply the layer, but overlay may work
- adjust the opacity until I get a look I like
- you may also need a bit of blur on the layer to soften the transition into the iris.
If you completely get rid of the catch light, the eyes will look creepy.
 
^^ what he said. Make a new layer, paint a black circle with a soft edge brush, and add gausian blur to soften it further.
 
Another way (which may actually be better in the long run) is:
1: Create a Curves adjustment layer
2: Make it very dark
3: invert the mask (ctrl-i)
4: Use a white brush to paint where you want it to be darker.

Then you can play with blending modes, adjust the curves, darken around the iris, etc. all in a non-destructive way.

I tried this and it has almost identical results, so either way is a good solution.

The beauty of photoshop. So many ways to achieve the same thing :)
 
Thanks, guys. Feel free to post your results if you messed with it. This is the first client of mine that's had an issue with this and I'm still learning CS5.

I'll give it a try.
 
Thanks, guys. Feel free to post your results if you messed with it. This is the first client of mine that's had an issue with this and I'm still learning CS5.

I'll give it a try.

I think it looks weird when the pupil is too dark, but seeing as this is what your client is after, here is the edit.
ficbwp


3 layers additional layers:
- 1st is black with a soft brush and then gaussian blurred to obscure detail. Overlayed at 100%
- second is black, overlaid at 84%
- third is a soft, black brush with low opacity. I painted over the orange part of the catch light until I had knocked it back far enough to be less noticeable. This layer is in normal mode.
 
Thanks, guys. Feel free to post your results if you messed with it. This is the first client of mine that's had an issue with this and I'm still learning CS5.

I'll give it a try.
The set up you used to make the photo created the problem.

I recommend you study information about photographic lighting. Even when shooting outside using only ambient light and open shade, you need to be aware of the angles and where catchlights will be.

By properly placing catchlights, you also wind up with good angles to produce shadows that add definition and compliment the facial mask.

If you only take pictures when your model/actor/client is in the perfect light, with precisely positioned catchlights, you miss the relevant emotions. Sometimes you just have to capture the moment and fix it later.

I asked for CS5 help and it was given. When I ask for lighting help, in the proper thread, I'll look for your inevitable contribution.
 
Wow. I wuss out on the pupil thing, lol. I usually just use the burn tool (smooth brush) to slightly under the actual pupil outline, then dot it at 20% opacity until it looks right, then, if more definition is needed at the pupil outer boundary, I use the more rigid brush to circle it along the natural line. Depending on where the highlight is or is needed, I may avoid some of the light for a catchlight or just dodge one in.
 
Wow. I wuss out on the pupil thing, lol. I usually just use the burn tool (smooth brush) to slightly under the actual pupil outline, then dot it at 20% opacity until it looks right, then, if more definition is needed at the pupil outer boundary, I use the more rigid brush to circle it along the natural line. Depending on where the highlight is or is needed, I may avoid some of the light for a catchlight or just dodge one in.

The end result is all that matters. If it looks good when you're done, the path to get there is irrelevant. Unless, of course, you're being judged on your methods.

They never hang methods in a gallery.
 
I would clone out the original catchlights, paint in the pupil, then add a new catchlight. No end of ways to do that, but of course you want to make them compatible with the lighting on the face. Here are two, just offhand ...

catchlights.jpg
 

Most reactions

New Topics

Back
Top