What's new

Bar Harbor Landscape Crop version *Revisited* Opinions needed

I just spent last hour playing with other things on the image, various crops n stuff, sized, etc. I did a crop in from right, but tossed it. lol. I guess I should have saved it for you. I'd do it now just for you, but I'm kinda tired of looking at this picture. lolz

The image atop (number 2) looks tons better than the one I used for printing the other day, so I'm curious to see how she comes out now though.

Maybe when my eyes are done with their break, i'll revisit the raw again and see about leaving more sky, less rocks.

One thing is certain...each time I play with it, I learn a bit more. So that's a good thing.
 
yay, I paid for my flickr.

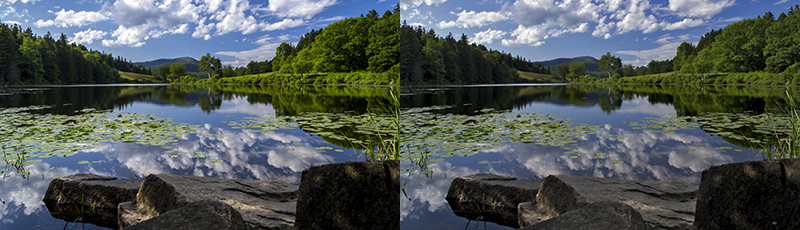
Here is side by side of the one I printed the other day and today 'fix'. Sucks that you cant tell what the lens correction did unless you flip back n forth, maybe i'll make an animated gif later if I'm bored, lol. I really like what the lens correction did though.

7464725910_f557a8e184_o.jpg
 
...and no...the lens correction thing did not fix the big ugly rock. :-P
 
I think this is beautiful Ernicus... would you mind telling me which lens you used... Obviously a wide angle, but fill me in so I can soak it in. Any exif data would be lovely :)
 
Thanks tmj, I am really looking forward to a return visit atop cadillac mtn. They say the view up there is awesome, I hope I can capture it.

I used my kit lens the
18.0-55.0 mm f/3.5-5.6
​
I don't mind sharing anything...I'll grab the exif off the flickr thingy for ya..short version is f/8, 1/250s, iso 200, spot metering (metered for upper left of sky), auto wb, single point AF (AF-S).

Exif | Bar Harbor Visit 6-24-2012 | Flickr - Photo Sharing!


*edit*
oh, and I had VR off this time. (Nikons image stabilizer thingy)

I did not use tripod, but I was lying on the ground well stabilized.

I also had a polarizer filter on, cheap 20 dollar Sunpak CP. I don't think I had it turned enough to cover the left part of the sky though. I will have some ND filters for certain when I go back.
 
That is a splendid photo -- beautiful! Congrats and I'm jealous.

In your versions 2, 3 and 4 you have begun to blow out the highlights in the clouds. In your version 1 you have held those highlights. This photo is worth the effort not to let those highlights go. I see you're using Photoshop ACR. Have you ever experimented with opening a raw capture as an object by holding down the shift key in ACR rather than just opening the RGB photo directly?

Joe

Joe
 
I'm using cs6, which opens up my raws in acr7. No, I have not tried opening them that way...

I wasnt sure on the clouds as my crappy laptop deceives me at times, so I guess my initial "sight" was good, as far as the clouds go.
 
Yes, as far as the clouds go, but it might be nice to open up the shadows otherwise and lighten the overall image while holding the clouds.

I mentioned the option to open a photo as an object because it allows you to push past what ACR will otherwise provide. Not sure that this photo needs that but it might be a candidate.

What you do basically is get the lens corrections and white blance correct in ACR and then hold the shift key down and the Open Image option becomes Open Object. Open the photo twice that way and in Photoshop you have two identical versions of the photo. Drag and drop one of them onto the other one and then close the one you dragged. The open photo now has two layers which are both objects. Take a look in Layers. If you double click in Layers the icon for either object it re-opens in ACR and any changes you make in ACR will apply back to the Photoshop object.

ACR's algorithms that allow you to adjust a photo for exposure, brightness, contrast, highlights, fill etc. are designed to try and hold on to a normal tone curve for output. So, for example, if you use the Fill option to lighten the shadows the overall photo begins to flatten out. Makes sense -- in the end you have to take the image to a fixed output target. Tone-mapping (HDR) is a technique that lets you break this normal tone curve requirement but often with bizzare resutls. So ACR isn't going to let you adjust the shadow end of a photo with complete disregard for the midtones and highlights. If you push too hard you end up with uncorrectable damage.

Using this double object method you can adjust the highlights ideally as you'd like them for the top object and then adjust the shadows ideally as you'd like them for the bottom object and use a mask on the top layer object to blend the two. It can extend your ability to get the ideal exposure and tone response highlights versus shadows beyond what ACR would otherwise permit.

When your ready you can rasterize either layer to proceed processing and then for example apply different noise/sharpness amounts to either one, etc.

Joe
 
Yes, as far as the clouds go, but it might be nice to open up the shadows otherwise and lighten the overall image while holding the clouds.

I mentioned the option to open a photo as an object because it allows you to push past what ACR will otherwise provide. Not sure that this photo needs that but it might be a candidate.

What you do basically is get the lens corrections and white blance correct in ACR and then hold the shift key down and the Open Image option becomes Open Object. Open the photo twice that way and in Photoshop you have two identical versions of the photo. Drag and drop one of them onto the other one and then close the one you dragged. The open photo now has two layers which are both objects. Take a look in Layers. If you double click in Layers the icon for either object it re-opens in ACR and any changes you make in ACR will apply back to the Photoshop object.

ACR's algorithms that allow you to adjust a photo for exposure, brightness, contrast, highlights, fill etc. are designed to try and hold on to a normal tone curve for output. So, for example, if you use the Fill option to lighten the shadows the overall photo begins to flatten out. Makes sense -- in the end you have to take the image to a fixed output target. Tone-mapping (HDR) is a technique that lets you break this normal tone curve requirement but often with bizzare resutls. So ACR isn't going to let you adjust the shadow end of a photo with complete disregard for the midtones and highlights. If you push too hard you end up with uncorrectable damage.

Using this double object method you can adjust the highlights ideally as you'd like them for the top object and then adjust the shadows ideally as you'd like them for the bottom object and use a mask on the top layer object to blend the two. It can extend your ability to get the ideal exposure and tone response highlights versus shadows beyond what ACR would otherwise permit.

When your ready you can rasterize either layer to proceed processing and then for example apply different noise/sharpness amounts to either one, etc.

Joe

Awesome information, thank for taking the time to write it, I will definitely see how it goes, I can see the possibilities.
 

Create an account or login to comment

You must be a member in order to leave a comment

Create account

Create an account on our community. It's easy!

Log in

Already have an account? Log in here.

Back
Top Bottom