Garbz
No longer a newbie, moving up!
- Joined
- Oct 26, 2003
- Messages
- 9,713
- Reaction score
- 203
- Location
- Brisbane, Australia
- Website
- www.auer.garbz.com
- Can others edit my Photos
- Photos NOT OK to edit
I was inspired by a PM earlier today to explain a bit about what you can and can’t do with a 16bit file, and how Photoshop actually works with images when you set them at 8bit or 16bit. This hopefully will answer questions such as “is there a point to working in 16bit if the image was 8bit?” The usual answers start an argument whereas the correct answer as always is It depends.
First a background for those who don’t know. The bit depth of an image determines the number of discrete possible values a single pixel can have. The end points are still the same and some colours directly map to each other. Black can be represented as RGB8(0,0,0) or as RGB16(0,0,0). White is represented as RGB8(255,255,255) or RGB16(65535,65535,65535), middle grey is represented as RGB8(128,128,128) or RGB16(32768,32768,32768) etc. Every 8bit value can be converted to a 16bit value by simply multiplying by 256.
But you don’t get any extra detail! They say. And this is true. If you convert an 8bit file to a 16bit file you don’t get any extra detail, You’ll get discrete steps in the colour values such as the next level below white will be RGB8(254,254,254) or RGB16(65279,65279,65279). Therefore all the values between 65279 to 65535 will be basically wasted when you convert an 8bit file to a 16bit file. So the conversion is pointless, maybe.
But suppose you start with 16bit file and convert to an 8bit file after making an adjustment. Suppose you take a really dark picture with a couple of the RGB8 values: 0,1,1,2,2,3,3 and you now double the brightness values you get the values 0,2,2,4,4,6,6.
Now lets do the same with a 16bit file: RGB16 0,128,240,440,512,660,768, which if we convert to RGB8 would be: 0,1,1,2,2,3,3. Suppose we take this 16bit file and double the brightness you get: 0,256,480,880,1024,1320,1536. Ok I’m going somewhere with this. Now convert it to 8bit and the result is RGB8: 0,1,2,3,4,5,6 EXTRA DETAIL.
Ok but we knew that already. Working in 16bits has more data in the in between values than 8bit. And what I mean by in-between, I mean that 8bits can display every discrete visibly discernable colour in the sRGB gamut. So it really all comes down to working with 16bit files that were recorded as 16bit files avoid rounding errors from causing a loss of detail.
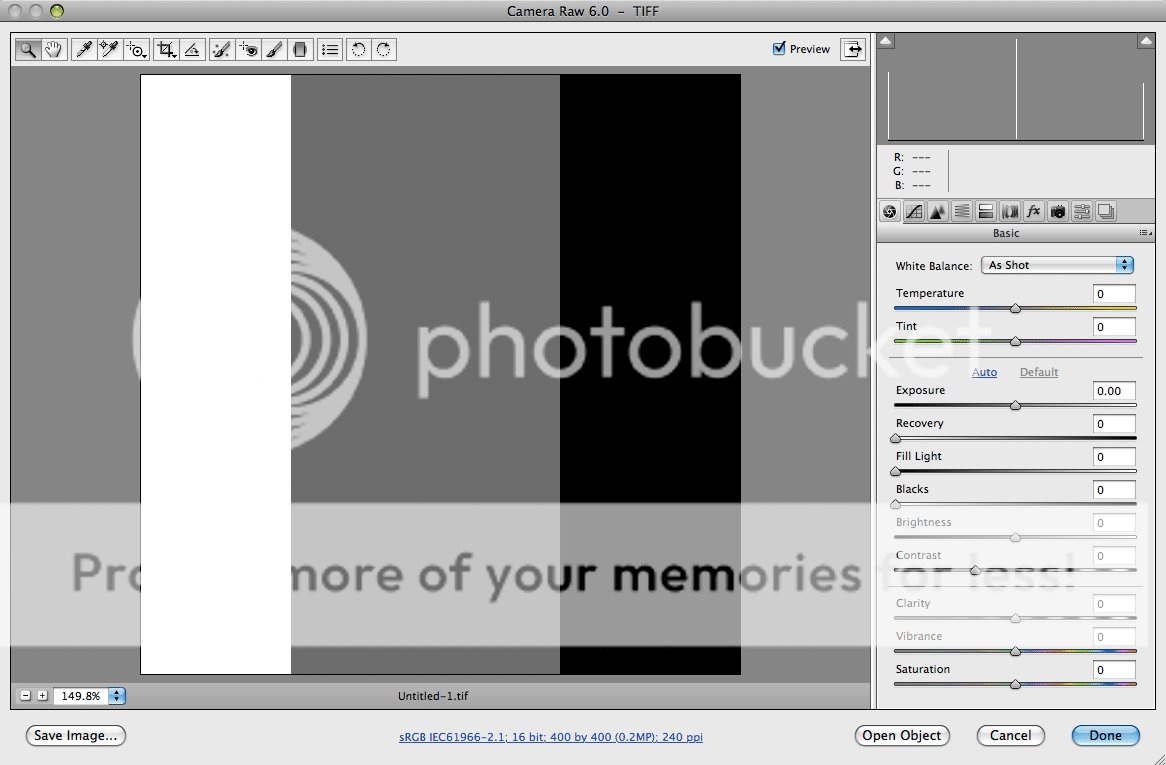
ROUNDING ERRORS! Of course! And this brings me to the meat of my ramblings. Converting an 8bit file to a 16bit file in photoshop produces no additional detail, but it will eliminate rounding errors when you start stacking changes on top of each other. For this example we’ll use an image with a black to white gradient map applied:

In Photoshop an adjustment layer for levels is made with the values 0, 0.15, 255
Now another adjustment layer for levels is made attempting to reverse that with values 0, 5, 255
The result in 8bit:

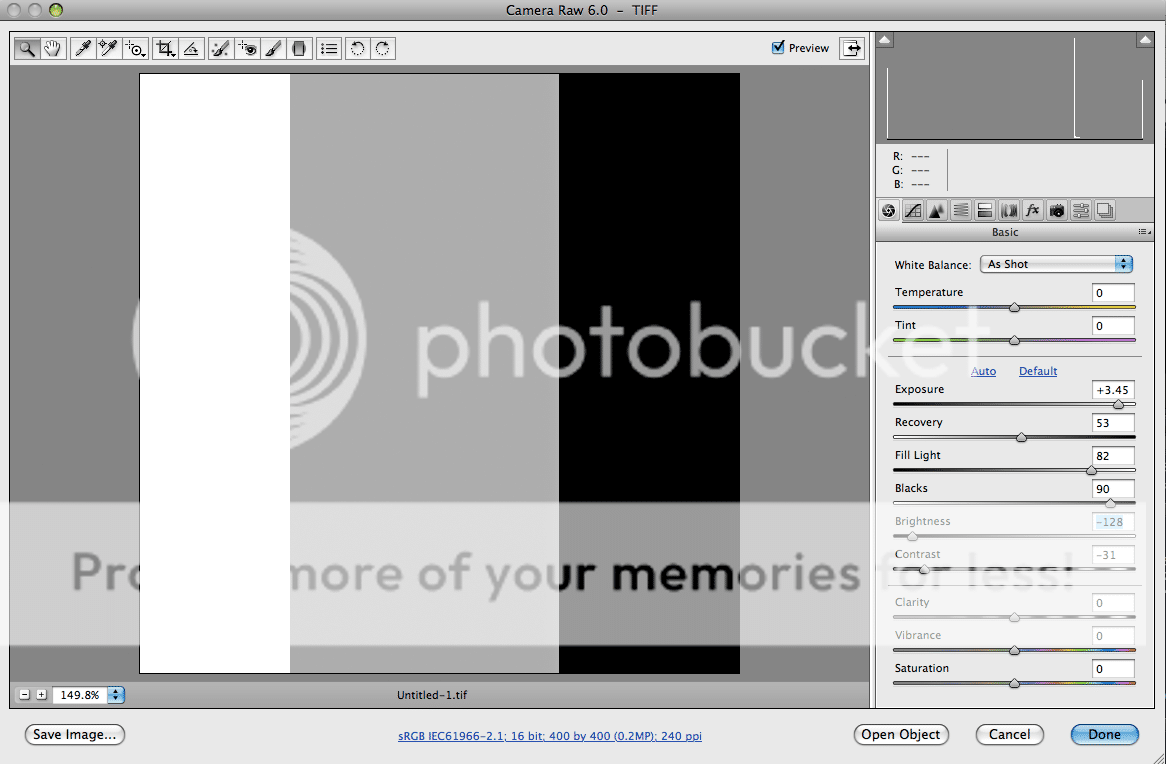
Eeek nasty posterisation, too late, image ruined. …. Or is it. Because these were done as layers the processing has not been applied to the image in the lowest level. So switch the image to 16bit:

Much nicer. So there is still benefit to working with a 16bit image even if it started as an 8bit. Sure this is an extreme example, but if the HDR crowd is to be used as example we are dealing with an extreme art with some extreme post processing. So use 16bit, regardless if the image was 8bit. It doesn’t create what wasn’t there, but saves you from destroying what was when you’re feeling like some extreme processing.
Do you know this about photoshop CS4 and earlier:
Ok we have our 16bit image now let’s make a JPEG to put on the internet to show off our talent. File Save …. Now in CS5 you can select JPEG, but in CS4 you can’t because JPEG is an 8bit only format. Ok so convert the image to 8bit. Image -> Mode -> 8bit.. ****! Ok the image now looks like it did when we started in 8bit, so undo.
Solutions:
Flatten Layers – Yeah it’s not pretty but it does work. Don’t forget if you want to keep your layers to undo the flatten process.
Save For Web and Devices – This is the ticket, the money maker. All these functions in one simple window. Converts to 8bit automagically, will show you what the image looks like with the JPEG settings you selected, has a check box to convert to sRGB so I’ll never upload the wrong colourspace to the net again. Ooooh and a resize box, all non-destructive to my original work. I suggest all people should get intimate with this tool.
So that’s it. Do you work in 16bit?
First a background for those who don’t know. The bit depth of an image determines the number of discrete possible values a single pixel can have. The end points are still the same and some colours directly map to each other. Black can be represented as RGB8(0,0,0) or as RGB16(0,0,0). White is represented as RGB8(255,255,255) or RGB16(65535,65535,65535), middle grey is represented as RGB8(128,128,128) or RGB16(32768,32768,32768) etc. Every 8bit value can be converted to a 16bit value by simply multiplying by 256.
But you don’t get any extra detail! They say. And this is true. If you convert an 8bit file to a 16bit file you don’t get any extra detail, You’ll get discrete steps in the colour values such as the next level below white will be RGB8(254,254,254) or RGB16(65279,65279,65279). Therefore all the values between 65279 to 65535 will be basically wasted when you convert an 8bit file to a 16bit file. So the conversion is pointless, maybe.
But suppose you start with 16bit file and convert to an 8bit file after making an adjustment. Suppose you take a really dark picture with a couple of the RGB8 values: 0,1,1,2,2,3,3 and you now double the brightness values you get the values 0,2,2,4,4,6,6.
Now lets do the same with a 16bit file: RGB16 0,128,240,440,512,660,768, which if we convert to RGB8 would be: 0,1,1,2,2,3,3. Suppose we take this 16bit file and double the brightness you get: 0,256,480,880,1024,1320,1536. Ok I’m going somewhere with this. Now convert it to 8bit and the result is RGB8: 0,1,2,3,4,5,6 EXTRA DETAIL.
Ok but we knew that already. Working in 16bits has more data in the in between values than 8bit. And what I mean by in-between, I mean that 8bits can display every discrete visibly discernable colour in the sRGB gamut. So it really all comes down to working with 16bit files that were recorded as 16bit files avoid rounding errors from causing a loss of detail.
ROUNDING ERRORS! Of course! And this brings me to the meat of my ramblings. Converting an 8bit file to a 16bit file in photoshop produces no additional detail, but it will eliminate rounding errors when you start stacking changes on top of each other. For this example we’ll use an image with a black to white gradient map applied:
In Photoshop an adjustment layer for levels is made with the values 0, 0.15, 255
Now another adjustment layer for levels is made attempting to reverse that with values 0, 5, 255
The result in 8bit:
Eeek nasty posterisation, too late, image ruined. …. Or is it. Because these were done as layers the processing has not been applied to the image in the lowest level. So switch the image to 16bit:
Much nicer. So there is still benefit to working with a 16bit image even if it started as an 8bit. Sure this is an extreme example, but if the HDR crowd is to be used as example we are dealing with an extreme art with some extreme post processing. So use 16bit, regardless if the image was 8bit. It doesn’t create what wasn’t there, but saves you from destroying what was when you’re feeling like some extreme processing.
Do you know this about photoshop CS4 and earlier:
Ok we have our 16bit image now let’s make a JPEG to put on the internet to show off our talent. File Save …. Now in CS5 you can select JPEG, but in CS4 you can’t because JPEG is an 8bit only format. Ok so convert the image to 8bit. Image -> Mode -> 8bit.. ****! Ok the image now looks like it did when we started in 8bit, so undo.
Solutions:
Flatten Layers – Yeah it’s not pretty but it does work. Don’t forget if you want to keep your layers to undo the flatten process.
Save For Web and Devices – This is the ticket, the money maker. All these functions in one simple window. Converts to 8bit automagically, will show you what the image looks like with the JPEG settings you selected, has a check box to convert to sRGB so I’ll never upload the wrong colourspace to the net again. Ooooh and a resize box, all non-destructive to my original work. I suggest all people should get intimate with this tool.
So that’s it. Do you work in 16bit?
Last edited:
")


![[No title]](/data/xfmg/thumbnail/32/32150-7445fc014b4b484b24ba067189aa45b6.jpg?1619735233)