Developing film without a dark room?

.........It is a rare bathroom indeed that is actually large enough and with enough counter space to function as a decent darkroom. ............

For a couple years, I set a sheet of plywood on my bathtub and used that as a 'counter'. Yes, way too low to be sure. But functional for the enlarger and trays.

I did similar in one of my apartments, a partial sheet of 1/2 inch plywood over the tub for the enlarger, and it worked out quite well.
I just sat on a foot stool while I worked on the enlarger.
I built a portable counter extension that fit over the toilet, where I had some of my trays. I don't remember but may have used another plywood sheet, over the tub for some of the trays.

If you are resourceful you can do a LOT in a small bathroom.
In my current home, I use a small half bath as my darkroom . . . to print.
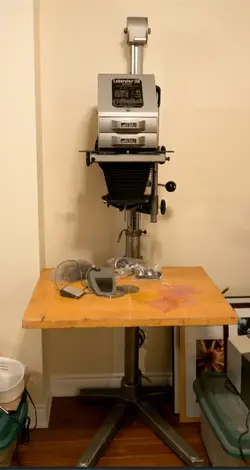
Small Durst M600, 6x6 enlarger on the toilet.
Rocking print tray or drum to process the print = minimal need of counter space.
Washing is done in the nearby kitchen.​
Film developing (35mm and 120) in comparison to printing is easy.
The only issue is finding a DUST-FREE place/enclosure to dry the film.​
 
... sometimes a small bathroom ain't going to cut it ...

upload_2019-1-3_17-18-20.png
 
If you are going to develop your own film. The next logical step is to print your own prints.
Although you could scan the negative, then print via the computers editing program.
But to me, printing in the darkroom is part of the fun of shooting with film. After so many decades, it is still neat to watch the image slowly appear in the developing tray.
Though from a practical and financial point of view, I only do B&W, not color. Though I did do Cibachrome printing from slides, and that was cool.

I quite agree, although lets not get ahead of ourselves, I still need to decide on and acquire all the gear I need for developing film first. What I will likely do is acquire a scanner and an enlarger as I do put photos online.

In regards to the enlarger, I would love to have one, I just have to figure out where I would put it.
 
In regards to the enlarger, I would love to have one, I just have to figure out where I would put it.
That was kind of the point of my first post. So, lessee; we have an enlarger, which has a certain footprint, you will need three trays probably close by, some storage space for your papers and chemicals, a timer, a little bit of space for your tongs, some place to hang the prints to dry, the safelight usually hangs on a wall, and maybe a paper trimmer.

Visualize that setup somewhere in your house, and you'll know if you need to add a room. :D

Eh... more like clear up space in my shop, I have too much crap in there anyways, just need to add dust filtration and seal up cracks that light could get through. Also need to add a small off grid solar system to said work shop as it doesn't have power wired to it, although I have been using extension cords for temp power. So space isn't quite an issue yet., although I do have a question about chemicals and wet print paper, do those need to be stored in low temperatures like a fridge?
 
I would not worry about storing paper in a fridge, unless it is HOT in your workshop.
A trick for that is to keep the paper in the house, which is hopefully at a lower temp, and bring it out to the darkroom when you print.

From experience in high school, where the photo teacher kept all the mixed chemicals in a fridge, it is a PiA to have to warm up all the chemicals from 40F fridge temp to 68-72F working temp. However, if the ambient temp is HIGH (ie 90+F), leaving chemicals out will have them at ambient temp. Some chemicals don't like high temp. In that case, a fridge and water bath is used to be able to develop at a lower than ambient temp.

You also need to deal with the area around the shop. You don't want dust going into the darkroom when you open the door.
 
HERE is a good tip (if I do say so myself) for storing B&W film developing chemicals during the warmer months of the year: Store everything liquid under the kitchen sink (film developer, stop bath, liquid ready-to-use fixer, and distilled water [for rinsing film and for diluting developer solutions to working ratio]).By keeping everything in one location that's moderately cool in the warm months, you'll most likely have chemicals and water that's at around a 65 to 69 degree temperature when you want to develop your films. Using the developer at the under-the-sink temperature is pretty easy, and keeping the stop, fixer, and washing water ALL at the SAME temperature avoids accidental reticulation of the film. One can adjust the film development time a little bit, plus or minus, using the Massive Development Chart information,to compensate for temperature variations.

Massive Dev Chart Film Development, Film Developing Database

As far as washing B&W film after it has been fixed: above in one of the posts is the so-called "Ilford Method". I've used a variation of that method for 30-plus years, and it's effective. Film the film developing tank with the distilled, washing water, and agitate for 10 seconds, pound the tank on the counter firmly,then let sit 30 seconds more, them dump the water out. Repeat this for five t o seven minutes. This cuts the fixer level dramatically on the first pass, and each subsequent pass, the remaining fixer level is halved. This is actually moire effective than simply sloshing running water into a topless film tank for 10 or 15 minutes...that doesn't do too much, and 1)running water has the chance for temperature fluctuation that might cause accidental reticulation 2) running water that is not filtered can have a lot of junk in it and 3) running water for 10 to 15 minutes without an actual FILM WASHER system that has bottom-entry of the water, does not reach all the film well and 4) running water for 10 to 15 minutes wastes a lot of water.
 
When you use an enlarger, make sure you have room for 4 trays. I use three trays and a tub of water, but you need the foot print for 4.

I agree creating the enlargements is the most enjoyable part. I do want to expand to scanning and printing, but as I acquire those things, time mucking about in the dark room is pretty awesome. A 25 pack of BW 8x10 paper from Adorama for $15 is pretty inexpensive fun.
 

Most reactions

New Topics

Back
Top