- Joined
- Mar 29, 2016
- Messages
- 15,960
- Reaction score
- 9,400
- Can others edit my Photos
- Photos NOT OK to edit
- Moderator 🛠️
- #1
A lot of times when shooting ambient light I have a problem getting a lot of data in the midtone section of the histogram. Here's an original example of such an image.
 The light is such that most of my data is to the left, resulting in a histogram like this.

The problem is how to get more detail in midtone area without blowing the highlights or affecting the shadows. Clarity in camera raw helps, but I think I prefer a couple of old school methods I've been working with better.
First step make two duplicate layers Crtl>J x 2 (PC). Now convert each layer for smart filters Filters>Smart filters. Then click on the first duplicate layer and run Filters>Sharpen>Unsharp mask. You can adjust these settings per taste, but these are for the image I used. Click OK. Blending mode normal. Opacity 100%. You can click on the eyeball on the layer to see the difference, it'll be very subtle, and mostly in the shadows.

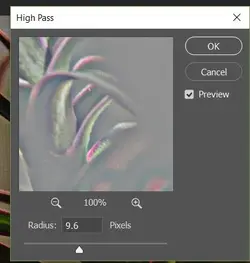
Now go to the second duplicate layer. Filters>Other>High Pass filter. These are the settings I used for the image, but you can adjust the radius to taste. Click OK. Since you have both layers set as smart filters, you can go back and dbl click on these to adjust later if you like.

Now change the blending mode on this layer to Overlay, and dbl click on layer to open the layer style menu.

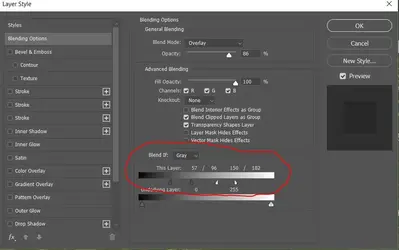
Now go down to the slider circled. Clk, hold and drag the left and right slider in to about the point I have it. Now go to the left indicator hold down the alt key (PC) and Clk, hold and drag in to separate. Do the same on the right indicator. Clk ok. At this point I dropped the opacity of the layer down to about 85%. That's not a hard fast number, you can adjust the opacity up or down on either of the layers as per your taste.
And here is the image with layers applied

And the histogram with the changes applied. Note the small changes that took place in the curve, but look at the detail difference in the leaves and note there were no changes to either the extreme highlights or shadows.

Footnote: here is an overlay of the two histograms to give you a better idea of where it adjusted. The bottom is the original the top is with the layers, and lighter gray is where the actual adjustment took place.


The problem is how to get more detail in midtone area without blowing the highlights or affecting the shadows. Clarity in camera raw helps, but I think I prefer a couple of old school methods I've been working with better.
First step make two duplicate layers Crtl>J x 2 (PC). Now convert each layer for smart filters Filters>Smart filters. Then click on the first duplicate layer and run Filters>Sharpen>Unsharp mask. You can adjust these settings per taste, but these are for the image I used. Click OK. Blending mode normal. Opacity 100%. You can click on the eyeball on the layer to see the difference, it'll be very subtle, and mostly in the shadows.

Now go to the second duplicate layer. Filters>Other>High Pass filter. These are the settings I used for the image, but you can adjust the radius to taste. Click OK. Since you have both layers set as smart filters, you can go back and dbl click on these to adjust later if you like.

Now change the blending mode on this layer to Overlay, and dbl click on layer to open the layer style menu.

Now go down to the slider circled. Clk, hold and drag the left and right slider in to about the point I have it. Now go to the left indicator hold down the alt key (PC) and Clk, hold and drag in to separate. Do the same on the right indicator. Clk ok. At this point I dropped the opacity of the layer down to about 85%. That's not a hard fast number, you can adjust the opacity up or down on either of the layers as per your taste.
And here is the image with layers applied
And the histogram with the changes applied. Note the small changes that took place in the curve, but look at the detail difference in the leaves and note there were no changes to either the extreme highlights or shadows.

Footnote: here is an overlay of the two histograms to give you a better idea of where it adjusted. The bottom is the original the top is with the layers, and lighter gray is where the actual adjustment took place.

Last edited:


![[No title]](/data/xfmg/thumbnail/37/37606-3c9ffb5906173fa2aa489341967e1468.jpg?1734170733)


![[No title]](/data/xfmg/thumbnail/41/41820-5b89d2c0ef3c8c232c56fabddbeaee0b.jpg?1734176132)

![[No title]](/data/xfmg/thumbnail/34/34072-be456691237ae73cb2936416e2e9e8c0.jpg?1734164508)
![[No title]](/data/xfmg/thumbnail/37/37111-64f64f2c8371420041bf39244ff12117.jpg?1734169830)

