What's new

Focus Stacking: Camaro Edition

qmr55

No longer a newbie, moving up!
Joined
Jul 6, 2016
Messages
326
Reaction score
113
Location
Philly/NJ
Can others edit my Photos
Photos OK to edit
So I just attempted focus stacking for the first time, more or less because I wanted to teach myself how to do it in Photoshop. Don't mind my "studio" setup, as it was a couple back t shirts and some led lights with home made diffusers. I think I missed the focus on the rear of the car a little bit

Comments and critique is always welcome!

Focus Stacking Camaro 1 by Sam LaMothe, on Flickr
 
Side note: its 22 images stacked
 
Focus stacking is fun, but yeah focus was missed in the rear of the car. I can't say it was missed by you or the camera or PhotoShop hard to say. Also I can't say if another image would have fix it either, there are a ton a variables with focus stacking; focal length, aperture, distance from the focus plan, focus ring throw (the circular travel distance of the focus ring), subject angle...etc.

Some pointers, place a piece of tape around the focus ring then focus on the nearest point of the car and make a mark from the lens barrel mark to the tape, then focus past the farthest point of the car and mark from the lens barrel to the tape. This is the total distance needed to have the whole car in focus and from there you can take all the images you need.

Next PS does an OK job at FS but if you really want get into it check out Helicon Focus software it is pretty cheap for what you get and it does 100X better the PS at FS.

Good luck and keep shooting.
 
Focus stacking is fun, but yeah focus was missed in the rear of the car. I can't say it was missed by you or the camera or PhotoShop hard to say. Also I can't say if another image would have fix it either, there are a ton a variables with focus stacking; focal length, aperture, distance from the focus plan, focus ring throw (the circular travel distance of the focus ring), subject angle...etc.

Some pointers, place a piece of tape around the focus ring then focus on the nearest point of the car and make a mark from the lens barrel mark to the tape, then focus past the farthest point of the car and mark from the lens barrel to the tape. This is the total distance needed to have the whole car in focus and from there you can take all the images you need.

Next PS does an OK job at FS but if you really want get into it check out Helicon Focus software it is pretty cheap for what you get and it does 100X better the PS at FS.

Good luck and keep shooting.

That's an awesome idea, thanks! I will definitely use that.

Question, for a shot like this since I'm stacking and light was relatively limited, should I be shooting at a smaller or larger aperture? I took all these at 1.8 and shorter shutter times (I think they were 3 sec each, but I don't have it in front of me to check right now) or should I be shooting at say 7-9 and a longer shutter speed?

Its a 50mm prime lens. Should I expect sharper images when stacking at a smaller or larger aperture?

Also, cool I will check out Helicon, because I definitely have an interest in stacking.
 
That's a pretty cool Camaro ;) I saw [a real] one very similar at a drag race last year; big monster engine with a blower and injector sticking up just like that. I told the guy that owned it, "That's what everybody that owns a Camaro THINKS theirs looks like." He folded up laughing.
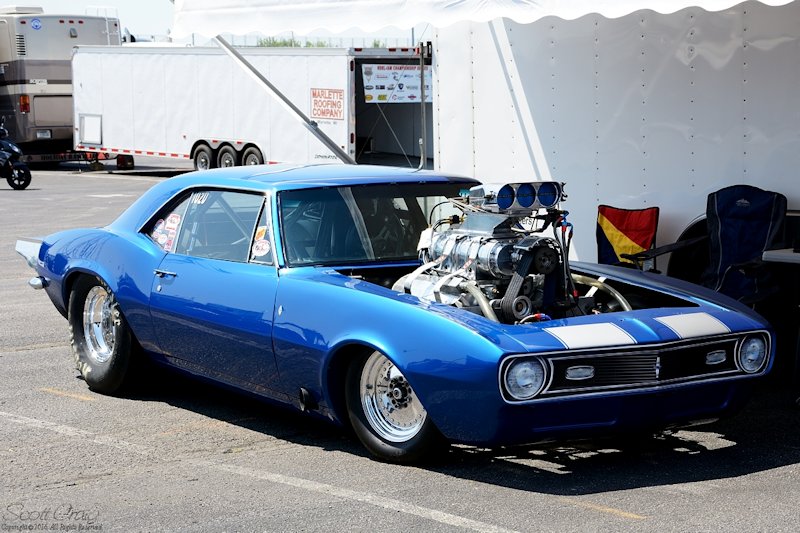
 
That's a pretty cool Camaro ;) I saw [a real] one very similar at a drag race last year; big monster engine with a blower and injector sticking up just like that. I told the guy that owned it, "That's what everybody that owns a Camaro THINKS theirs looks like." He folded up laughing.

That's awesome! It's my favorite car and also my favorite color combo (yellow with the black rally stripes). I probably have 10-15 models of this around the house somewhere.

You might already have this but if not then a focus rail will really help. I've got a cheap one similar to this Amazon.com: SHOOT 4 Way Macro Focusing Rail Slider for Canon Sony Pentax Nikon Olympus Samsung and All Digtal Camera with 1/4" Screw Hole for Close-up Shooting: Cell Phones & Accessories

It works pretty well, but if I did a lot of these, I spend the money on a better one, because stability between the shots is important.

I've been looking into getting one. I might start out with a cheaper model like you linked and see how much it helps! The shot I did was just me adjusting the focus ring between every shot.
 
Question, for a shot like this since I'm stacking and light was relatively limited, should I be shooting at a smaller or larger aperture? I took all these at 1.8 and shorter shutter times (I think they were 3 sec each, but I don't have it in front of me to check right now) or should I be shooting at say 7-9 and a longer shutter speed?

Most lenses sweet spot is no where near the max aperture(1.8), it is closer to F9-F14 (depends on the lens) this should give you the sharpest image. But increasing your aperture limits the amount of light coming into the camera decreasing your shutter speeds which can create movement. I would buy brighter bulbs, I know Lowe's sells 100watt+ equivalent CFLs which is only like ~20watts so it is still safe to put in any normal light fixture. Other benefits of increasing your aperture is keeping the off plane items in focus this is because the car is not perpendicular with the focus plane it is in the 45 degree range. This is also lower the needed photos in the stack.
 
That's awesome! It's my favorite car and also my favorite color combo (yellow with the black rally stripes). I probably have 10-15 models of this around the house somewhere.
I've owned 4 of them, I think, starting with a 1968 Z28. Always had a fondness for them myself.

This is the one I mentioned. Sorry, it's blue but it does have the rally stripes ;)

2016-05-06-042.jpg
 
Your DOF is actually a function of aperture, lens focal length, and distance to the subject. In your image if you are at 12" from the subject with a 50mm lens, and f/1.8, your total DOF would only be 8/10". Even with 22 shots that's pretty slim. Adjusting the aperture to f/8.0 with the same set up would give you a total DOF of 3/8", which at 22 shots is going to work much better.

I use this online calculator a lot. Online Depth of Field Calculator

Another comment, in addition to increasing the amount of light, increasing you ISO is another option. You could easily increase it to 400 without a lot of noise issues.
 
Question, for a shot like this since I'm stacking and light was relatively limited, should I be shooting at a smaller or larger aperture? I took all these at 1.8 and shorter shutter times (I think they were 3 sec each, but I don't have it in front of me to check right now) or should I be shooting at say 7-9 and a longer shutter speed?

Most lenses sweet spot is no where near the max aperture(1.8), it is closer to F9-F14 (depends on the lens) this should give you the sharpest image. But increasing your aperture limits the amount of light coming into the camera decreasing your shutter speeds which can create movement. I would buy brighter bulbs, I know Lowe's sells 100watt+ equivalent CFLs which is only like ~20watts so it is still safe to put in any normal light fixture. Other benefits of increasing your aperture is keeping the off plane items in focus this is because the car is not perpendicular with the focus plane it is in the 45 degree range. This is also lower the needed photos in the stack.

Ok cool I will try again tonight and shoot everything around F9-14, and when I get a chance I'll swing over to Lowes and pick up some brighter bulbs. I was testing shooting at F16 for a single exposure and I was somewhere around 25-30 seconds but I was definitely getting a little movement.

I will play around again tonight. Thanks for the tips.

That's awesome! It's my favorite car and also my favorite color combo (yellow with the black rally stripes). I probably have 10-15 models of this around the house somewhere.
I've owned 4 of them, I think, starting with a 1968 Z28. Always had a fondness for them myself.

This is the one I mentioned. Sorry, it's blue but it does have the rally stripes ;)

2016-05-06-042.jpg

That's freakin' sweet! Blue is #3 on my list only behind orange and yellow. I've only owned one later gen 81 z28 but my next project is a 68 RS. I'm excited.

Your DOF is actually a function of aperture, lens focal length, and distance to the subject. In your image if you are at 12" from the subject with a 50mm lens, and f/1.8, your total DOF would only be 8/10". Even with 22 shots that's pretty slim. Adjusting the aperture to f/8.0 with the same set up would give you a total DOF of 3/8", which at 22 shots is going to work much better.

I use this online calculator a lot. Online Depth of Field Calculator

Another comment, in addition to increasing the amount of light, increasing you ISO is another option. You could easily increase it to 400 without a lot of noise issues.

That's great, I will use that tool for future references. As for the ISO, I did try bumping it up to 400 or 600, I forget exactly, but the background started to show a lot of specs and spots so I tried keeping it down to 100.

Granted, I don't have a proper studio setup and I had t shirts laying on a clothes basket with two pieces of wood behind it and a t shirt draped over that as a backdrop. Do what I can with what I have for now lol.

Thanks for all the tips everyone!
 
Any comments on the lighting? I was bouncing 3 lights, one of ceiling, one off left wall and one off right wall. With home made diffusers on all 3 of them (tissue paper stretched over foam core with a hole cut in it.)
 
I forget exactly, but the background started to show a lot of specs and spots so I tried keeping it down to 100.

Either move your background further back, or in PS open a new 50% gray layer, then use the burn tool to darken the background, or in PS use a curves layer and levels layer to adjust.
 
I was bouncing 3 lights, one of ceiling, one off left wall and one off right wall.

With the light limited as it is, I think I'd either pull off the modifiers and just bounce the light, or use the modifiers but don't bounce them.

Looking at the image more, it lacks contrast. Contrast will give the appearance of sharpness even if it is a little soft on focus. This is a quick edit in PS doing what I told you above. You also need to adjust the WB on the original, to match the lights you're using.

36146929125_de9b0eae7c_b-1.webp
 
I was bouncing 3 lights, one of ceiling, one off left wall and one off right wall.

With the light limited as it is, I think I'd either pull off the modifiers and just bounce the light, or use the modifiers but don't bounce them.

Looking at the image more, it lacks contrast. Contrast will give the appearance of sharpness even if it is a little soft on focus. This is a quick edit in PS doing what I told you above. You also need to adjust the WB on the original, to match the lights you're using.

View attachment 143992

I will have to try tonight without the modifiers and see what kind of difference it makes.

Funny you say/do that with the background, as I originally did exactly that and made it stand on a black solid background but I actually thought it lacked something then so I brought it back to the original and just darkened the background up a tad. I don't know maybe its just personal artistic preference but I think the one with a solid black is "lacking" something. Hard to explain lol. Thanks though!
 

Create an account or login to comment

You must be a member in order to leave a comment

Create account

Create an account on our community. It's easy!

Log in

Already have an account? Log in here.

Back
Top Bottom