G85 w/12-60mm F3.5-5.6 lens

VidThreeNorth

No longer a newbie, moving up!
Joined
Oct 21, 2016
Messages
1,172
Reaction score
212
Can others edit my Photos
Photos NOT OK to edit
Until now, the most I spent on a camera was on my JVC GS-TD1 3D camcorder. It is actually a really nice camcorder, and as far as 1080P goes, the quality is excellent -- even for 2D video, and the sound was wonderful. The main reason I didn't use it for 2D was because it was quite bulky.

Lately, I decided that it was time to invest in UHD (4K) video. I have satisfactory equipment for stills and 1080p video production, but so far, I have held back from investing in a 4K video system with substantial capabilities. The Yi-M1 was never meant to be my "end game" UHD camcorder. It lacks basic capabilities. There is no control for contrast, saturation nor sharpening, and so, it is only good when lighting is close to ideal -- at least 50% overcast, and since it is not weather sealed, I could not even chance using it on a day which might rain. A camera that needs clouds but no rain? That's a good definition of a camera that will sit on the shelf a lot.

Having built a Micro 4:3 system, I decided that the new G95 suited my needs the best, and so I set aside enough money to cover that much and a bit more. But checking the current prices changed my mind.

Vistek was the only store listing a price, and it was $1,499.99 Cdn (saving $300 Cdn). What? I had been watching the US price (B&H) for the same package -- G95 w/12-60mm F3.5-5.6 lens was $997.99 US (saving $200 US). If you use a $.75 US = $1.00 Cdn conversion, that is ~$1330.65 Cdn. I had set aside enough money, but . . . WHAT? I decided to check further.

B&H showed the G85 w/12-60mm F3.5-5.6 lens $697.99 US (~$930.65 Cdn), saving $300. Vistek's price for the same package was $899.99 Cdn (saving $300). That's a little better! Actually, more than just a little better. The price difference between the two models in the US is about $300 US. The difference in Canada is $600 Cdn. Definitely a time to reconsider things.

If I had not bought the Yi-M1, then I might have simply paid the difference and bought the G95, even buying it locally and swallowing the price difference, but I did buy the Yi-M1, and I was keeping it! This changes things. Compared to the G85, the G95 has a better display, it has up to 4x slow motion in 1080p (120 fps), it has a microphone jack, it has V-logL support, it has USB charging, it has a number of added still photo features (like viewing long exposures "live") and it has a 20 MP sensor. The ergonomics in the G95 are also better, but I had not heard terrible things about the G85, so that might not mean anything.

But keeping the Yi-M1 changes things. I had a 20 MP sensor. In fact, from what I knew, I probably had the exact same sensor as the G95. I never did find out if the Yi-M1 has an anti-aliasing filter. It probably does, but for still pictures, I've had good results. In fact, as I have said, it has been particularly good to use for adapted manual lenses.

But there is more to consider. The G85 actually has a couple of advantages over the G95. Not entirely ironically, the G85's 16 MP sensor can be better than the G95's 20 MP sensor. The 4K crop for the G85 (yes, there is) is about 2.2x instead of the G95's 2.5x. The 4K crop in the G85 is often treated by users as "ignorable" whereas the G95's 2.5x crop is obvious and significant. Moreover, the 16 MP sensor has a bit better low light performance. And while the G85 might not have a Log profile, its "CineLikeD" profile can be easier to grade and has been used for "Pro" video work for years. The 2.2x crop factor, making better use of my lenses, stands out.
[2020-03-23 01:09 Above rewritten for clarity. Also:

Confirmation:
According to DP Review, the relative 4K sensor crop for the G85 is 1.1x (compared to the whole M43 sensor). 1.1 x 2.0 (the crop of the whole sensor compared to a 35mm "Full Frame" sensor) = 2.2x, which confirms my estimate of the 4K sensor crop.

Back when it was first published, I read the DP Review coverage of the G95, and I recently went back over it, along with their previous coverage of the G85. It was all interesting. Here is the page in the G95 coverage where they compared its specs with the G85 and Fuji X-T30 and Sony a6400. Notice also that the 22ms "4K shutter rate" of the G95 gives it the best "rolling shutter" performance while the G85's 25ms is just behind the Fuji. And while I do not get the G95's 1080p 120 fps, at least I still get 60 fps. Looking at the comparison, at the list price difference of $200 US, and even at the $300 US price difference at the time I bought my camera, I feel that the G95 is certainly worth the extra cost. But the cost difference locally, at the time I bought leaves me with no regrets. Besides, as I have noted, I still have the G95's sensor in the Yi-M1.

"Panasonic Lumix DC-G95/G90 Review"
Published Aug 13, 2019 by Jeff Keller and Richard Butler for DP Review
"Panasonic Lumix DC-G95/G90 Review"]


And what can I buy with that $600 Cdn? Well, for one thing, I can afford the Shure VP83F LensHopper Shotgun Microphone with Integrated Audio Recorder which costs ~$400 Cdn. ($299.00 US), and that creates an interesting advantage over the G95 alone. I was thinking about buying this recorder/microphone eventually anyway. It gives one an interesting "trick" allowing different record settings between the internal camera recording and the external recording. Well, maybe anyway.

The problem with this "trick" on the G85 and G95 is that these both have worst microphone placement I know of on any interchangeable lens camera. The mics are perfectly placed to record overhead aircraft or sound reflections off ceilings. I guess that having really quiet pre-amps, Panasonic wants to avoid rivalling Sony's reputation with sound. Why else would they sabotage their cameras like this?

So recording with the built in mics is not all that valuable, but it is possible. And there is the possibility of using the VP83F completely separated from the camera, perhaps on a small grip-pod. It can be placed on or near a stage, or near a speaker, while I wander around and record videos or stills. At least I could do that if I had someone to watch that it didn't get stolen, which has been happening lately. If I do this, I already have a Rode VideoMicro that I can use on the camera. So I actually have quite a few options.

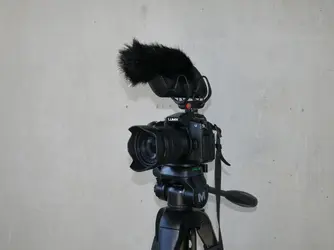
I also needed a new "main" tripod. All my tripods had significant deficiencies. I won't go into that in this post, but it was on the forefront of my considerations.

I could also have consider GH4's which are still around new in US (B&H) for $654.95 w/spare battery (no lens) or $694.99 (no lens) w/V-Log activation code, (but no IBIS). This is also a considerable entry level "Pro" grade option, but I wanted to buy locally for service issues, and for now, the G85 would be my only 4K IBIS camera, and that is very important.

Those were my considerations, and the decision was made, and I am now the owner of a "brand new" G85 with kit zoom, and a new tripod, and a Shure VP83F Lenshopper mic/recorder. Now I just need to practice with all this stuff. . . .
 
Last edited:
Leica 12 - 60mm F2.8 - 4.0 v. Panasonic F3.5-5.6 and Olympus 14-54 F2.8-3.5 ("4:3") Lenses

The Leica 12 - 60mm F2.8 - 4.0 lens has been a surprisingly controversial "kit zoom" lens since it appeared around May 2017. It is an expensive lens to buy on its own, and I have not looked into what it costs as a kit. And I still have not actually seen one myself. Why am I mentioning it now? My G85 did not come with that lens, it came with the Panasonic 12 - 60mm F3.5 - 5.6. But I have collected some data for the Panasonic and was curious about whether I might agree with the criticism of the Leica lens.

"Panasonic 12-60mm f/2.8-4 Review - Why I'm not buying it",
posted May 4, 2017, by "Max Yuryev"
""

First, here are my current findings for the Panasonic (F3.5 - 5.6 lens)

Some Max Apertures for the Panasonic 12-60 F3.5-5.6:
12mm F3.5
18mm F3.9
25mm F4.5
40mm F5.5
50mm F5.6
60mm F5.6


The Hybrid Shooter reported the following maximum apertures for the Leica 12-60mm F2.8-4.0:
[2020-03-18 20:24 rewritten for clarity.]

Some Max Apertures for Leica 12-60 F2.8-4.0:
12mm F2.8
25mm F3.5
36mm F3.9
52mm F4.0
(60mm F4.0 per advertising)

"Panasonic Leica DG VARIO-ELMARIT 12-60mm F2.8-4.0 ASPH Review with Panasonic G9",
posted Feb 8, 2018 by "The Hybrid Shooter", [Length 7:36]
""

Primary Differences:

There is no doubt that the Leica lens is optically superior. All the reliable tests I have seen confirm that. From the reports I have seen, for optical quality, the Panasonic lens is a very good to excellent lens, and since I am mainly interested in video use, it is unlikely I will see any such difference. The visible difference for video will likely be limited to F-stop, which translates into brightness and depth of field. As is typical of Leica, their lens is significantly more expensive. You can look that up for yourself.
[2020-03-18 20:24 rewritten for clarity.]

Aside from the price, the main criticism of the Leica lens is that the optical design causes the maximum aperture to drop immediately when zooming beyond 12mm. Max Yuryev summarized his feeling that this lens is mainly an "F4.0" lens, and as such was not worth his money.

I have provided a graph that shows the F-stop changes of the Leica and Panasonic 12-60mm zooms and included a comparison to my older Olympus 14-54mm F2.8-3.5 "4:3" zoom lens, which I can use on my G85 using an adapter.
[2020-03-18 20:25 corrected typo. "F2.4" was wrong.]
[2020-03-28 21:39 corrected typo. The Olympus is "2.8 - 3.5" -- that was a bad night.]

The graph I have provided is an approximation. I do not have "Log" based graph paper, so I had to estimate the scales, so it is a very crude graph. But it does show some significant points.

First, from the data I have, the Leica's apertures do not look that bad. Keep in mind that at the wide end, the F3.5 on the Panasonic is only about 2/3 stop from F2.8 on the Leica, but while the Leica decreases "immediately" it probably maintains at least 1/3 - 1/2 stop advantage over the Panasonic out to around 25mm. I need more data points to be sure of this.
[2020-03-18 20:15 rewritten for clarity.]

The Panasonic 12-60mm lens performs more like most photographers prefer, losing brightness slowly out to around 17mm. There appears to be a quick drop out to around 30-35mm (I might test that someday), and somewhere around 35mm to 40mm it is down to around F5.5, and continues to down to F5.6 at 50mm where it remains out to 60mm.
[2020-03-18 20:15 rewritten for clarity.]

My older Olympus maintains F2.8 from 14mm out to at least 17mm. The rapid drop is from around 19mm (F2.9) to around 29mm (F3.2) and then flattens out from 40mm (F3.3) to 54 (F3.5).

The Leica 12-60mm lens graph is probably wrong since all reports say that it drops immediately from 12mm F2.8 "as soon as you touch it". But I have no report of how far it drops. All I know is that at 25mm it is F3.5. But I think it is fair to assume that it does not get darker than F3.5 between 12mm and 25mm, and that it probably follows a gentle curve after the inital drop. I do not expect that if I had more data that there would be any point at which the maximum F-stop for the Leica would be smaller than the Panasonic. Moreover, from around 17mm to around 30mm the gap appears to widen out again, leaving roughly 1-stop difference from 40mm to to 60mm.

From these numbers (and the graph), the Leica does not look so bad. Considering that it is "par-focus", (and depending a bit on whether there is significant focus breathing), and of course depending on the price, I think it might well be worth buying.

I have included a capture of a table showing the data from the three mentioned lenses and also the old version of the Panasonic 14-42mm F3.5-5.6 kit zoom.

My previous reports about the Olympus lens aperture:

"Zuiko 14-54mm F2.8-3.5 zoom, OM-D E-M10, MMF-3 Adapter"
"Maximum Aperture Table:"

"Zuiko 14-54mm F2.8-3.5 zoom, OM-D E-M10, MMF-3 Adapter"
 

Attachments

  • M43-Zooms-Graph01-rsz1200.jpg
    M43-Zooms-Graph01-rsz1200.jpg
    202.2 KB · Views: 210
  • M43-Zooms01a.png
    M43-Zooms01a.png
    19.6 KB · Views: 212
Last edited:
I have not had a lot of opportunities to go out and take pictures or videos since I got the new camera, but I thought I should post some.

01-...jpg

Rough Equivalence:

For roughly the price of a Lumix G95 w/12-60 F3.5 - 4.0 kit zoom, I bought a Lumix G85 w/the same kit zoom, the Shure VP83f mic/recorder, WindTech Mic-Muff MM-28 for Shure VP83F and a Magnus DLX-363M tripod. Choosing the G95 and kit zoom alone instead is not necessarily a poor decision. I already had a M43 camera with a 20MP sensor (Yi-M1) which reduces the advantages of the G95 for still photography. Photo taken with my Lumiz GF3 w/12-32 F3.5-5.6 zoom

02-...jpg
For this outing, I was using the "Standard" image style for still pictures in order to compare it to the "CineLikeD" style for video. This picture shows the strong contrast of the cloudless sunny day of this project.

03-...jpg
Here is an un-adjusted crop from previous image.

04-...jpg
Here is an unadjusted frame capture from the CineLikeD video. The highly exposed rock in the bottom left of the frame is the end of the rock in the previous crop. The "local" exposure of this section of the scene is higher anyway, but the recovery of the shadow detail is mainly due to the higher dynamic range of the "CineLikeD" profile.
[2020-04-02 15:32 One thing I should point out: So far I am concentrating on 1080p because I am concerned about things like focussing, exposure and colour grading. The G85 has a reputation for being a bit grainy in darker areas in 4K. From what I have seen so far, I don't feel its a major issue. But it is something I'll be looking for in the future.]

05-...jpg

I have been testing all my compatible equipment on the new camera. This picture and the next are taken with the my Yi Technology 42.5mm portrait/macro lens. The fill flash was calculated automatically by the camera. This image is cropped and resized, but otherwise, straight out of the camera.

06-...jpg
This is similar to the above, but without crop -- just resizing. The colours are acceptably correct. Autofocus works about as well on this body as on the Yi-M1 the lens came with. That is to say, for macro, autofocus can be a bit unreliable. Really, I probably would have gotten more consistent results focusing manually, but the point was to test the autofocus in this situation.

[2020-04-02 2:41 Added following:]

More About the First Pictures:

I thought I would explain a bit about what happened regarding the first demo pictures I posted:

The first pictures were taken at a park. When I started that set, I took the picture of the tunnel from a point that was a bit far away and I decided I wanted to get closer. So I started walking towards it. But then a small family group -- a couple of kids and their father, entered the area. I generally try to avoid including strangers in my pictures, so I stopped for a while and waited to see if they were going to leave. But the boys started to explore the tunnel, so eventually I gave up on that idea and that is when I took the video of the far bank of the river. After a while, I left and started off in the opposite direction, down-stream. I intended to come back some other day. Maybe someday I will, but it might not be for a while. That is why the compositions in the still and the video are so different, which makes them hard to compare.

Regarding the auto-focussed macro, I wrote that the autofocus did not work well. I didn't count the "keeper-rate", but I think it was around one-per-dozen. And that is only true if you count any of them "keepers". Even the ones I posted were just marginally acceptable. They were both F3.5, and I think I would have preferred re-doing them at F4.0 and F5.6 if I were being fussy. And I was not really happy with the light balance (a bit too much fill flash). But as far as the autofocus went, they were "good enough". I found "manual focus" in the manual. It uses the "left" and "right" buttons or brings up a horizontal bar along the bottom of the screen that can be used by "dragging". I will try that later.
 

Attachments

  • 01-P1010842.jpg
    01-P1010842.jpg
    317.6 KB · Views: 208
  • 02-P1000075.JPG
    02-P1000075.JPG
    919.6 KB · Views: 220
  • 03-P1000075.JPG
    03-P1000075.JPG
    525.6 KB · Views: 200
  • 04-2020-03-19-21h00m38s837.jpg
    04-2020-03-19-21h00m38s837.jpg
    659.6 KB · Views: 221
  • 05-P1000107.JPG
    05-P1000107.JPG
    503.8 KB · Views: 217
  • 06-P1000105.JPG
    06-P1000105.JPG
    547.6 KB · Views: 208
Last edited:
About Reviews:

One thing that I find annoying about reports and reviews (most of them, both written or video) is that reviewers rarely state the versions of firmware that are being reviewed. I do that too, and I cannot say how often, but I do try to report the specifics. Here's why:

This is the revision list for the G85 firmware version 1.4 which came on my camera:

" Ver.1.4 1.Improved compatibility with the Panasonic LEICA DG VARIO-SUMMILUX 10-25mm / F1.7 ASPH. (H-X1025) digital interchangeable lens.
- Smooth aperture control is available during video recording.


- [Aperture Ring Increment] has been added with which users can choose the control method of the aperture ring from [SMOOTH] or [1/3EV] in photo shooting.

2.Improved compatibility with the Panasonic Remote Shutter DMW-RS2.
- The video REC switch on the Remote Shutter can be disabled in the camera's custom menu.

3.Improved operational stability
- There were cases where the headphone volume did not change in real time when [Headphone Volume] registered in "My Menu" has been changed. This bug has been fixed.


Notice for the Change of Specifications

2017/12/11
Ver.1.3 1.Performance of image stabilizer is improved with the interchangeable lens LEICA DG ELMARIT 200mm / F2.8 / POWER O.I.S.(H-ES200).
2.Operation bug occurred in specific conditions when the camera is controlled with external devices are fixed.

2017/2/8
Ver.1.2 1.Reduced operation noise during the shooting standby or the motion picture recording.
2.Dual I.S.2 function with the interchangeable lens H-RS100400 is available.
(Firmware update of the H-RS100400 is required.)

2016/11/16
Ver.1.1 1.Improved image stabilizer performance during the motion picture recording."


One expects that this is a complete list of changes, but sometimes there are errors or omissions. If there is an undocumented improvement, that can be a nice bonus, but on the other hand, a new problem (which is called a"regression" in the programming world) can also occur. So when one looks at a review at version 1.0, for example and finds that the G85's image stabilization is less than perfect, well, that was corrected back in Nov. 16, 2016. And on Dec. 11, 2017 a more specific correction was made for the Leica DG Elmarit 200mm / F2.8 / Power OIS (H-ES200) lens. The date a review was published or posted can tell you if an upgrade was not available, but you cannot be sure that the tester was actually using the latest upgrade unless it is mentioned either directly or indirectly in the review.


My First Compatibility Issue:

This is sad but not entirely a surprise: My G85 with its 1.4 firmware is not entirely compatible with my Olympus 4:3 mount 14 - 54mm F2.8 - 3.5. It works well enough in fully automatic mode, but manual focus is not working. I have the body set to "SF + Manual Focus" for both still and video, but only the autofocus works. Not only that but the combination of the camera + adapter + this setting sometimes causes the camera to "lock up" if I try to focus manually. Unfortunately, I am training myself to use "SF + Man" for video because the autofocus can be slow and unreliable. Having to remember that "I can't do that" with this lens (and so far, only this lens) is really going to get in my way because I really want to use this lens!

My Second Compatibility Issue:

I am still not entirely sure if I can get around this one: The body does not seem to have a manual focus control, and the Yi Technology 42.5mm F1.8 portrait/macro lens has no focus ring. I am about 2/3'rds through the manual, so I might find something yet, but I doubt it. The screen touch focus should make it unnecessary, but really I would prefer a real manual focus control of some kind -- even like on the Yi-M1.

[2020-04-02: See my addition to the previous comment. I did find instructions for "manual" focus. I will try that later.]
 
Last edited:
Yesterday I used a Datacolor "SpyderCheckr 24" standard color card and made a set of video clips to test my Yi-M1 and my Panasonic G85. I posted a set of frames from the Yi-M1 and I was hoping to do some analysis before posting the frames from the G85. Unfortunately, I have been a bit too busy to do that, so I am, again, posting the frames from the G85 without much commentary. Apparently, Datacolor has a program at:

"goto.datacolor.com/download/checkr24"

I have not yet checked this link, but there should be a program there to help analyze the frames. The program should not really necessary, but presumably it will make analysis easier.

Conditions:

This was a morning file set (around 9:30-ish) on a clear day. I was careful not to locate the card in shadow, but due to the angle, the card did reflect light more directly towards the Panasonic. The cameras were located on my 3D bar and were about 3' away from the card. The card is sitting on top of the Elvid slate to keep it off the grass.

The lens on the Yi-M1 is my Panasonic 12-42 F3.5-5.6 and the lens on the G85 is the 12-60 F3.5-5.6. Focal lengths were around 30-35mm. Exposure settings were not recorded. Both cameras were set to Auto exposure and Auto white balance. ISO should have been 200 for both. Exposure compensations are noted for each clip. For each of the profiles I was interested in, I tested EV = +0.0, and for some I also tested EV = -1.0 and sometimes also EV = +1.0. I am not uploading captures from all the files I made. These are just the ones I think are most interesting. Most of the recordings were 1080P unless otherwise noted. The Yi-M1 had digital stabilization active and the G85 has dual hardware stabilization active (no digital), all of which are my typical settings when recording at 1080P.

There are tutorials for color grading online, so I might not added much in the way of commentary later. I have not decided.

[all JPGs are compressed using level 1]

"G85-00010-Standard-ev0_0-13h26m54s730"

"G85-00015-Natural-ev0_0-13h57m06s629"

"G85-00019-Scenery-ev0_0-14h11m36s938"

"G85-00021-Portrait-ev0_0-19h17m53s740"

"G85-00023-CineLkD-ev0_0-14h20m50s135"

"G85-00027-CineLkV-ev0_0-14h28m54s299"

The Yi-M1 files are at "Yi Technology -- Yi-M1"

[2020-04-26 18:51]
The file "00010" which was the source of the first capture of this G85 set was recorded simultaneously with file "P4250002" which is the source file for the first image capture from the Yi-M1 and so they are mutual "control" files. The G85 along with many of the Panasonics is known to produce "yellowy" greens which can been seen in all the captures from the G85 in this set compared to the Yi-M1 image set. When the GH5S came out, "DSLR Videoshooter" reported that the GH5S had slightly different colour rendering than the GH5. I think the GH5S is a bit more neutral. Since I have never bought or used either of those cameras, I have not been paying attention to the issue, but if you check around you might find information about it.
 

Attachments

  • G85-00010-Standard-ev0_0-13h26m54s730.jpg
    G85-00010-Standard-ev0_0-13h26m54s730.jpg
    551.2 KB · Views: 216
  • G85-00015-Natural-ev0_0-13h57m06s629.jpg
    G85-00015-Natural-ev0_0-13h57m06s629.jpg
    494.3 KB · Views: 180
  • G85-00019-Scenery-ev0_0-14h11m36s938.jpg
    G85-00019-Scenery-ev0_0-14h11m36s938.jpg
    550.3 KB · Views: 178
  • G85-00021-Portrait-ev0_0-19h17m53s740.jpg
    G85-00021-Portrait-ev0_0-19h17m53s740.jpg
    569.2 KB · Views: 200
  • G85-00023-CineLkD-ev0_0-14h20m50s135.jpg
    G85-00023-CineLkD-ev0_0-14h20m50s135.jpg
    531.3 KB · Views: 192
  • G85-00027-CineLkV-ev0_0-14h28m54s299.jpg
    G85-00027-CineLkV-ev0_0-14h28m54s299.jpg
    541.1 KB · Views: 183
Last edited:
Contrast Calculations:
[Based on the Frames posted above.]

This is not a standardized method of calculating contrast. It is just a method that I worked out based on the equipment that I have -- specifically my "datacolor Spyder Checkr 25" colour reference chart. It is, so far, only relevant to my own collection of equipment.

Procedure:

Across the "top" of the colour reference chart, from left to right, there are six greyscale sample squares, ranging from darker to lighter. I am calling these reference colours "Black", "Black + 1", "Black + 2", "White - 2", "White - 1" and "White". I am calcuating an estimated "Luma" value for each sample as follows:

First, I am using Corel PaintShop Pro X9, using the "eyedropper" to read the colour of five semi-random pixels. I am testing these pixels in the following order: center, upper left, upper right, lower right, lower left. I test pixels in a pattern roughly like a die. Specifically, I am avoiding edges of the colour samples and yet, spreading them out. The Red, Green and Blue values for each pixel are read as 8 bit values (0 - 255) and recorded as such.

The values are cumulated for each component colour and the averages are kept. Then the three averages are further averaged into an 8-bit "luma" value (representing the brightness of the sample colour).

Lastly the contrast is calculated by subtracting "White - 1" - "Black + 1".

If one or more component colours of any pixel of a sample colour = 0 or 255, then the Luma is marked as "Clipped".

If the calculated Luma value of a sample is 20 or below, then the value is indicated as "Below 20" as a warning that it is below "legal black".

I have graphed two of the data sets as reciprocity graphs.
[2020-05-20 20:21 Corrected the Graph.]

I will not be commenting on the results yet. I'm just too tired right now. . . .

I expect to post more data someday later, but, that might be before or after I post any comments about this much.


"G85-00010-Standard-ev0_0-13h26m54s730"

"Black" Luma: 54.9
"Black + 1" Luma: 104.5
"Black + 2" Luma: 163.0
"White - 2" Luma: 207.3
"White - 1" Luma: 235.3
"White" Luma: 253.5 [Clipped]

Contrast ("White - 1" - "Black + 1")
235.3 - 104.5 = 130.8
- [recommended reduce exposure 1/3 stop]


"G85-00015-Natural-ev0_0-13h57m06s629"

"Black" Luma: 67.6
"Black + 1" Luma: 111.9
"Black + 2" Luma: 165.0
"White - 2" Luma: 205.4
"White - 1" Luma: 233.6
"White" Luma: 254.1 Clipped

Contrast ("White - 1" - "Black + 1")
233.6 - 111.9 = 121.7
- [recommended reduce exposure 1/3 stop]


"G85-00019-Scenery-ev0_0-14h11m36s938"

"Black" Luma: 55.4
"Black + 1" Luma: 101.3
"Black + 2" Luma: 159.1
"White - 2" Luma: 205.3
"White - 1" Luma: 235.7
"White" Luma: 255.0 Clipped

Contrast 235.7 - 101.3 = 134.4
[recommended reduce exposure 1/3 stop?]


"G85-00021-Portrait-ev0_0-19h17m53s740"

"Black" Luma: 71.0
"Black + 1" Luma: 113.9
"Black + 2" Luma: 166.5
"White - 2" Luma: 207.3
"White - 1" Luma: 234.3
"White" Luma: 255.0 Clipped

Contrast 234.3 - 113.9 = 120.4
[recommended reduce exposure 1/3 stop?]


"G85-00023-CineLkD-ev0_0-14h20m50s135"

"Black" Luma: 70.9
"Black + 1" Luma: 99.2
"Black + 2" Luma: 141.0
"White - 2" Luma: 185.8
"White - 1" Luma: 220.3
"White" Luma: 247.0

Contrast 220.3 - 99.2 = 121.1


"G85-00027-CineLkV-ev0_0-14h28m54s299"

"Black" Luma: 61.7
"Black + 1" Luma: 99.8
"Black + 2" Luma: 153.9
"White - 2" Luma: 194.8
"White - 1" Luma: 223.3
"White - 1" Luma: 247.2

Contrast 223.3 - 99.8 = 123.5
 

Attachments

  • G85-Graph01a-Corrcted-C46.jpg
    1.9 MB · Views: 180
Last edited:
More Colour Chart Test Reports and Frame Captures

This is set of frame captures are probably the last that I will be uploading from the files I recorded in the first set. I am just starting to evaluate the results. You will find that many of these are repeats of the same profiles, but at an exposure of EV = -1.0. Moreover, in these cases the files are "better" exposed. One reason for this set of tests is to evaluate the "Spyder Checkr 24" card itself. What do the grey patches represent? Are they 1.0 stops apart? How accurate are they in that regard? If you take the "Standard EV = +0.0" frame you find that "Black + 2" = 130.2 and "White - 2" = 184.8. Then if you look at the "Standard EV = -1.0" frame, the "White - 2" = 149.3 and "White - 1" = 188.5. The 184.8 is very close to the 188.5, but the 130.2 seem surprisingly darker than 149.3. So is this because the greys are not that close to 1-stop apart or is something else going on? I will be looking at some matched pairs like this for a while, but I have other things to get done too, so I am not sure what this is going to tell me. Anyway, this is what I have for now:

Files:

"G85-011-Standard-minus1_0-10h20m26s178"

"G85-013-Vivid-ev0_0-10h31m19s404"

"G85-020-Scenery-minus1_0-23h12m12s327"

"G85-022-Portrait-minus1_0-23h23m22s023"

"G85-024-CineLkD-minus1_0-23h29m51s546"

"G85-028-CineLkV-minus1_0-23h37m55s644"


"G85-011-Standard-minus1_0-10h20m26s178"

"Black" Luma: 27.3
"Black + 1" Luma: 58.6
"Black + 2" Luma: 103.1
"White - 2" Luma: 149.3
"White - 1" Luma: 188.5
"White" Luma: 218.2

Contrast ("White - 1" - "Black + 1")
188.5 - 58.6 = 129.9


"G85-013-Vivid-ev0_0-10h31m19s404"

"Black" Luma: 46.9
"Black + 1" Luma: 94.6
"Black + 2" Luma: 160.2
"White - 2" Luma: 205.6
"White - 1" Luma: 235.8
"White" Luma: 254.9 Clipped

Contrast 235.8 - 94.6 = 141.2


"G85-020-Scenery-minus1_0-23h12m12s327"

"Black" Luma: 28.8
"Black + 1" Luma: 53.7
"Black + 2" Luma: 95.9
"White - 2" Luma: 148.3
"White - 1" Luma: 187.5
"White" Luma: 219.0

Contrast: 187.5 - 53.7 = 133.8


"G85-022-Portrait-minus1_0-23h23m22s023"

"Black" Luma: 38.1
"Black + 1" Luma: 67.5
"Black + 2" Luma: 109.3
"White - 2" Luma: 154.9
"White - 1" Luma: 191.3
"White" Luma: 216.7

Contrast: 191.3 - 67.5 = 123.8


"G85-024-CineLkD-minus1_0-23h29m51s546"

"Black" Luma: 44.9
"Black + 1" Luma: 66.4
"Black + 2" Luma: 95.7
"White - 2" Luma: 129.3
"White - 1" Luma: 163.7
"White" Luma: 198.7

Contrast: 163.7 - 66.4 = 97.3


"G85-028-CineLkV-minus1_0-23h37m55s644"

"Black" Luma: 29.2
"Black + 1" Luma: 54.5
"Black + 2" Luma: 95.7
"White - 2" Luma: 140.9
"White - 1" Luma: 178.5
"White" Luma: 206.8

Contrast: 178.5 - 54.5 = 124.0


Attachments

  • G85-011-Standard-minus1_0-10h20m26s178.jpg
    G85-011-Standard-minus1_0-10h20m26s178.jpg
    457 KB · Views: 178
  • G85-013-Vivid-ev0_0-10h31m19s404.jpg
    G85-013-Vivid-ev0_0-10h31m19s404.jpg
    541.9 KB · Views: 193
  • G85-020-Scenery-minus1_0-23h12m12s327.jpg
    G85-020-Scenery-minus1_0-23h12m12s327.jpg
    443.3 KB · Views: 177
  • G85-022-Portrait-minus1_0-23h23m22s023.jpg
    G85-022-Portrait-minus1_0-23h23m22s023.jpg
    478 KB · Views: 185
  • G85-024-CineLkD-minus1_0-23h29m51s546.jpg
    G85-024-CineLkD-minus1_0-23h29m51s546.jpg
    469.8 KB · Views: 178
  • G85-028-CineLkV-minus1_0-23h37m55s644.jpg
    G85-028-CineLkV-minus1_0-23h37m55s644.jpg
    436.9 KB · Views: 185
Summary of Tests [so far]

The graph that I posted above (reply #6) was wrong so I have uploaded a correction. I have been making some other graphs, but some have mistakes and others are quite messy, so I don't think I will upload more for now. The first graph is useful because you can print it out and add your own data on top of it.

After seeing the discrepancies on the graphs, I think that at least some of them are probably due to the angle of the card reflecting sunlight, which changes from one clip to another. The finish of the card is a matte, but there is still some reflection. I should check the order of the files and the date/time stamps.

Most of the file pairs show similar contrast, which is what I expected. The discrepancy between the contrast results for CineLikeD (EV = +0 vs EV = -1) is something I have no explanation for yet. It is particularly important for me because I have been planning to use CineLikeD a lot. I am considering the "Scenery" and "Portrait" profiles as well. The "Portrait EV = -1" produced a nice graph.

The information that I got from the current set of files is enough for my purposes, so I am not planning on re-doing this set of tests in the near future. I still have files from this set which I have not analyzed, and I might check a couple more, but I have not really made that decision. Put simply, I have spent a lot of time on this already, and I have other things to get done.


Metering Method:

So far I have been using the "2nd" focus and light metering setting which says "Focus and measure the subject on[sic] the center of the screen". This seems to be the closest I can come to a "center weighted" metering, which is what I would prefer.


Contrast Summary:
[updated w/2020-05-23 data]

Standard
EV +0 = 130.8
EV -1 = 129.9

Natural
EV +0 = 121.7 (recommend EV = -1/3)
EV -1.0 = 123.8

Vivid
EV +0 = 141.2 (recommended EV = -2/3?)
EV -1.0 = 140.8

Scenery
EV +0 = 134.4 (recommend EV = -2/3?)
EV = -1 = 133.8

Portrait
EV +0 = 120.4 (recommend EV = -2/3?)
EV -1 = 123.8

CineLikeD
EV +0 = 121.1
EV +0 = 116.8 [2nd test file '030]
EV -1 = 97.3
EV -2 = 71.0

CineLikeV
EV +0 = 123.5
EV -1 = 124.0


Known File recording times:
Standard EV -1 (Clip 011 @09:17)
Vivid EV +0 (Clip 013 @09:21)
 
Last edited:
Continuing Contrast/Dynamic Range test (continued):

As I wrote above about this file set, I felt I had enough data from the previous measurements and calculations to learn all that there was to learn from them. With some thoughtful analysis I could come to enough conclusions to work with for now. But the more I thought about it, the less I was satisfied with the results. So, since I had recorded more files, I decided to take the measurements from another four files before I left this set behind. Ironically, it was while I was working on the new files that I realized what was probably causing the biggest discrepancy in the earlier files -- the "CineLikeD" profile readings. After I finished all the calculations, I am fairly convinced I understand it now.


Starting with the "Natural EV = -1.0" file:

Source file: "00017.MTS" April 25 2020 09:26:15
"G85-Natural-minus1_0-18h46m26s922"

"Black" Luma: 36.5
"Black + 1" Luma: 67.7
"Black + 2" Luma: 109.6
"White - 2" Luma: 155.3
"White - 1" Luma: 191.5
"White" Luma: 217.4

Contrast: 191.5 - 67.7 = 123.8

Calculated Differences between Grey Scale Samples:

67.7 - 36.5 = 31.2
109.6 - 67.7 = 41.9
155.3 - 109.6 = 45.7
191.5 - 155.3 = 36.2
217.4 - 191.5 = 25.9

Looking at the contrast calculation (123.8), it looks like the "Natural" profile is intended to have fairly wide Dynamic Range. To me, the very name "Natural" probably implies that it will be fairly "linear" or "flat". Looking at the jumps from "Black + 1" (67.7) to "White -2" (155.3) the contrast through the "mid-tones" are similarly spaced, and even the adjacent jumps ("Black" to "Black +1" 31.2 and "White - 2" to "White - 1" 36.2) are mirrored and rolling off fairly gradually.

If I were to decrease the contrast on this profile, I would expect it to flatten out even more.


On the other hand, the "CineLikeD" profile seems to be a type of "Log profile". It might not be the same formula as the "VLog-L" profile in the "GH4" and "GH5" cameras, nor the same as "full VLog" which is available in the "S1" series cameras, but it seems to be some kind of Log incremented profile. Look at the first EV = +0.0 frame from file "00023.MTS":

"G85-00023-CineLkD-ev0_0-14h20m50s135" (previously posted)

"Black" Luma: 70.9
"Black + 1" Luma: 99.2
"Black + 2" Luma: 141.0
"White - 2" Luma: 185.8
"White - 1" Luma: 220.3
"White" Luma: 247.0

Contrast 220.3 - 99.2 = 121.1

Calculated Differences between Grey Scale Samples:

99.2 - 70.9 = 28.3
141.0 - 99.2 = 41.8
185.8 - 141.0 = 44.8
220.3 - 185.8 = 34.5
247.0 - 220.3 = 26.7

While contrast is low overall and thus, there is a clear intention to retain shadow detail, It appears that there is less attempt here to keep the response linear. Instead, the mid-tones are given "more room" while the upper and lower exposure ranges look more compressed. Looking at the lower end especially, the "Black" is still at 70.9. Looking at the "CineLikeD EV = -2.0" file we find:

Source file: "00026.MTS" April 25 2020 09:39:11
"G85-CineLkD-minus2_0-18h56m17s124"

"Black" Luma: 24.4
"Black + 1" Luma: 43.5
"Black + 2" Luma: 64.8
"White - 2" Luma: 88.5
"White - 1" Luma: 114.5
"White" Luma: 142.6

Contrast: 114.5 - 43.5 = 71.0

Calculated Differences between Grey Scale Samples:

43.5 - 24.4 = 19.1
64.8 - 43.5 = 21.3
88.5 = 64.8 = 23.7
114.5 - 88.5 =26.0
142.6 - 114.5 = 28.1

Assuming that the samples are meant to be about 1 stop apart, while the exposures don't seem to be lining up perfectly (EV = -2) there is a clear continuation of the decreasing steps between the samples. I think that a more tightly controlled test would give a more consistent result, but these tests show the intention clearly enough. So I think that the decrease in the "contrast calculation" for the three conditions (EV = +0, EV = -1.0 and EV = -2.0) is consistent with the intention of the profile, which is to give a lot of Dynamic Range in order to maintain a lot of shadow detail.

I made a second "CineLikeD EV = + 0.0" file which was the control file recorded simultaneously with the YiM1 "4K Portrait EV = 0.0" file, and the Luma values are close to the earlier version with the same settings. Luma values are generally within "4/256" of the corresponding readings of the earlier file, and the contrast calculation of the second file is 116.8 compared to 121.1 for the earlier test for a difference of 4.3/256, which is something to keep in mind for the future. If you simply look at the resulting captured frames, the visual similarity is "close enough". As far as the actual samples are concerned, I don't think I would be able to tell they were from different source files.

As for "CineLikeV", looking at the EV = + 0.0 file, there appears to be a big Jump from "Black + 1" to "Black +2" and a taper above that. But there is no strong reason to drop down as far as "EV = - 1.0". I think "EV = -1/3" or "EV = -2/3" would give a pleasing result.

"G85-00027-CineLkV-ev0_0-14h28m54s299" (previously posted)

"Black" Luma: 61.7
"Black + 1" Luma: 99.8
"Black + 2" Luma: 153.9
"White - 2" Luma: 194.8
"White - 1" Luma: 223.3
"White" Luma: 247.2

Contrast 223.3 - 99.8 = 123.5

Calculated Differences between Grey Scale Samples:

99.8 - 61.7 = 38.1
153.9 - 99.8 = 54.1
194.8 - 153.9 = 41.9
223.3 - 194.8 = 28.5
247.2 - 223.3 = 23.9

"G85-028-CineLkV-minus1_0-23h37m55s644" (previously posted)

"Black" Luma: 29.2
"Black + 1" Luma: 54.5
"Black + 2" Luma: 95.7
"White - 2" Luma: 140.9
"White - 1" Luma: 178.5
"White" Luma: 206.8

Contrast: 178.5 - 54.5 = 124.0

Calculated Differences between Grey Scale Samples:

54.5 - 29.2 = 25.3
95.7 - 54.5 = 41.2
140.9 - 95.7 = 45.2
178.5 - 140.9 = 37.6
206.8 - 178.5 = 28.3


Current Plans:

For now, I am planning to "explore" and use "CineLikeD", and one other profile. I am still choosing what the other profile will be. The "Natural" profile and the "Portrait" profile both look like they would be useful.


Other Observations:

If you look closely at the mid-tone colour samples it is interesting to see how much noise they show. It is safe to say that the G85 1080p is using "line skipping" rather than "over sampling". I have said before that I don't mind the noise level and overall, I don't. But if I wanted to get rid of it, the best way would clearly be to record UHD (100 mbps) and "resize" the frame down to 1080p. I really dislike this "option". I still feel that it is inexcusable that these Japanese companies have not provided a 1440p set of file options at around 50 - 60 mbps. If I had such format capabilities then that is what I would chose for most of my recordings. That would leave UHD for special recording where I would really want the extra file quality. Most of what I upload to YouTube is still 1080p, and for me, 100 mbps is just ridiculous waste.


The "New" Files:

Source file: "00014.MTS" April 25 2020 09:22:28
"G85-00014-Vivid minus1_0-12h37m31s592"

"Black" Luma: 22.4
"Black + 1" Luma: 46.9
"Black + 2" Luma: 91.7
"White - 2" Luma: 145.9
"White - 1" Luma: 187.7
"White" Luma: 219.0

Contrast: 187.7 - 46.9 = 140.8


Source file: "00017.MTS" April 25 2020 09:26:15
"G85-00017-Natural-minus1_0-18h46m26s922"

"Black" Luma: 36.5
"Black + 1" Luma: 67.7
"Black + 2" Luma: 109.6
"White - 2" Luma: 155.3
"White - 1" Luma: 191.5
"White" Luma: 217.4

Contrast: 191.5 - 67.7 = 123.8


Source file: "00026.MTS" April 25 2020 09:39:11
"G85-00026-CineLkD-minus2_0-18h56m17s124"

"Black" Luma: 24.4
"Black + 1" Luma: 43.5
"Black + 2" Luma: 64.8
"White - 2" Luma: 88.5
"White - 1" Luma: 114.5
"White" Luma: 142.6

Contrast: 114.5 - 43.5 = 71.0


Source file: "00030.MTS" April 25 2020 09:46:12
[Control, simultaneous w/P4250011.MP4 YiM1 "4K Portrait" file]
"G85-00030-CineLkD-ev0_0b-21h31m40s101"

"Black" Luma: 72.4
"Black + 1" Luma: 100.2
"Black + 2" Luma: 138.8
"White - 2" Luma: 181.7
"White - 1" Luma: 217.0
"White" Luma: 243.5

Contrast: 217.0 - 100.2 = 116.8

[2020-05-24 12:36]
I am uploading a couple of reference graphs. One graph shows results from two instances of "CineLikeD". The lower line shows EV = -2 and the upper line shows the second test of EV = 0.0. While I think it shows the intention of the programmers to retain shadow detail, the discrepancy between the graphs is at the least annoying. Assuming that the samples on the card are 1 EV apart, I should be able to cut the lower part of the graph paper and slide it to the left and have a single continuous reciprocity graph. But the data shows more slope in the EV = 0.0 graph in the overlap section, so that even if I compensate the luma differences for a couple of data points, the graph does not look "trust worthy". The whole point of all this testing is to help me learn the characteristics of the camera. When I go out and record something live, I only have "one chance to get it right". So I need to be able to predict the results of key settings in order to get those results. A discrepancy like this means that I will need to do more work learning the camera.

The other graph shows only the "Natural" profile at EV = -1.0. Since EV = +0.0 was clipped at white, EV = -1.0 is closer to what I will normally use. Since I have only included the data from this one profile setting, you can print it out and re-use the graph by adding more data from other samples for comparison. If you use a reference card similar to mine, you can even use it to compare it with other cameras of your own.
 

Attachments

  • G85-00014-Vivid-minus1_0-12h37m31s592.jpg
    G85-00014-Vivid-minus1_0-12h37m31s592.jpg
    375.4 KB · Views: 181
  • G85-00017-Natural-minus1_0-18h46m26s922.jpg
    G85-00017-Natural-minus1_0-18h46m26s922.jpg
    415.5 KB · Views: 195
  • G85-00026-CineLkD-minus2_0-18h56m17s124.jpg
    G85-00026-CineLkD-minus2_0-18h56m17s124.jpg
    399.1 KB · Views: 174
  • G85-00030-CineLkD-ev0_0b-21h31m40s101.jpg
    G85-00030-CineLkD-ev0_0b-21h31m40s101.jpg
    528.7 KB · Views: 175
  • 0524-CineLkD-c57.jpg
    1.9 MB · Views: 193
  • 0524-Natural-minus1_0-c53.jpg
    0524-Natural-minus1_0-c53.jpg
    1.9 MB · Views: 183
Last edited:
Understanding "CineLikeD" (aka "I think I get it now")

For CineLikeD, testing the EV changes it shows that contrast changes with the EV. The "Black" sample on the card is is the darkest sample value. It is not necessarily real black. In fact, if you look at the shadows in the grass in the first set of tests, there are darker "blacks" in the shadows than the black on the card. On a rough guess, it seemed like there was an arbitrary "true" black" level, probably where the sensor gets too noisy to be used (the "noise floor") and the "white" clip level is adjusted by the EV setting and the contrast is scaled between those two limits. In effect, the bottom "black" level probably does not change.

Assuming I want the full sensor capability to be represented, then simply adjusting the "clip level" by adjusting the EV is all I should need. So this simplifies setting the camera. But the contrast is variable, and if the EV is dropped, then, for example, the grey scale in the low shadows is not going to have a lot of range to work with. So stretching the values down in that range is going to fall degrade into "banding" fairly quickly.

This leaves the question of what happens when the "Contrast" control of the profile is adjusted? Contrast has a variable range of -5 to +5. What does it do?

The Conditions:

It was a partly overcast day.

I am uploading two reduced pictures of the sky so you can see the conditions.

P1000207-1600-C1.JPG
P1000208-1600-C1.JPG


The clouds were thin enough to cause changes in lighting as they were blown by. The auto-exposure did well enough to keep the overall exposures close enough between the files and throughout the files to give acceptable, valid results.

The first clip ("P1000205.MP4") was recorded at UHD specifically to see if there was any discrepancy caused by the change in file format. After that I changed back to FHD to save the file size.

P1000205.MP4
UHD 24 fps CinelikeD, no changes, Focal length 38mm (use this one)
Created May 17, 2020 09:50:42
Size: 785,300,749 bytes
Video:
Length 1:06
Frame width 3840
Frame height 2160
Data rate: 93,611 kbps
Total bitrate: 93,735 kbps
Frame rate 23 fps [sic]
Audio
Bit rate 124 kbps
Channels 2 (stereo)
Audio sample rate 48 kHz
Caps @ ~10 sec.

"Black" Luma: 60.3
"Black + 1" Luma: 91.5
"Black + 2" Luma: 131.9
"White - 2" Luma: 175.7
"White - 1" Luma: 211.8
"White" Luma: 239.6

Contrast: 211.8 - 91.5 = 120.3


[For the following: FHD 24 fps, EV = +0.0]


"00035.MTS" CineLikeD EV = +0.0, Contrast = -5.0

"Black" Luma: 76.0
"Black + 1" Luma: 113.7
"Black + 2" Luma: 137.3
"White - 2" Luma: 176.2
"White - 1" Luma: 211.5
"White" Luma: 241.2

Contrast: 211.5 - 113.7 = 97.5


"00038.MTS" CineLikeD EV = +0.0, Contrast = -3.0

"Black" Luma: 73.2
"Black + 1" Luma: 102.2
"Black + 2" Luma: 140.7
"White - 2" Luma: 181.5
"White - 1" Luma: 216.2
"White" Luma: 243.9

Contrast: 216.2 - 102.2 = 114.0


"00039.MTS" CineLikeD EV = +0.0, Contrast = -2.0

"Black" Luma: 69.6
"Black + 1" Luma: 100.0
"Black + 2" Luma: 138.2
"White - 2" Luma: 180.6
"White - 1" Luma: 215.8
"White" Luma: 243.5

Contrast: 215.8 - 100.0 = 115.8


"00040.MTS" CineLikeD EV = +0.0, Contrast = -1.0

"Black" Luma: 67.0
"Black + 1" Luma: 98.7
"Black + 2" Luma: 138.1
"White - 2" Luma: 182.0
"White - 1" Luma: 217.2
"White" Luma: 244.1

Contrast: 217.2 - 98.7 = 118.5


Due to time constraints I originally decided to do only Contrasts -5, -3, and -1, but as I got further along, I changed my mind and added EV = -2, which means I am only missing EV = -4. I almost decided to add the "-4" at the end, but decided that I really needed to leave it to some other day. After looking at the data, I do not feel that I missed anything significant. I might redo the test someday to fill in the missing data, but I it does not seem urgent now.

The "control" file this time was recorded in UHD (aka "4K") and was recorded simultaneously with one in my Sony a5000, which I plan on posting later. I decided to record in UHD this time to compare with the previous CineLikeD files I made in FHD. Despite the slightly different lighting conditions (slightly overcast), the contrast is close to the first "EV = +0.0" file I recorded:

First FHD version contrast (file 00023.MTS) = 121.1
UHD version contrast (file P1000205.MP4) = 120.3

The UHD file specific grey levels are all about 10/256 lower luma than the earlier FHD file. I attribute this to the large shadow area in the earlier file which pushed the exposure of the colour card up. The resulting reciprocity graph curves track very well, which indicates that the tests have been valid.

G85-CineLkD-UHD-Base-21h55m07s921a-C1.jpg to
G85-CineLkD-UHD-Base-21h55m07s921c-C1.jpg

These four files should be enough to re-construct the original frame as follows:

UHD Sample Frame:
Pixels in Frame: 3840 x 2178
each 1/4 = 1920 x 1089

Make a blank file 3840 x 2178 and then copy-paste each of the four files into the new file (upper left, upper right, lower left and lower right).

Observations and Conclusions:

Looking at the contrast calculations, as the "Contrast" setting is lowered, the contrast does reduce, but slower than I expected. The curve's slope likewise reduces slowly. What is notable is that the upper "white" value stays fairly even and the reduction in contrast is a result of the level of the "black" card sample being raised.

So the "Exposure" and "Contrast" controls seem to be intended to work together, to control exposure and contrast, but not in the way I expected. While "Exposure" does control the overall exposure, it also changes contrast by compressing or expanding the "gamma" (reciprocity) curve by "locking" the black. On the other hand, the "black" is moved by the "Contrast" control.

It appears that, for a wide range of lighting situations, the sensor's ability to record the light can be fully utilized by adjusting these two controls.

This raises the question: "How much advantage is there in the "VLog-L" in the G95? It appears that if one uses the controls properly in the G85, that there might not be any loss in not having the extra profile.
 

Attachments

  • G85-CineLkD-UHD-Base-21h55m07s921a-C1.jpg
    G85-CineLkD-UHD-Base-21h55m07s921a-C1.jpg
    404.1 KB · Views: 179
  • G85-CineLkD-UHD-Base-21h55m07s921b-C1.jpg
    G85-CineLkD-UHD-Base-21h55m07s921b-C1.jpg
    339.2 KB · Views: 172
  • G85-CineLkD-UHD-Base-21h55m07s921c-C1.jpg
    G85-CineLkD-UHD-Base-21h55m07s921c-C1.jpg
    298.7 KB · Views: 175
  • G85-CineLkD-UHD-Base-21h55m07s921d-C1.jpg
    G85-CineLkD-UHD-Base-21h55m07s921d-C1.jpg
    346.5 KB · Views: 192
  • G85-00035-CineLkD-ConMinus5_0-10h45m27s045-C1.jpg
    G85-00035-CineLkD-ConMinus5_0-10h45m27s045-C1.jpg
    334.6 KB · Views: 161
  • G85-00038-CineLkD-CntrsttMinus3_0-15h31m23s748-C1.jpg
    G85-00038-CineLkD-CntrsttMinus3_0-15h31m23s748-C1.jpg
    360.7 KB · Views: 138
  • G85-00039-CineLkD-CntrstMinus2_0-14h55m45s025-C1.jpg
    G85-00039-CineLkD-CntrstMinus2_0-14h55m45s025-C1.jpg
    361 KB · Views: 121
  • G85-00040-CineLkD-CntrstMinus1_0-18h47m38s672-C1.jpg
    G85-00040-CineLkD-CntrstMinus1_0-18h47m38s672-C1.jpg
    366.4 KB · Views: 112
  • P1000207-1600-C1.JPG
    P1000207-1600-C1.JPG
    230.1 KB · Views: 178
  • P1000208-1600-C1.JPG
    P1000208-1600-C1.JPG
    307.7 KB · Views: 182
Cleaning Up "CineLikeD" Testing:

I have finished my testing of CineLikeD for now. I will be uploading data from one video clip today, and I have two more clips which I might get the stats from later. Really, the most important thing that I will do today is post a couple of graphs which summarize how the "Exposure Compensation" and "Contrast controls seem to be working. I deliberated made these graphs including the blank space where I am missing data because I have not done the testing in those areas. It is important to understand that in that sense the testing is "incomplete". However, as far as I am concerned, it is complete enough for my current needs.

About the "00034.MTS" video file. This file is the control file for some files I created on another camera (I think it was the Sony a5000) and as such I am posting it here in anticipation for that set of tests. It was also supposed to be a "control" for the UHD video which I reported above. In other words, it was supposed to be recorded at EV = +0.0 and Contrast = +0, and that is how I identified it while I recorded it. Unfortunately, when I went to change the settings I saw that I had made an error and the actual setting was "EV = -0.3". I decided not to bother re-recording that pair of videos because I would eventually be recording more tests matching the FHD and UHD later. I still have not done that, but eventually I will. In the meanwhile, I am fairly confident that there is little or no difference between the setting in EV and Contrast that results from changing from FHD to UHD. If there is, well, I'll deal with it later when I have to, but I don't have time for it right now.

The following are the stats from the sample frame from that clip:

"G85-00034-CineLkD-EVmns-0_3-16h51m20s069"

"Black" Luma: 51.7
"Black + 1" Luma: 86.7
"Black + 2" Luma: 126.9
"White - 2" Luma: 171.7
"White - 1" Luma: 209.9
"White" Luma: 238.5

Contrast: 209.9 - 86.7 = 123.2


I have about three more clips which I recorded on a later day which test "mixed" setting changes of EV and contrast. Those are less important because they are for "proof of concept". That is to say, the result in those videos should show changes based on the controls as I have described them working. I will eventually do the work and post a report, but I am fairly confident that I have understood this much. If the results do not fall within "predictable" ranges, I will be very surprised.


Now to the graphs that I am posting today:

These two graphs show how changes to the EV and Contrast controls result in changes in how the light recorded by the sensor is being represented in the final videos. In the EV graph, it appears that the "black" is locked and "white" is adjusted, and in the Contrast graph it appears that the "black" is adjusted while the "white" is locked. All my tests have been in the negative range so far, but both controls have positive range adjustment as well. I can test the positive ranges, but I will need to set up a backlight scene for the EV test, which will be a bit difficult, but not impossible. But for now, I am not planning on doing such tests. I am already starting to test the "Natural" profile, and I have already started using the G85 in video projects. So this is pretty much the end of this exploration of CineLikeD.
 

Attachments

  • G85-00034-CineLkD-EVmns-0_3-16h51m20s069-C1.jpg
    G85-00034-CineLkD-EVmns-0_3-16h51m20s069-C1.jpg
    336.9 KB · Views: 184
  • CineLkD-Grph1-EV-C59.jpg
    1.9 MB · Views: 159
  • CineLkD-Grph2-Cntrst-C61.jpg
    1.9 MB · Views: 182
About UHD, CineLikeD, "Extreme Grades" and Image Noise

I wrote before that for 8-bit in with an 8-bit target, it is best to at least come close to your final image when you record, and I specifically wrote that "banding" (aka "posterizing") was a particular problem that is avoided this way. That's true enough, but working on this set of clips brought up the problem of image noise. It gave me a chance to grin a bit, but I'll get to that.

The scene is a beach location, late in the day with clear, warm weather. Toronto is slowly coming out of "lock down" out of Covid-19 so the beaches are not as full as in a regular year. This was a panned clip, so I used more dynamic range than this particular frame needed.


"02-0267-20h17m42s153a-rsz1920-C1.jpg"

The first image is the whole frame, but reduced from UHD (2160) to FHD (1080), so you can see my start point for "grading".

"02-0267-20h17m42s153b-SmartFix1920-C2.jpg"

The second image has had the suggested corrections applied. There is still a slight blue cast which I might leave, but otherwise, it is good enough. The JPEG version is a bit more compressed than the other images. The most important "detail" for this image was the colour corrections anyway.


"02-0267-20h17m42s153c-Crp1-C1.jpg"
"02-0267-20h17m42s153d-Crp2-C1.jpg"


The last two images are full resolution crops of the UHD frame after the corrections.


If you look at the first detail crop from the full image, the orange chairs in the shadows show the worst of the image noise. It is interesting how colour specific the problem can be. The blue and white chairs are not showing as much noise despite being in identical lighting. Partly this is simply because they are lighter shades, but I think the orange is a particularly susceptible colour. From this image, you might not want to try to sit in an orange chair. In fact, if you look at the nearby beach sand, which is actually fairly fine texture, it is smoother looking than parts of the orange chairs -- even where the light is close to the same.

Part of the problem is that increasing the contrast, as a part of the correction, increases the visibility of the image noise. And that is the point. If I had adjusted the camera to output closer to the target image, I might have ended up with less noise -- maybe or maybe not. It depends on how things are really being handled in the camera. For me, the only way to tell is to record the same thing twice with different settings and see the results. Right now, I cannot practically do that.

Can I fix it in post? I don't know yet. I would not want to apply a general noise reduction. I like the amount of detail in this clip. One acceptable approach is to look at the reduced FHD images. Gee, don't they look good? Noise reduction is a natural result of the most common size reduction methods. Note that NOT ALL reduction methods reduce noise. But realistically, all the methods that I would use have some degree of noise reduction. I do not have to go down to FHD either. Even "1440" would result in some noise reduction.

If this was a stationary image instead of a pan, there might be a "frame to frame" image reduction capability. I don't know if I have such a tool but "frame to frame" compression has been around a long time, so the "pieces" are there to do it.

I could bring down the shadow and increase the contrast above the noise level. But that is simply giving up some amount of the shadow detail, and I like the shadow detail.

About the shadow detail, "Potato Jet" found that, to his surprise, the Lumix G7 (same image as the G85) had more shadow detail than the Canon M50. The so-called "punchier" image he noted is simply that -- higher contrast which results in less shadow detail.

"Best $500 Youtuber Camera in 2019? Canon M50 vs Panasonic Lumix G7",
posted Jan 15, 2019 by "Potato Jet", [length 18:03]
""


And yes, within the Panasonic line, this is one reason that you pay the "bigger bucks" to get the high end GH5 and GH5S cameras. Each in its own way produces images with better noise characteristics than a G85, though it takes a GH5S to have lower light capability than the G85.
[2020-07-13 Correction. There are more reasons to pay more for the higher Panasonics than just this.]

[2020-07-13 1:50 Added the following:]
Another thing I noticed was that the frame shows a bit more sharpening that I liked, so I will probably take that down a notch in the future.
[2020-07-14 20:24 Correction to my addition:]
Oops! I checked my working notes and part of the adjustments that I made was a substantial amount of sharpening. So the camera output was ok, and I will not have to decrease sharpening. This is why I keep my notes!

[2020-07-14 Add uploads]
2nd Kew Beach caps upload set:

I am posting a couple of pictures that I should have included before.

"02-0267-20h17m42s153-Crop-C1.jpg"

This is a detail crop from the frame captured frame before any changes.

Comparing the noise before I increased the contrast shows that it did not really look that bad until I made the alteration. So if I had a more normal level of contrast in the first place, the noise would probably turned out less obtrusive.

"02-0267-20h17m42s153c-HueM5-SatP5-Rsz1920.jpg"

This shows a different approach to adjustments. I have shifted the hue -5 and increased the saturation +5 in Corel Paintshop Pro. I would probably still increase the contrast and brightness a bit, but really, considering it was early evening (notice the long shadows), it is not really necessary to bring it up to a "daylight" appearance.

It is interesting to see that intensifying the colours, to an extent, reduces the need for the "brightening".
 

Attachments

  • 02-0267-20h17m42s153a-rsz1920-C1.jpg
    02-0267-20h17m42s153a-rsz1920-C1.jpg
    317.5 KB · Views: 164
  • 02-0267-20h17m42s153b-SmartFix1920-C2.jpg
    02-0267-20h17m42s153b-SmartFix1920-C2.jpg
    445.3 KB · Views: 162
  • 02-0267-20h17m42s153c-Crp1-C1.jpg
    02-0267-20h17m42s153c-Crp1-C1.jpg
    450 KB · Views: 168
  • 02-0267-20h17m42s153d-Crp2-C1.jpg
    02-0267-20h17m42s153d-Crp2-C1.jpg
    256.4 KB · Views: 161
  • 02-0267-20h17m42s153-Crop-C1.jpg
    02-0267-20h17m42s153-Crop-C1.jpg
    295.4 KB · Views: 157
  • 02-0267-20h17m42s153c-HueM5-SatP5-Rsz1920.jpg
    02-0267-20h17m42s153c-HueM5-SatP5-Rsz1920.jpg
    318.8 KB · Views: 160
Last edited:
My Kew Beach video has been uploaded and is now available:

"[UHD] 20200706 Toronto Kew Beach"
""

This is my first completed video using the G85, and represents the results of a lot of experimentation. For those of you long time photographers, that might elicit a cringe, or a grin, or both. It means that, in many ways, I "didn't know what I was doing", and yes, I was pushing the boundaries of my experience with it.

The simple summary of the technical problem I was exploring is what to do about the changes in illumination caused by long rotational pans?

For some of the clips I was working with, the sun was in the picture at the start or the end, and in between there is side lighting, and then at the other end, is regular direct sun light. Of course, the easy answer is "don't do that!" Yes, if I simply did not do that, I would have gotten an easier, and maybe better video. Better is always an interesting question. But I was interested in what the new capabilities of this G85 camera really bring to me. So I used the CineLikeD profile and tried a few different settings, and made what adjustments I could in post.

Artistically, I am actually fairly satisfied. The result looks a bit bleak. That suits the situation. The final look is, in my mind "old Ektachrome".

As for posting it in UHD, the only reason I did that was because it was my first production using the G85, and I felt I should show at least that much of its capabilities. I don't actually feel that there is anything to see in it that makes the high resolution necessary. So if you see it in FHD, you aren't missing anything.

Anyway, it was an interesting "panning exercise" and yes, the panning tells a story -- the current situation where I live, is still quiet and cautious. Even in really good weather, the beach was fairly empty. The long empty stretches of panning leave no doubt about that.
 
G85 CineLikeD Redo:

I decided to try more takes with different settings. Returning to the same location (literally within inches of my original camera placement), with similar lighting (a bit of clouds, but not blocking the sun), I recorded with settings with more normal adjustments. This clip still had more dynamic range than absolutely necessary, but about what I would normally use with CineLikeD and this camera.

[2020-08-03 11:03
I checked back through my notes and as far as I can tell, the actual settings of the clip from which this sample frame came from was set "Contrast = +1, EV = +0". The "Contrast = +1" is the key. It seems to re-scale the ISO and probably increases the overall exposure reducing the noise. Part of the result though, is the whites are higher. So if I do this again, I should try "Contrast = +1, EV = -1/3", or something like that.}


Processing the captured sample frame in Corel Paintshop Pro, the white chair was just starting to clip in the source file, so I over-rode the recommended adjustments to keep the whites on the borderline, but the contrast is stretched downward for the blacks.

"G85-CineLkD-0720-0288-54m11s952-Rsz1920-C1.jpg"
- a sample frame capture resized to "Full HD"

"G85-CineLkD-0720-0288-54m11s952-Crop01-C1.jpg"
- a detail crop of the same chairs as before
- notice that there is almost no visible noise this time

"G85-CineLkD-0720-0288-54m11s952b-Rsz1904-C1.jpg"
- my adjustments

"G85-CineLkD-0720-0288-54m11s952a-AdjustedCrop-C1.jpg"
- a detail crop of the chairs after adjustments
- even with the increased contrast the noise is much
better than the earlier recordings.

Conclusion:

Properly used, the G85 "CineLikeD" can give good results, but as I noted before, working from 8-bit colour camera files to 8-bit target files, you do want to record reasonably close to your final target appearance.
 

Attachments

  • G85-CineLkD-0720-0288-54m11s952-Rsz1920-C1.jpg
    G85-CineLkD-0720-0288-54m11s952-Rsz1920-C1.jpg
    417.5 KB · Views: 173
  • G85-CineLkD-0720-0288-54m11s952-Crop01-C1.jpg
    G85-CineLkD-0720-0288-54m11s952-Crop01-C1.jpg
    338.6 KB · Views: 164
  • G85-CineLkD-0720-0288-54m11s952b-Rsz1904-C1.jpg
    G85-CineLkD-0720-0288-54m11s952b-Rsz1904-C1.jpg
    435 KB · Views: 150
  • G85-CineLkD-0720-0288-54m11s952a-AdjustedCrop-C1.jpg
    G85-CineLkD-0720-0288-54m11s952a-AdjustedCrop-C1.jpg
    429.2 KB · Views: 83
Last edited:
More "CineLikeD" Tests:

I mentioned these test files previously but I am just getting around to looking at them now.

These first two tests were my follow-up for CineLikeD adjustments. I am only looking for data to confirm or reject my theory of how the Contrast and EV controls work. If the data looks "reasonably close" to what I expect, that that is all that matters.

NOTE: All the video clips recorded for this set of tests were accidentally focused on the background instead of the card. Since I am not reading pixel data near the edges of the colour samples, that should not affect the test results. In fact, it might even make the readings more accurate.


"G85-077-CineLkD-ConMns2-EVMns1-19h31m16s651-C1.jpg"

From "00077.MTS" 1920 x 1080
- focused on background

Windows:
Size 193,892,352 bytes
Created May 31, 2020, 09:56:58
Video
Length 1:06
Frame width 1920
Frame height 1080
Data rate 23047 kbps
Total bitrate 23239 kbps
Audio
Bit rate 192 kbps
Channels 2 (stereo)
Audio sample rate 49 kHz

CineLkD
Contrast -2, Exposure -1
- caps from ~ 10 sec

"Black" Luma: 62.7
"Black + 1" Luma: 75.2
"Black + 2" Luma: 95.3
"White - 2" Luma: 123.2
"White - 1" Luma: 152.2
"White" Luma: 185.0

Contrast: (152.2) - (75.2) = 77.0


"G85-078-CineLkD-ConMns4-EVMns1-20h58m45s423-C1.jpg"

From "00078.MTS" 1920 x 1080
- focused on background

Windows:
Size 213,909,504 bytes
Created May 31, 2020, 09:58:36
Video
Length 1:13
Frame width 1920
Frame height 1080
Data rate 23245 kbps
Total bitrate 23437 kbps
Audio
Bit rate 192 kbps
Channels 2 (stereo)
Audio sample rate 49 kHz

CineLkD
Contrast -4, Exposure -1
- caps from ~ 10 sec

"Black" Luma: 67.7
"Black + 1" Luma: 79.8
"Black + 2" Luma: 99.1
"White - 2" Luma: 123.5
"White - 1" Luma: 151.4
"White" Luma: 180.6

Contrast: 151.4 - 79.8 = 71.6

In post #7, The previous test of EV = -1 alone had a "white" luma of 198.7 whereas this test (Contrast = -4) shows a white luma of 180.6 and the Contrast =-2 showed white as 185.0.

The "slow" drop in "white" as "contrast" is reduced implies that there is probably a "stable" level slightly darker than this "white" which would have remained unchanged,.

In post #10, the contrast of "Contrast = -2" (actual contrast reduction of about "3 to 4") and in post #7 the "EV = -1" test contrast was 97.3. In this test, with EV = -1 in both new cases, I consider the contrast of 77.0 for "contrast - 2" and contrast of 71.6 for "contrast - 4" as plausible, though they seem to be off a bit. This might be due to differences in the lighting of the specific tests from differences in sky conditions, etc.
 

Attachments

  • G85-077-CineLkD-ConMns2-EVMns1-19h31m16s651-C1.jpg
    G85-077-CineLkD-ConMns2-EVMns1-19h31m16s651-C1.jpg
    368.1 KB · Views: 154
  • G85-078-CineLkD-ConMns4-EVMns1-20h58m45s423-C1.jpg
    G85-078-CineLkD-ConMns4-EVMns1-20h58m45s423-C1.jpg
    377.4 KB · Views: 143

Most reactions

Back
Top