Halloween themed shoot

adamhiram

No longer a newbie, moving up!
Joined
Feb 6, 2015
Messages
857
Reaction score
575
Can others edit my Photos
Photos OK to edit
I try to get a few shots of my son in his Halloween costume each year. This time around I thought I would go the extra mile and create a themed shoot in a controlled studio environment. I’m pretty happy with the concept, but would have liked to have gotten in more than 7 shots before he lost interest and wandered off. If there’s one thing I’ve learned about toddlers, you get what you get.

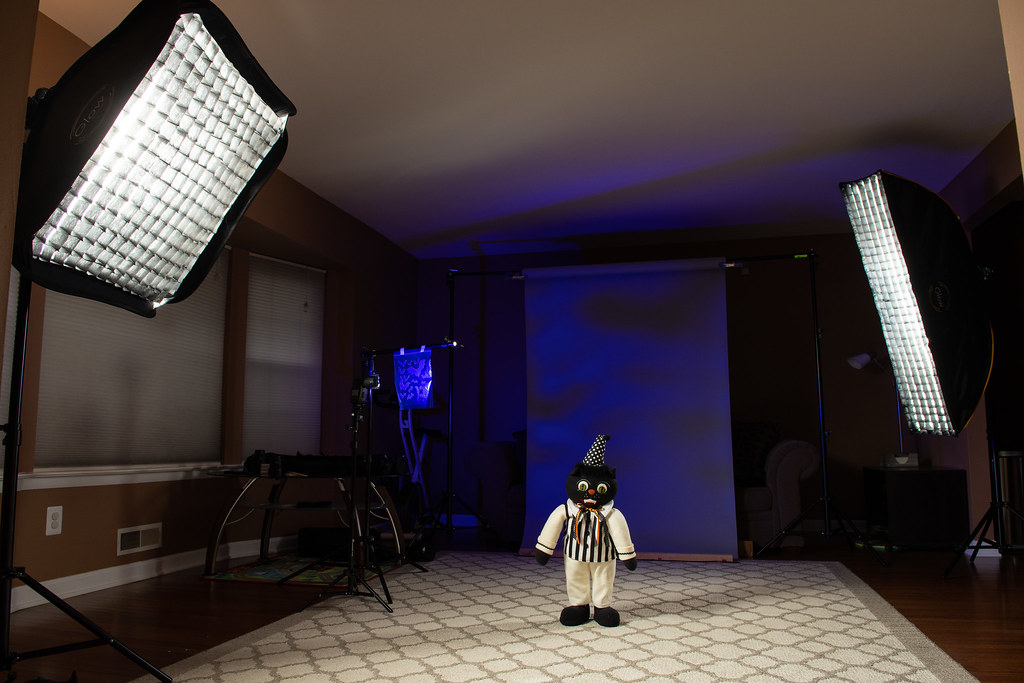
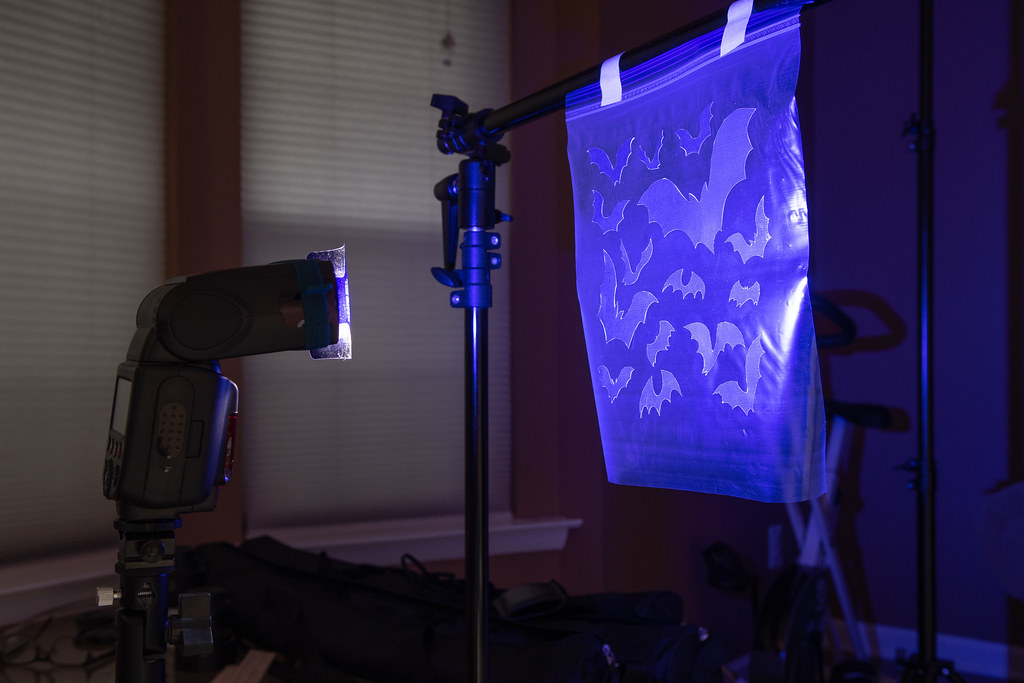
I aimed for a darker theme with more directional light and deeper shadows, and fairly rapid fall-off on the main light. Photo of lighting setup is below. I already see some things I would have liked to tweak or have done differently, and am interested in some honest feedback on how I did and what could be improved. As always thanks for looking!

  • Main light is a 32” square gridded softbox
  • Rim light is a 12”x56” gridded stripbox
  • Background light is a bare strobe shot through a blue (“Special HK Lavender”) gel and DIY gobo with bat shapes onto gray seamless

Nikon D500 with 50mm f/1.8 lens
50mm, f/5.6, ISO 400


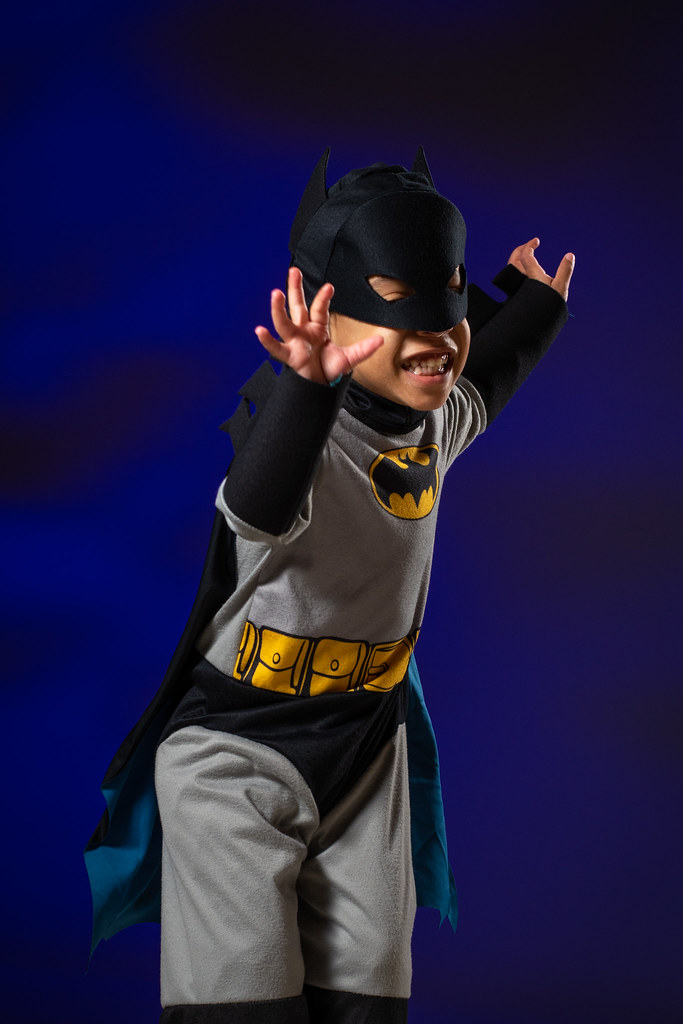
20181028-DSC_9924a
by adamhiram, on Flickr


20181028-DSC_9938a
by adamhiram, on Flickr


20181028-DSC_9941a
by adamhiram, on Flickr
 
I like the image of your son, he seems to of enjoyed it. Plus it`s good to see the wider images, my only thought is try and have just a bit bigger mask for your son so you can see his eyes more.
 
Son makes a great dark knight. Great shot and write up on the behind the scenes. I see you also use a stand in (mine is a duck) for light placement and setup. My granddaughter won't stand still long either. I've also came to the decision that the more simple sets are best at that age. My last setup had to many lights for a moving subject (5 total), there was no way to keep them focused correctly on a moving object. I believe your use of two soft boxes is the way to go at that age. Placing them high gave good menacing shadows on the face, though I think I might have flagged the main and key to keep some of the light off the pants. I'm really impressed with background effect and the gobo, you've given me some ideas for the future. Lastly on the mask, I'm assuming that it was a wardrobe malfunction that caused it to slip up at the most inopportune time, which with toddlers is pretty much anytime. Lol
 
@Fujidave thank you! The mask actually fit just fine, he just wouldn’t stop fussing with it. As I say every time, you get what you get with a toddler, and you’re thankful for it!

@smoke665 as always, thanks for the inspiration! You always make such well thought-out sets and I wanted to try for more than just a blank wall or backdrop this time. Some additional notes:
  • I found that the spread on gridded softboxes is still pretty wide, such that the subject can move around a bit and still be lit properly. The grids are supposedly 30 degrees, but I found that if I took the rim light much off of 45, I either got spill on the backdrop or lens flare. However I am done with snoots as rim/hair lights unless I have a stationary adult subject standing on a marker or sitting in a chair.
  • I debated flagging the key light for falloff below the chest, but wound up just using a grad filter in post to reduce exposure by about 0.3 stop, then doing some light dodging to bring back some edge highlights.
  • I am probably more bothered by the motion blur in the right hand than I should be. I assume the effective shutter speed is somewhere around the max flash duration, which is just above the max sync speed, or around 1/300s. I took some test shots of myself waving quickly, and sure enough 1/320s is not fast enough to freeze motion. I guess there wasn’t much I could do about that other than maybe raise my ISO and use HSS to allow for a faster actual shutter speed.
  • Lastly, I am still learning how to correctly use a large strip box for rim lighting. I took some test shots with a 1:1 key:rim ratio and the rim light was way too bright for this shot. I started at a 16:1 ratio to match the background and had intended to gradually raise it until i was happy with the shadow-side highlights, but unfortunately didn’t get the opportunity. It worked well enough for some subtle background separation, but I think around 4:1 ratio would have been the right power here.
Thanks again for the feedback!
 
. The grids are supposedly 30 degrees, but I found that if I took the rim light much off of 45, I either got spill on the backdrop or lens flare

I always find your posts full of practical examples that I can use to improve my shooting. As I've moved to more complex lighting sets, I've found flagging to be invaluable in controlling spill. I have to wonder if it wouldn't have allowed you more latitude on your rim light?

I've accumulated several large foam core black and white, and a couple of 4x4 V flats painted white on one side and flat back on the other. Foam insulation board works good, but needs to be at least an inch thick.
 

Most reactions

New Topics

Back
Top