Hey sbower363,
I totally understand how frustrating shooing glass can be. When I used to photograph artwork, and before I had really figured it out, I had to struggle and struggle through it. BUT, I did learn quite a few helpful tips and am happy to pass them on to you.
Tip #1: Indirect Lighting Set up #1:
Gradient Background - This will create a glowing effect.
To accomplish this, follow these steps:
Step 1: Set up a sweeping white or grey background.
Step 2. Place black reflectors on either side of the glass product (sandwich it).
Step 3: Set up your light (can be spotlight, or diffused light) to shine onto the background onto a spot about 6 inches behind the product.
Step 4: Expose your image correctly and remove imperfections with an editing program like Photoshop.
Tip #2: Indirect Lighting Set up #2: Black Background - This will make the product appear to be outlines in white light, while the middle of the glass product will be black. Sort of see-through.
Step 1: Set up product on a small black table or surface. If you use a shiny tabletop, this will add a nice professional look. For example, you could use black plexi, or a sheet of glass with black construction paper underneath it.
Step 2: Set up a large diffused softbox (larger than the product at least) behind this table.
Step 3: Set up a black background to hang right in front of the large softbox - this creates the background for the image and acts as a "go-between" between the light and the product.
Step 4: Set up two black reflectors on either side of the product.
Step 5: Set up another softbox at a low level directly in front of the product to light any labels on the products.
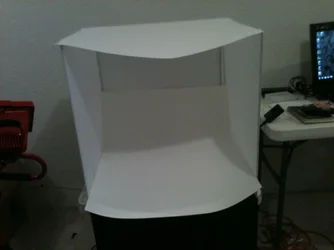
Tip #3: Lighting Tent: White Background - Since you already have one!
Step 1: Place objects in the tent, on a stable surface.
Step 2: If possible, evenly light each side of the tent: Top, Back, Side 1, Side 2, and front (to light the label). If you have a limited amount of lighting, use a large window during a bright time of day to light the back, and use a large white reflector for fill light in the front and above.
Step 3: Insert black reflector boards (you can easily make these if you don't have them - think kid's art project!) into the back corners of the tent, behind or to the sides of the product. This will bounce black onto the glass to give it definition from the background.
After you shoot, pump up contrast and brightness as necessary in post-production. This will give a professional edge!
Well, I hope this has served you a little bit and made things a bit easier! Let me know if it has, and how your attempts turn out! You can connect with me back at my website too:
Katie Nixon Photography | Commercial Food + Product + Still Life - Food
Good luck!