Help with lightness in B&W photo ..

ntz

No longer a newbie, moving up!
Joined
Oct 29, 2020
Messages
716
Reaction score
387
Location
Central Bohemian, Czech Republic
Can others edit my Photos
Photos OK to edit
Hello,

I have new camera (Fujifilm X100F) and can't resist to it ... I am just shooting B&W to JPGs using the film emulation .. I can't get out of RAWs the same results like film emulation does in-camera with JPGs .. I love it .. I love whole that idea about raw-less shooting .. anyway

please comment out edits on following two photos .. on first, there is just added exposure and lowered blacks a bit .. on second one are also lightened shadows a bit and more positive exposure added and blacks are lowered even more

I am trying to find a balance what looks good on internet on usual screens .. wort to say, that I am IT guy and I care for my eyes so I am on my all computers using a low-contrast paper-like profile so I would also like to know what you would suggest with that in mind because perhaps what I see on my screen differs a lot to what you see on your screens

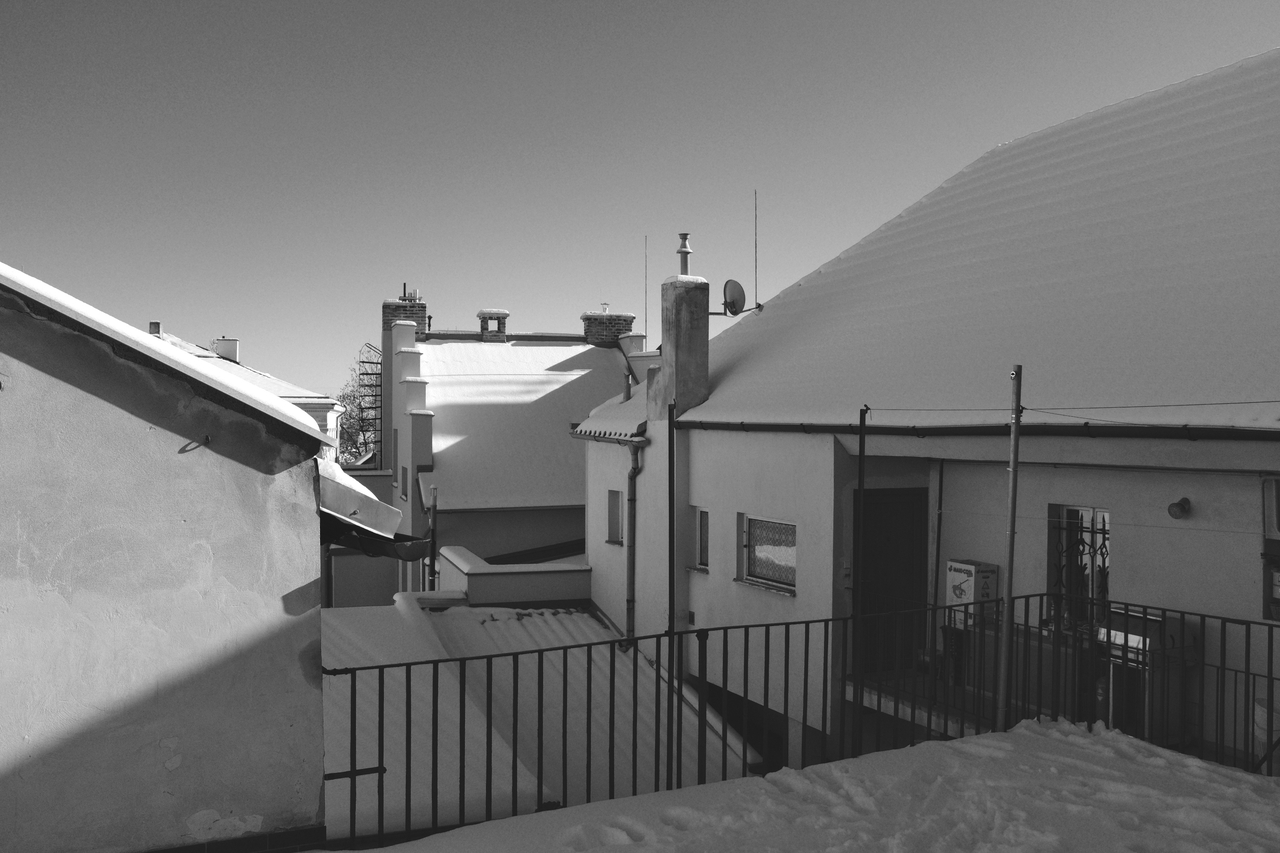
#1 - slightly positive exposure correction and slightly negative blacks

42753
by ntz on ThePhotoForum: Film & Digital Photography Forum

#2 - more positive exposure, more negative blacks and also adjusted shadows to be lighter

42752
by ntz on ThePhotoForum: Film & Digital Photography Forum

ps. photos OK to edit :)

thanks much for your input .. I owe so much to this forum ..

regards, dan
 
What application are you using to edit?
Your mid-tones are flat, which makes it look muddy.
 
  • Like
Reactions: ntz
What application are you using to edit?
Your mid-tones are flat, which makes it look muddy.

Hello, thanks much for your input ... I used in this case just GIMP straight away to edit JPGs from camera with FUJI's film ACROS-R simulation ... I've been only editing the exposure, blacks and on the second one lightened a bit shadows

Congrats on the Fuji camera. I also have a couple Fuji cameras and I'm very happy with them.

Dxqcanada is correct your photos are flat and muddy. They need more contrast. I downloaded your 2nd image and made some adjustments to improve the tone response. I raised the contrast a lot. I got this:

snow-rooftops.jpg


Given the lighting in that photo it does beg for processing a raw file. Editing JPEGs is not a great idea.
 
  • Like
Reactions: ntz
.. I downloaded your 2nd image and made some adjustments ...

thanks so much ... simply, shortly, I've got it ... appreciated pretty much, this is the priceless kind of the input .. ofc it's matter of "personal tastes", I prefer a natural looking photos so in reality I don't like *that much* your edit but I understand well what you meant with that and I am very very very grateful for it ..

thank you very much ..

regards, dan
 
To me ... I think my eye/brain would see that scene as below ... I adjusted the tonal curve (toe and shoulder) much Like I would have done with B&W film and print developing.

upload_2021-2-17_22-34-53.png
 
  • Like
Reactions: ntz
To me ... I think my eye/brain would see that scene as below ... I adjusted the tonal curve (toe and shoulder) much Like I would have done with B&W film and print developing.

YES !!! that's it ... I love it ... thank you so much ... would you be so kind and elaborate a bit on your changes ??
 
When I had my x100t I'd shoot RAW for editing for better results w/ greater dynamic range which yielded better B&W photos. Your second photo actually has a nice low-black look that works on many photos. It you want more pop increase the contrast and sharpness. Think of it this way that a well exposed photo w/ a full dynamic range should have black areas that are pitch black and whites that are pure white and a full range of grays in the middle.

Here's a quick re-editing your second edit (not the best scenario) by adjusting curves, levels, sharpness, vignetting, and slight crop to reduce clutter in corner using Mac's basic 'Photo' editing software.
You will need to lighten lower right area w/ your editing program also. If you edit from RAW the greater dynamic range will give you better results in the shadows.
villlage (1).jpeg
 
Last edited:
I predominately save my working files as RAW, and occasional as RAW+ (RAW & JPEG), because of the flexibilty in editing. Saving to JPEG in camera places an even greater burden on getting a good exposure. Your subject matter is a good example of the Dynamic Range limitations of the camera.

In high DR scenes various auto modes, without input from you, your camera will attempt to mininimize blowing the highlights and raising the shadows, resulting in a very flat (lacking contrast) image comprised of only midtones. This is luminosity histogram of your first image.
image.jpg

Notice the lack of data in the highlights and shadows. I'm not that familiar with Fuji, but I would think that they have a fairly common adjustment called Exposure Value Compensation. This setting lets you decrease the highlights or increase the shadow exposure.

Saving as a JPEG makes it even more important to make sure you have a properly exposed file. Your image looks to be under exposed.

Again I'm not a Fuji user so this may be irrelevant for your model, but this might be something you can use if your intent on saving Jpegs. How to Use Fujifilm's Highlight and Shadow Tones
 
Last edited:
@ntz tried to download the RAW file, but computer is updating and hogging bandwidth. I did download your first edit for a few quick adjustments in LR. As I said earlier the image is underexposed, by slightly over 1-1/2 stops. Here is the RGB histogram on the original.
Capture.JPG

Note the lack of data in the data both left and right. You don't have a white point or black point in the image. Here is the RGB histogram after adjustments to exposure, contrast, highlights, setting the white & black point, shadow adjustment, clarity, and Dehaze. Dehaze is an interesting adjustment that it adjusts the contrast, but in a kind of 'intelligent' way so that haze in the background gets removed, without increasing the contrast in clear areas in the foreground. Finally a mild contrast curve and you have the following RGB histogram.
Capture1.JPG


If I was editing the RAW file this could be improved on but the old computer adage also applies to editing digital images (garbage in garbage out). Please don't take offense I'm not saying the image is garbage, but in the case of a digital image, when you don't fully expose the sensor, you don't capture data. Editing does not create data it only spreads out what you have. Here is a comparison with the adjustments. Left is your original, right is the edit.
compariso.jpg
 
Here is a comparison with the adjustments. Left is your original, right is the edit.
View attachment 203662

Thank you Smoke ... in my opinion the roof on the right side is not now so obviously shed by a shadow .. shadow is almost diagonal in this image with darker opposite corner (upper-left) .. I will now try to focus on working with RAFs because my initial issue was that I was not able to achieve those in-camera film-like filters ..
 

Smoke is right: A photo has to reach black. If there's a cardinal rule that's it: No black in a photo is just wrong. Setting black and white points goes a long way to getting appropriate tone response and contrast in a photo.

I still think you need to open the shadows in this photo. The first thing in the photo I'm drawn to look at is the door and then the stuff piled up along the walkway to the door, the windows in that building and then the foreground balcony and footprints in the snow. The rest of the photo is an excellent setting and the rooftops are interesting but I'm frustrated if what I want to see is so dark that I can't make it out.

With the raw file I was able to do this:
snow-rooftops2.jpg


Since you posted the raw file it's worth a look. Here's a histogram of your raw file. Your camera has a 14 bit ADC so I marked the sensor recording threshold on the histogram graph. Note the number scale below the three color graphs. Your photo's histogram reaches up a little beyond 2000. The threshold limit is a little above 16000. You shot this photo with the camera's DR setting active at DR400. That resulted in the camera withholding two stops of analog sensor gain that would have otherwise been applied to the raw file. Your camera's meter set an exposure that protected the highlights by about 1 stop. Add the two together and you've got a raw file that sure would have liked three additional stops of exposure.

The DR400 setting forced you to raise the ISO to 800 -- that's two stops of sensor underexposure up front. You're trying to get a better SOOC JPEG from the camera and sun on snow with large shadow areas qualifies as high contrast lighting but the camera solution (DR400 mode) exacts a hefty price. I doubt that you're using 20% of the sensor's recording capacity for the photo.

raw-hist.jpg
 
Last edited:
  • Like
Reactions: ntz
Thank you Smoke ... in my opinion the roof on the right side is not now so obviously shed by a shadow .. shadow is almost diagonal in this image with darker opposite corner (upper-left) ..

Of course not, the shadows are still there just not as dark. Where you really start to notice issues with lack of data, on an underexposed image is in the areas of Micro Contrast (the ability for one area of the image to maintain strong tonal variation relative to the adjacent areas of the image). These are all "global" edits, that's where you start editing an image, and as such reflect that lack of data because it's been spread out. Local adjustments are the final steps in editing process, you still aren't creating data, but rather selectively adjusting specific pixels. In real life the EV value of scene is not constant across the frame, to achieve that level of realism requires a localized approach, both in shooting and editing.
 
Last edited:
  • Like
Reactions: ntz
I just did a quick adjustment of the tonal curve, I was not trying to get the best result ... just a result that looked better quickly, so I just opened the image in paint.net - Adjustments - Curves.
Normally I would have used a raw image in LR and made finer adjustments.

upload_2021-2-18_15-2-28.png
 

Most reactions

New Topics

Back
Top