gravity1000
TPF Noob!
- Joined
- Jun 3, 2013
- Messages
- 1
- Reaction score
- 1
- Location
- Durban
- Can others edit my Photos
- Photos NOT OK to edit
Repairing the CY1-4292 Lock Unit (locking unit) on Canon Long Lens Hoods
Having seen on the Internet that many people have problems with this Locking Unit, and the absurd price that Canon charges for the replacement part, I have devised a simple solution that works well for the most common problem, and costs virtually nothing.
The CY1-4292 locking unit comprises 3 parts:
1) Locking Unit Body (LUB): The locking unit body that has a screw head which extends and retracts as you tighten or untighten the hood onto the body of the lens.
2) Flange: A flange which attaches to the LUB and which is extended and retracted by screw head of the LUB.
3) E-Clip/Sirclip: A tiny sirclip which holds the flange in to the LUB.
The most common area of failure in the unit is that the E-Clip/sirclip rusts off and/or breaks. This causes the flange to be able to be easily extended and locked, with the hood on, but then leaves one unable to remove the hood because the flange is no longer attached to the LUB, and when the screw head of the LUB is unscrewed, the flange does not get pulled backwards to retract.
Repairing this is simple and virtually free, and you will save yourself the ridiculous price for replacing the entire locking unit. Follow these directions and the pictures (I had already done the repair when I decided to photograph the process, but you will get the idea):
1. Remove the 2 securing screws which hold the lock unit to hood. (Pic 1)

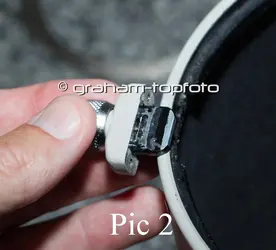
2. Remove the LUB from the hood. (Pic 2)

3. Carefully save the screws they are easily lost.
4. Look carefully at the retractable male pin that extends and retracts in the LUB when you screw it and you will see a tiny groove at the top this is where the sirclip grabs the pin when the flange is seated. With the sirclip in, the pin can rotate freely, and the flange is locked to the LUB at the same time. We will in effect replace the sirclip. Most of the locking units and the flanges will last for years, but the sirclip will break or rust away regularly.
5. Use a vice to gently hold the locking unit so that you can use both your hands for the work on it. Make sure that the locking unit is screwed into the most extended position it can be (i.e. the male pin should be as far out as possible. (Pic 3)

6. Get hold of some VERY fine wire I use curtaining wire, which is made up of many very fine wires twisted together. (Pic 4)

7. Cut a small piece about 2 inches long to work with.
8. Untwist the wire into fewer strands as necessary to get a much finer strand which will fit the sirclip groove. I use a 3-wire twist. (Pic 5)

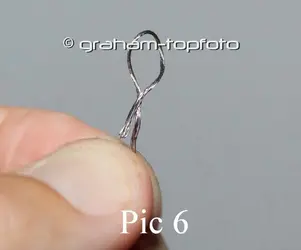
9. Bring the 2 ends of the wire together and while holding the looped end, start to twist the wire. (Pic 6)

10. Keep twisting your working wire tail while holding the noose end firm, until the wire stays in its twisted state.
11. Place the flange into its recess and press it as far down over the pin as possible, until the pin is sticking out into the cutout in the center of the flange.
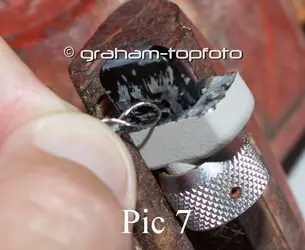
12. Gently insert the noose of your twisted wire into the cutout over the male pin, and then pull it back towards you until it catches in the groove of the pin. (Pic 7)

13. Carefully twist the extended wire so that it tightens on itself and you reduce the noose size until it is very tight around the groove. This is the most difficult part, because the noose slips off the groove when you start tightening. With practice you will figure it out though. (Pic 8)

14. Once the noose is tight in the groove of the pin, you have effectively replaced the sirclip.
15. Carefully cut off any tail from the noose, so that the flange is able to freely move in its recess in the LUB. (Pic 9) If there is a tiny wire tail, just rotate it inside the recess of the cutout so that the flange can retract and extend without impediment.

16. The repaired LUB will now look like this. (Pic 10)

17. Screw the LUB back into the hood using the screws you saved from when you removed it. (Pic 1 again)
18. Go and spend the $75 saved on something worthwhile.
19. Repeat when the wire rusts off and a new sirclip is needed.
[FONT=&]If this was useful to you, please go to my facebook Page at www.facebook.com/GrahamTopfoto[/FONT] [FONT=&]and LIKE the Page (the main LIKE button).[/FONT] Thanks!
Having seen on the Internet that many people have problems with this Locking Unit, and the absurd price that Canon charges for the replacement part, I have devised a simple solution that works well for the most common problem, and costs virtually nothing.
The CY1-4292 locking unit comprises 3 parts:
1) Locking Unit Body (LUB): The locking unit body that has a screw head which extends and retracts as you tighten or untighten the hood onto the body of the lens.
2) Flange: A flange which attaches to the LUB and which is extended and retracted by screw head of the LUB.
3) E-Clip/Sirclip: A tiny sirclip which holds the flange in to the LUB.
The most common area of failure in the unit is that the E-Clip/sirclip rusts off and/or breaks. This causes the flange to be able to be easily extended and locked, with the hood on, but then leaves one unable to remove the hood because the flange is no longer attached to the LUB, and when the screw head of the LUB is unscrewed, the flange does not get pulled backwards to retract.
Repairing this is simple and virtually free, and you will save yourself the ridiculous price for replacing the entire locking unit. Follow these directions and the pictures (I had already done the repair when I decided to photograph the process, but you will get the idea):
1. Remove the 2 securing screws which hold the lock unit to hood. (Pic 1)

2. Remove the LUB from the hood. (Pic 2)

3. Carefully save the screws they are easily lost.
4. Look carefully at the retractable male pin that extends and retracts in the LUB when you screw it and you will see a tiny groove at the top this is where the sirclip grabs the pin when the flange is seated. With the sirclip in, the pin can rotate freely, and the flange is locked to the LUB at the same time. We will in effect replace the sirclip. Most of the locking units and the flanges will last for years, but the sirclip will break or rust away regularly.
5. Use a vice to gently hold the locking unit so that you can use both your hands for the work on it. Make sure that the locking unit is screwed into the most extended position it can be (i.e. the male pin should be as far out as possible. (Pic 3)

6. Get hold of some VERY fine wire I use curtaining wire, which is made up of many very fine wires twisted together. (Pic 4)

7. Cut a small piece about 2 inches long to work with.
8. Untwist the wire into fewer strands as necessary to get a much finer strand which will fit the sirclip groove. I use a 3-wire twist. (Pic 5)

9. Bring the 2 ends of the wire together and while holding the looped end, start to twist the wire. (Pic 6)

10. Keep twisting your working wire tail while holding the noose end firm, until the wire stays in its twisted state.
11. Place the flange into its recess and press it as far down over the pin as possible, until the pin is sticking out into the cutout in the center of the flange.
12. Gently insert the noose of your twisted wire into the cutout over the male pin, and then pull it back towards you until it catches in the groove of the pin. (Pic 7)

13. Carefully twist the extended wire so that it tightens on itself and you reduce the noose size until it is very tight around the groove. This is the most difficult part, because the noose slips off the groove when you start tightening. With practice you will figure it out though. (Pic 8)

14. Once the noose is tight in the groove of the pin, you have effectively replaced the sirclip.
15. Carefully cut off any tail from the noose, so that the flange is able to freely move in its recess in the LUB. (Pic 9) If there is a tiny wire tail, just rotate it inside the recess of the cutout so that the flange can retract and extend without impediment.

16. The repaired LUB will now look like this. (Pic 10)

17. Screw the LUB back into the hood using the screws you saved from when you removed it. (Pic 1 again)
18. Go and spend the $75 saved on something worthwhile.
19. Repeat when the wire rusts off and a new sirclip is needed.
[FONT=&]If this was useful to you, please go to my facebook Page at www.facebook.com/GrahamTopfoto[/FONT] [FONT=&]and LIKE the Page (the main LIKE button).[/FONT] Thanks!


![[No title]](/data/xfmg/thumbnail/34/34117-1b7262554b31c443fa8f93830807c578.jpg?1734164581)
![[No title]](/data/xfmg/thumbnail/30/30871-c87f97bf2d9d493b4c08ba6482680038.jpg?1734158853)


