- Joined
- Mar 8, 2011
- Messages
- 25,157
- Reaction score
- 9,010
- Location
- Iowa
- Website
- pixels.com
- Can others edit my Photos
- Photos NOT OK to edit
During my vacation last year, I didn't bother to think how to have my gear riding with me in my truck. I defaulted to it all just sitting in the passenger seat, but quickly found this was a very poor arrangement. It all rattled around together, and if I didn't move things once in a while, I'd end up with wear marks on some of the stuff. Plus, if I braked hard, something would end up on the floor. So I determined I would come up with a better way of having my gear handy while driving hither and yon.
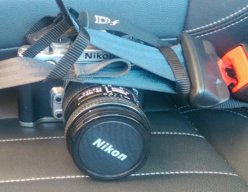
My solution: My custom camera copilot caddy! I spent this past winter engineering it in my mind, and last night I finally decided it was time to put it together for real.
My first step was to purchase some 2" wide birch stock to make the 'divider' portion. I laid out my three DSLRs with the lenses I usually travel with (D7100 w/ Tamron 150-600, D600 with 24-120 and D600 with 12-24) and got the basic layout. I had enough room to add a third section for my 70-200 as well as another small lens, such as a fisheye, 17-35 or even a 50 or my 105 micro. I did this on my dining room table.

Once the basic layout was set, I used a miter saw to cut the stock to the sizes needed to complete the dividers

It was just a matter of predrilling the holes for the screws used to assemble it all (predrilled to prevent the wood splitting!)
Next up, a 24x48"x½" cabinet-grade panel from the home center, cut down to the same width as the dividers, plus a bit longer (more about the length later):

A 6"-wide strip of the panel was cut to 16" for the front 'leg' to support the shelf. I attached the legs with hinges so the entire thing could be folded up when not in use.

Once the legs were attached to the shelf, the divider assembly was screwed on from underneath. Wa-la: one custom camera copilot caddy!

Now while I tool around the countryside looking for images, I have my three cameras ready and handy..... with focal lengths from 12mm clean through 600mm (900mm, if you figure in the crop factor of the D7100!)

If you look close, you'll notice I didn't make it so it rests directly on the seat. I kept it up higher so I could still use the seat itself for storage.
Here's a couple shots of the underside: The back 'leg' is 12" wide and attached with a hinge. The width determined by the seat, and height determined by the front leg. It's capped off with a piece of pipe foam insulation to protect the seat.

The front 'leg' is 6x16", which is pushed through the handle under the seat used to slide the seat forward/backward. This is what prevents the whole shebang from falling over. Wedged between the floor, handle and seat, it's more than sturdy enough.

And the nice thing is, it's not permanent. Once all the toys are removed, the whole thing just pulls up and out, and folds up for easy storage!


This is as far as I got this morning before the horrendous heat/humidity drove me into the house. I'm not done with this little project as I plan on the following:
Paint the whole thing black.
Add a narrow rim around the portion toward the dash so small items such as filters can ride there.
Bolt on a couple rear lens caps so a couple more small lenses can be just turned into place and ride face up.
Add some cut-up 4" PVC pipe to act as 'cradles' for the lenses so they don't roll and shift around.
Add some heavy felt to the sides, bottom and PVC cradles to prevent wear marks.
My solution: My custom camera copilot caddy! I spent this past winter engineering it in my mind, and last night I finally decided it was time to put it together for real.
My first step was to purchase some 2" wide birch stock to make the 'divider' portion. I laid out my three DSLRs with the lenses I usually travel with (D7100 w/ Tamron 150-600, D600 with 24-120 and D600 with 12-24) and got the basic layout. I had enough room to add a third section for my 70-200 as well as another small lens, such as a fisheye, 17-35 or even a 50 or my 105 micro. I did this on my dining room table.
Once the basic layout was set, I used a miter saw to cut the stock to the sizes needed to complete the dividers
It was just a matter of predrilling the holes for the screws used to assemble it all (predrilled to prevent the wood splitting!)
Next up, a 24x48"x½" cabinet-grade panel from the home center, cut down to the same width as the dividers, plus a bit longer (more about the length later):
A 6"-wide strip of the panel was cut to 16" for the front 'leg' to support the shelf. I attached the legs with hinges so the entire thing could be folded up when not in use.
Once the legs were attached to the shelf, the divider assembly was screwed on from underneath. Wa-la: one custom camera copilot caddy!
Now while I tool around the countryside looking for images, I have my three cameras ready and handy..... with focal lengths from 12mm clean through 600mm (900mm, if you figure in the crop factor of the D7100!)
If you look close, you'll notice I didn't make it so it rests directly on the seat. I kept it up higher so I could still use the seat itself for storage.
Here's a couple shots of the underside: The back 'leg' is 12" wide and attached with a hinge. The width determined by the seat, and height determined by the front leg. It's capped off with a piece of pipe foam insulation to protect the seat.
The front 'leg' is 6x16", which is pushed through the handle under the seat used to slide the seat forward/backward. This is what prevents the whole shebang from falling over. Wedged between the floor, handle and seat, it's more than sturdy enough.
And the nice thing is, it's not permanent. Once all the toys are removed, the whole thing just pulls up and out, and folds up for easy storage!
This is as far as I got this morning before the horrendous heat/humidity drove me into the house. I'm not done with this little project as I plan on the following:
Paint the whole thing black.
Add a narrow rim around the portion toward the dash so small items such as filters can ride there.
Bolt on a couple rear lens caps so a couple more small lenses can be just turned into place and ride face up.
Add some cut-up 4" PVC pipe to act as 'cradles' for the lenses so they don't roll and shift around.
Add some heavy felt to the sides, bottom and PVC cradles to prevent wear marks.

![[No title]](/data/xfmg/thumbnail/31/31753-281132967af6a422c89bcc0d6f16499a.jpg?1619734991)
![[No title]](/data/xfmg/thumbnail/31/31752-fcbc5aa4a94154b9c273592aa37b8b1e.jpg?1619734991)