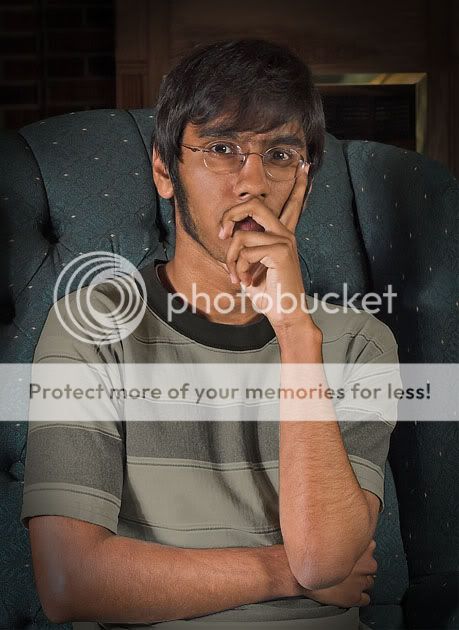
My first attempt at a portrait

danny

TPF Noob!
Joined
May 18, 2005
Messages
82
Reaction score
1
Sorry for the shadows, but I have no background to work with yet. I got my son to pose for a test shot with my 50mm 1.8 lens. If he finds out that I posted this he will kill me. He hadn't shaved for 3 days. Your comments are appreciated. Edit's ok. Lighting was 2 Vivitar 283's with silver umbrellas.

44867364.jpg
 
Lighting and everything looks pretty good. For this type of pose (with the hand up around the face), I would crop it super tight around just the face to really accentuate the eyes. As it is now, your attention wanders around up and down the arms, and the face kind of gets lost since it's partially obscured.
 
I like the "pose", and I put the word in parenthasis like that because it comes off looking very natural to me. I like the light and subject too. What distracts me though is the fireplace brass in the backgound. I learned a neat little trick from a photographer, and that was to flip the photo upside down and take a quick look and see what your eye first goes to. Try it with this portrait, and your eye will go to that bright shiny piece of brass.

Besides the piece of brass, I think the portrait is nice and casual, especially since you didn't have a bunch of lighting and backdrops, etc. Keep trying and next time maybe try and outdoor portrait when the light is nice. Maybe in a park or some place like that. But I really like the casual expression you caught here. Good eye.
 
There are a few small things to do to improve this image. It's cropped a bit close at the top making it look just a bit crowded. The shirt is "out of key," making it the brightest area in the photo drawing attention away from the subject. And, of course, a bit of general retouching is needed.

Most important, both lights have been positioned at the same height, making the lighting flat.

I've tried to correct some of these things show the difference. And, I added a bit of vignetting.

44867364alt.jpg


I hope this is helpful.

-Pete
 
The way I do vignetting is to select nearly the entire image using the oval marquee tool, then feather the selection. The amount of feathering will depend on the size of the file and personal preference. With a "full size" file, I feather about 125-150 pixels. Then select inverse. At this point, I use the image adjust, hue/saturation, and use the lightness adjustment to darken the edges. Again, the amount varies with the image and personal taste. Maybe -40 or so.

I do this on virturally all my low key portraits.
 
Yeah, something that was corrected in the edited photo was the double catch light in the eye. It takes some practice, but try adjusting the light to where you don't get that double light. It tends to be distracting.
 
wow the 2nd one is really good, I hope to be so good with manipulation in the near future.
 
I want to thank everyone for the advice and comments. Especially Pete. The edit looks much better. I especially like the vignetting, and I hadn't even noticed the double catch lights. Very much appreciated my friends.
 

Most reactions

New Topics

Back
Top