amolitor
TPF Noob!
- Joined
- May 18, 2012
- Messages
- 6,320
- Reaction score
- 2,131
- Location
- Virginia
- Can others edit my Photos
- Photos OK to edit
It's theme on this forum that flashes are a good thing, and they ARE, make no mistake. I use flash a lot. Still, not everyone has a bunch of strobes and light modifiers. Maybe you don't want to take the softbox and the beauty dish on vacation. There's lots of reasons to not want to use flash. Let us not forget that 100s of years of portraiture went along just fine without it. Rembrandt did not use a strobe for his Rembrandt lighting. It can be done, it's just trickier in several dimensions (and simpler in others).
There are surely lots of ways to do this, and my approach is surely imperfect. Regardless, this can be done.
I want to sketch out how to approach doing more or less contemporary portraits using natural light. I attach some sample images to illustrate the points. I apologize for the focus, I shot these with the self timer and a manual focus lens so, you know, not necessarily spot on. The exposures are adjusted slightly to make them match, but the tone curves are left alone (since that's kind of the whole point). I confess that I did clean up a little dandruff on my shirt, and I cropped them a bit. They're in black and white because the point is the shadows, where they lie, and how intense they are.
Here's my suggested program.
Step 1: If you're not already familiar with contemporary portrait lighting idioms, go look 'em up. There's a lot of web sites on this. Make sure you find one that mentions the HEIGHT of the key light, since not all of them do, and height matters. If they've left height out, they're probably just copying some stuff, badly. Get familiar with what butterfly lighting, loop lighting, Rembrandt lighting, all look like on the face. Get familiar with where the key light goes in each of these.
Step 2: Get a small hand mirror. Pick a window. Ideally in a room with more than one window in it, but pick a window with "nice" light coming through it. Draw the curtains or blinds on all the other windows. Stand directly in front of the window, facing the window, and examine your face in the mirror. Now move around. Sidestep once, twice. Watch what happens to the shadows in your face. Squat or sit down. Turn your face toward the window, and away from the window. You should be able to get to all the lighting idioms pretty easily.
Step 3: You're going to use this window as a "softbox". Unlike a real softbox, you cannot move it around. Therefore you need to move the camera and the model around instead. You're going to be limited, since backgrounds are going to change as you move around. The model may need to be seated to get the "key light" (your window) up high enough. Situate your model to get the lighting idiom you want.
Step 4: Modify the light as necessary. You may want to block off the bottom portion of the key light window to "move the light up". You should experiment with opening and closing curtains on the other windows, if any -- these are your "fill light". Experiment with placing large light or dark objects just out of frame near the model, to brighten or darken that side of the model.
ETA: A good window is casting a clear image of the window into the room, but not a razor sharp one. If direct undiffused sunlight is simply streaming through it, you may need to hang a sheet, or draw the sheers if the window has them (I should be so lucky...) On the other hand, if there is no shadow outline of the window cast, and you simply have a generally lighter area on the floor, the light may be too diffuse. Select another window. Note that the light will change as you work, the sun and clouds move around. So, pay attention.
Here is a worked example. It has some technical problems, yes. It should nonetheless illustrate.
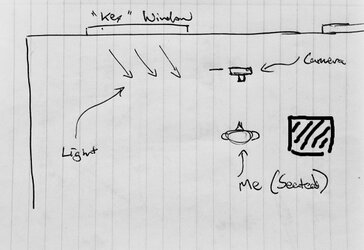
My front room has two large windows, one partially shaded. Since it was a lightly overcast day, I selected my un-obstructed window as the "key" light, since the light was already diffused by light cloud cover. The light was coming through the window at an angle, not straight into the room, but angled toward the middle of the room. I positioned my model (me) facing the wall beside the window, on the side the light was angled toward. The aim was basic loop lighting, as you can see.
I began with this setup just as described, no light modification at all:

You can see the loop lighting. The key light appears perhaps a bit low. Yes, yes, my hair is far too dark on the shadowed side.
Then I blocked off the lower portion of my "key light" window with a towel. I literally propped it there with a couple of books. It doesn't need to be perfect -- any light that gets through becomes "fill", the goal is simply to manage ratios. The catchlight becomes more defined, as does the "loop light" shadow. In general, the lighting ratio has gone up. So, there are TWO effects here - I have reduced the amount of fill light bouncing around the room, which makes the lighting ratio more intense, AND I have clarified and defined the key light. Arguably at this point I should have used improvised white reflectors to bring the ratio DOWN while maintaining more more defined key light. I did not.
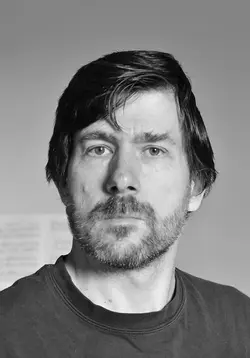
Next, I simply closed the curtains of the other window. This effectively increased the ratio further:

And finally I added an anti-reflector to the mix, positioning a black yoga blanket draped over a ladder just out of the frame on the left side, further pushing the lighting ratio up:
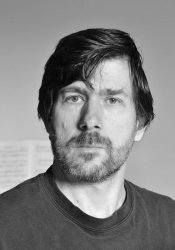
And here they all are together for comparison (I hope I haven't botched the order up anyplace..). Note the depth of the shadow on the shadowed side of the bridge of the nose, and on the shadowed side of the cheek:
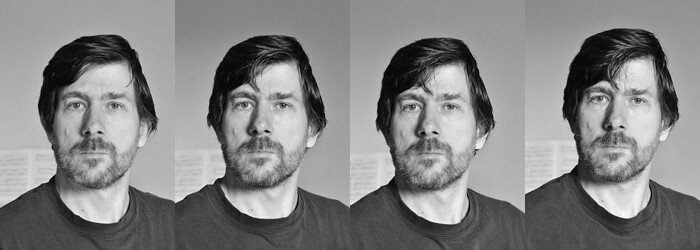
How could I have done this better?
I definitely should have introduced a reflector to fill in the hair upper-left in the frame. With a lovely assistant I could have had someone simply holding a pillowcase or light towel just out of frame, up high. It's fixable in post, but so what? It was shot wrong.
There are surely lots of ways to do this, and my approach is surely imperfect. Regardless, this can be done.
I want to sketch out how to approach doing more or less contemporary portraits using natural light. I attach some sample images to illustrate the points. I apologize for the focus, I shot these with the self timer and a manual focus lens so, you know, not necessarily spot on. The exposures are adjusted slightly to make them match, but the tone curves are left alone (since that's kind of the whole point). I confess that I did clean up a little dandruff on my shirt, and I cropped them a bit. They're in black and white because the point is the shadows, where they lie, and how intense they are.
Here's my suggested program.
Step 1: If you're not already familiar with contemporary portrait lighting idioms, go look 'em up. There's a lot of web sites on this. Make sure you find one that mentions the HEIGHT of the key light, since not all of them do, and height matters. If they've left height out, they're probably just copying some stuff, badly. Get familiar with what butterfly lighting, loop lighting, Rembrandt lighting, all look like on the face. Get familiar with where the key light goes in each of these.
Step 2: Get a small hand mirror. Pick a window. Ideally in a room with more than one window in it, but pick a window with "nice" light coming through it. Draw the curtains or blinds on all the other windows. Stand directly in front of the window, facing the window, and examine your face in the mirror. Now move around. Sidestep once, twice. Watch what happens to the shadows in your face. Squat or sit down. Turn your face toward the window, and away from the window. You should be able to get to all the lighting idioms pretty easily.
Step 3: You're going to use this window as a "softbox". Unlike a real softbox, you cannot move it around. Therefore you need to move the camera and the model around instead. You're going to be limited, since backgrounds are going to change as you move around. The model may need to be seated to get the "key light" (your window) up high enough. Situate your model to get the lighting idiom you want.
Step 4: Modify the light as necessary. You may want to block off the bottom portion of the key light window to "move the light up". You should experiment with opening and closing curtains on the other windows, if any -- these are your "fill light". Experiment with placing large light or dark objects just out of frame near the model, to brighten or darken that side of the model.
ETA: A good window is casting a clear image of the window into the room, but not a razor sharp one. If direct undiffused sunlight is simply streaming through it, you may need to hang a sheet, or draw the sheers if the window has them (I should be so lucky...) On the other hand, if there is no shadow outline of the window cast, and you simply have a generally lighter area on the floor, the light may be too diffuse. Select another window. Note that the light will change as you work, the sun and clouds move around. So, pay attention.
Here is a worked example. It has some technical problems, yes. It should nonetheless illustrate.
My front room has two large windows, one partially shaded. Since it was a lightly overcast day, I selected my un-obstructed window as the "key" light, since the light was already diffused by light cloud cover. The light was coming through the window at an angle, not straight into the room, but angled toward the middle of the room. I positioned my model (me) facing the wall beside the window, on the side the light was angled toward. The aim was basic loop lighting, as you can see.
I began with this setup just as described, no light modification at all:

You can see the loop lighting. The key light appears perhaps a bit low. Yes, yes, my hair is far too dark on the shadowed side.
Then I blocked off the lower portion of my "key light" window with a towel. I literally propped it there with a couple of books. It doesn't need to be perfect -- any light that gets through becomes "fill", the goal is simply to manage ratios. The catchlight becomes more defined, as does the "loop light" shadow. In general, the lighting ratio has gone up. So, there are TWO effects here - I have reduced the amount of fill light bouncing around the room, which makes the lighting ratio more intense, AND I have clarified and defined the key light. Arguably at this point I should have used improvised white reflectors to bring the ratio DOWN while maintaining more more defined key light. I did not.

Next, I simply closed the curtains of the other window. This effectively increased the ratio further:

And finally I added an anti-reflector to the mix, positioning a black yoga blanket draped over a ladder just out of the frame on the left side, further pushing the lighting ratio up:

And here they all are together for comparison (I hope I haven't botched the order up anyplace..). Note the depth of the shadow on the shadowed side of the bridge of the nose, and on the shadowed side of the cheek:

How could I have done this better?
I definitely should have introduced a reflector to fill in the hair upper-left in the frame. With a lovely assistant I could have had someone simply holding a pillowcase or light towel just out of frame, up high. It's fixable in post, but so what? It was shot wrong.
Last edited:


![[No title]](/data/xfmg/thumbnail/33/33339-c5b461af62b32f6b6529f1b334d818ba.jpg?1619735909)
