What's new

New and Looking for Critique

katmaetay

TPF Noob!
Joined
Jul 4, 2012
Messages
6
Reaction score
1
Hello everyone

I'm sure I am doing something incorrect in this first post of mine, but feel free to let me know if I need to do something different next time.
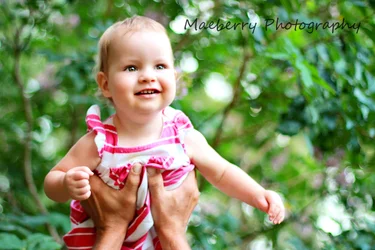
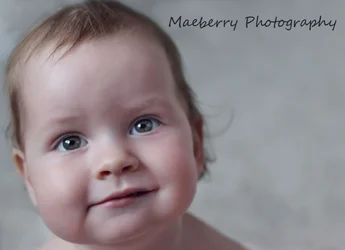
I am trying to improve both my photography and post processing skills and am hoping you wouldn't mind taking a look at this and let me know what areas you think I should work on. I'm still working on getting sharp focus at wide apertures as well as finding the best light. I feel a little confused by shadows and when any shadowing is acceptable or concerned harsh or a flaw to the photo.

Thank you for your feedback.
 

Attachments

  • $MaeBackyardWM.webp
    $MaeBackyardWM.webp
    1.1 MB · Views: 219
  • $MaeUpHighIIWM.webp
    $MaeUpHighIIWM.webp
    999.7 KB · Views: 199
  • $MaeSnaggleWM.webp
    $MaeSnaggleWM.webp
    355.4 KB · Views: 226
I see you have chosen to shoot all of these photos at f/1.8, and is probably the most common mistake beginners make. This is why 2 out of 3 of the photos suffer from being out of focus. Ideally you should not ever shoot with your aperture wide open, as it will generally produce soft images (especially on consumer grade lenses). I suggest you start shooting one stop down from wide open at least. F/2.5 to f/3.2 should greatly improve image sharpness, as well as give you a more acceptable DoF.
 
It looks like the white balance is all over the place.

1 way warm, 1 about right, save being overexposed, 1 kind of grayish.

Here are some tutorials you may find helpful.

Understanding White Balance

Tutorials on Color Management & Printing

Your camera can be turned 90° from the landscape orientation, to the to portrait orientation, to help minimize background distractions and to increase subject scale in the photos.
 
Thank you. This is very likely a question that will show my inexperience, but how are you able to tell what settings I used, i.e. f/1.8?
I have been doing some reading and as you suggest, will be trying to shoot a stop or two down. Thanks again for your help.
 
It looks like the white balance is all over the place.

1 way warm, 1 about right, save being overexposed, 1 kind of grayish.

Here are some tutorials you may find helpful.

Understanding White Balance

Tutorials on Color Management & Printing

Your camera can be turned 90° from the landscape orientation, to the to portrait orientation, to help minimize background distractions and to increase subject scale in the photos.

I've noticed that in other posts, photos for critique are attached differently to where they are separated and numbered, likely to make it easier to identify which ones you are referring too. I'm hoping to figure that piece out.

I'm going to guess that I had my white balance set to auto for each of these. After some reading, it was recommended to set it to cloudy regardless of light conditions, but I can't seem to remember the reasoning. This was from Understanding Exposure by Bryan Peterson. Even in trying to respond to my current understanding of white balance, it is telling me that I need a much better understanding of what it is and how best to set it. Thank you for the recommendations and hopefully I will return with better photos with more accurate white balance.
 
Hi Kat,

You had the white balance set to manual for the two outdoor photos and set to auto for the head shot. I'm assuming for the outdoor photos you selected one of the camera presets like daylight or cloudy, etc.

Forgive me for yelling: DO NOT LISTEN TO BRYAN PETERSEN!! Stop reading that book.

White balance: If you have something that is white (tee shirt for example) and you photograph it, the basic assumption is that it will be white in your photo. Let's do an example:

$philip_pfeffer.webp

The Phil Pfeffer there is painted white. And in this photo of Phil the white paint is indeed white in the photo. If you open the photo in Photoshop and use the Color Picker to check the paint on the exhaust stack which is directly in the sun you'll get the values R = 235, G = 235, B = 235. Each color channel has the same value and that means the color is perfectly neutral -- white.

Now we add a twist: The color of the light changes. It changes throughout the day and artificial lights are all different colors. You've seen the color change during the day. It's warmer early and late and gets bluer midday. The sun is yellow and the sky is blue. On overcast days the color gets bluer. If you move into the shade on a sunny day the color of the light is much bluer -- it's from the blue sky. If you have a white boat and it's lit by overcast blue light what happens? The white takes on a blue cast.

In extreme cases like theatrical lights we want to see the rock star various shades of purple, orange and green -- preferably all at once. But when the light shifts color a little we want our white things to photograph white and all our other colors like skin tones to photograph the color they really are. This is getting the white balance right. Your photograph records the actual color of what you photographed. NOTE: It's completely OK and in fact very common to deliberately shift the color a little. People look good a bit warmer and a photographer who adds a touch of orange to a portrait is doing the right thing if it makes the subject look better. A lush forest scene with a little extra green may be just right. But these things are only OK if they're deliberate -- control versus out-of-control.

Next twist: Human perception is tricky. Some of the input data coming in through our eyes gets ignored as not critically important. Our eyes are physically sensitive enough to see slight color variations but our brains have learned to dismiss them if they're minor. (This is really good for Fauxtographers who try and sell fauxtographs). Otherwise it means you have a job to do to re-train yourself to see. Modern software can help a lot because we can use it to "paint by the numbers" as I did with the boat above.

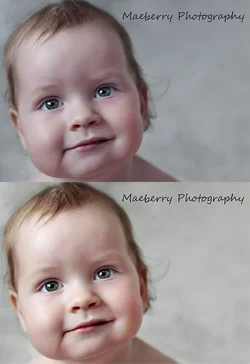
The baby in your three photos is, as Keith noted, three different colors. In the one where she's being held up the color is about right. In the other two she's too blue and too orange.
Here's the one where she was too blue along with a correction:

$baby_wb.webp

Practically from behind the camera what are your options:

1. Auto white balance fails 100% of the time. Your camera can't sense changes in light color.
2. White balance presets fail most of the time because the changes in light color are a continuum, not three fixed points. As for artificial lights, there's just too many of them and they're often mixed.
3. Your camera will allow you to set a custom white balance. This works great, learn how: WhiBal - LensAlign
4. You can fix it after taking the photo.
....A) If you're shooting camera JPEGs this is not too smart.
....B) If you're shooting camera raw captures this works great.

To sum up that list you'll notice there are two "works great" options, one "not smart" option and two failures.

Back to your photo above: What I did was check the color of her skin. Human skin has know average values. That check confirmed her skin was blue. I added orange to get the numbers in range. I also checked the color of the background behind her which I assumed was probably neutral and it likewise was blue and after my adjustment it's neutral.

Joe

 
Hi Kat,

You had the white balance set to manual for the two outdoor photos and set to auto for the head shot. I'm assuming for the outdoor photos you selected one of the camera presets like daylight or cloudy, etc.

Forgive me for yelling: DO NOT LISTEN TO BRYAN PETERSEN!! Stop reading that book.

White balance: If you have something that is white (tee shirt for example) and you photograph it, the basic assumption is that it will be white in your photo. Let's do an example:

View attachment 15287

The Phil Pfeffer there is painted white. And in this photo of Phil the white paint is indeed white in the photo. If you open the photo in Photoshop and use the Color Picker to check the paint on the exhaust stack which is directly in the sun you'll get the values R = 235, G = 235, B = 235. Each color channel has the same value and that means the color is perfectly neutral -- white.

Now we add a twist: The color of the light changes. It changes throughout the day and artificial lights are all different colors. You've seen the color change during the day. It's warmer early and late and gets bluer midday. The sun is yellow and the sky is blue. On overcast days the color gets bluer. If you move into the shade on a sunny day the color of the light is much bluer -- it's from the blue sky. If you have a white boat and it's lit by overcast blue light what happens? The white takes on a blue cast.

In extreme cases like theatrical lights we want to see the rock star various shades of purple, orange and green -- preferably all at once. But when the light shifts color a little we want our white things to photograph white and all our other colors like skin tones to photograph the color they really are. This is getting the white balance right. Your photograph records the actual color of what you photographed. NOTE: It's completely OK and in fact very common to deliberately shift the color a little. People look good a bit warmer and a photographer who adds a touch of orange to a portrait is doing the right thing if it makes the subject look better. A lush forest scene with a little extra green may be just right. But these things are only OK if they're deliberate -- control versus out-of-control.

Next twist: Human perception is tricky. Some of the input data coming in through our eyes gets ignored as not critically important. Our eyes are physically sensitive enough to see slight color variations but our brains have learned to dismiss them if they're minor. (This is really good for Fauxtographers who try and sell fauxtographs). Otherwise it means you have a job to do to re-train yourself to see. Modern software can help a lot because we can use it to "paint by the numbers" as I did with the boat above.

The baby in your three photos is, as Keith noted, three different colors. In the one where she's being held up the color is about right. In the other two she's too blue and too orange.
Here's the one where she was too blue along with a correction:

View attachment 15288

Practically from behind the camera what are your options:

1. Auto white balance fails 100% of the time. Your camera can't sense changes in light color.
2. White balance presets fail most of the time because the changes in light color are a continuum, not three fixed points. As for artificial lights, there's just too many of them and they're often mixed.
3. Your camera will allow you to set a custom white balance. This works great, learn how: WhiBal - LensAlign
4. You can fix it after taking the photo.
....A) If you're shooting camera JPEGs this is not too smart.
....B) If you're shooting camera raw captures this works great.

To sum up that list you'll notice there are two "works great" options, one "not smart" option and two failures.

Back to your photo above: What I did was check the color of her skin. Human skin has know average values. That check confirmed her skin was blue. I added orange to get the numbers in range. I also checked the color of the background behind her which I assumed was probably neutral and it likewise was blue and after my adjustment it's neutral.

Joe
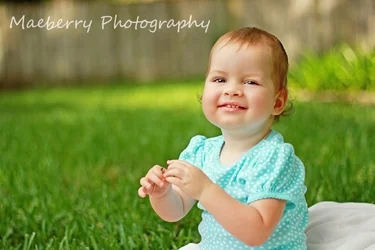
Thank you very much. It's amazing the difference I see with the comparison shot. I'm still training my eyes to see the blue as well as other off colors in my photos. I'm even more novice in knowing how to make color corrections in post processing. I'm currently using Photoshop Elements. It's hard to know when to fix an off photo when I'm having trouble seeing that it's actually off. Ideally I can improve from the start and not have to worry as much about color correction after the fact.

And again I find myself wondering how you guys are able to tell what settings my camera was in for each shot. If you can tell simply by looking at the photo, that's pretty impressive!

Based on everyone's feedback, I know what my next step needs to be. I'll definitely be looking into the tool you recommend and hopefully getting some much more accurate photos. Thanks again for your time and feedback. It's incredibly helpful.
 
Mostly you can tell by looking, actually. But when they bust out the "you were shooting at f/1.8" you know they were peering at what's called EXIF data. Your JPEG files all have a EXIF data in the file, which stands for, uh, something or other. It doesn't matter. What it IS is a bunch of random data attached to the picture. Your camera will usually store away all or most of the settings, as well as information about the camera itself and the lens, and so on.

These forums are full of EXIF-peepers.

But you could tell all this by looking. Look at 'em yourself -- now that you know what to look for, you can see it, can't you? After that, it's just practice.

I can't tell you what f-stop you used, because I don't care. But I can tell you the photo is soft and has no depth of field. I can tell you that it looks blueish, or reddish, and the skin tones look wrong.
 
EXIF data are embedded in the image, unless you 'save for web, which strips out most EXIF.
Yours are:

Camera Maker: Canon
Camera Model: Canon EOS REBEL T2i
Image Date: 2012-07-28 09:20:14 -0500
Focal Length: 50.0mm
Aperture: f/1.8
Exposure Time: 0.0008 s (1/1250)
ISO equiv: 100
Exposure Bias: none
Metering Mode: Matrix
Exposure: aperture priority (semi-auto)
White Balance: Manual
Flash Fired: No (enforced)
Orientation: Normal
Color Space: sRGB
GPS Coordinate: undefined, undefined
Software: Adobe Photoshop Elements 10.0 Windows

Typically the maximum shutter speed you can use with any lens in 1/twice the focal length so (since you are using a crop frame camera with an effective focal length of about 80 mm) you shouldn't shoot any slower than about 1/160. You shot at 1/1250 which means you could close the aperture more than 2.5 stops, still have sufficient shutter speed and a great deal more depth of field and much better lens performance.

I don't know Canon but you could increase the ISO quite a bit before you get color noise.
 
amolitor said:
Mostly you can tell by looking, actually. But when they bust out the "you were shooting at f/1.8" you know they were peering at what's called EXIF data. Your JPEG files all have a EXIF data in the file, which stands for, uh, something or other. It doesn't matter. What it IS is a bunch of random data attached to the picture. Your camera will usually store away all or most of the settings, as well as information about the camera itself and the lens, and so on.

These forums are full of EXIF-peepers.

But you could tell all this by looking. Look at 'em yourself -- now that you know what to look for, you can see it, can't you? After that, it's just practice.

I can't tell you what f-stop you used, because I don't care. But I can tell you the photo is soft and has no depth of field. I can tell you that it looks blueish, or reddish, and the skin tones look wrong.

Soft, as in out of focus, right? I'm hoping it's a combination of a fast moving baby in addition to an obvious lack of skill. I've convinced myself that manual focus is impossible with fast moving subjects, but the more I continue to struggle with it, the more I think I need to try using manual focus. I try focusing on the eyes and any new movement she makes or anything she grabs for that shows up in the picture sends the auto focus haywire and I miss the shot. At the same time, I don't see it realistic to be able to keep up with her in manual focus.

As far as the color situation, I can definitely see it now, especially with the comparison, and cant help but feel a tad embarrassed. Hoping things can only go up from here.

I am also thinking that my efforts in post processing may have botched what might have originally been a decent shot, color wise. I won't say the same about the focus, because I think post processing helped what was even worse straight from the camera.

Thanks for the explanation on how others can see my settings. I figured there was something I wasn't aware of.
 
The_Traveler said:
EXIF data are embedded in the image, unless you 'save for web, which strips out most EXIF.
Yours are:

Camera Maker: Canon
Camera Model: Canon EOS REBEL T2i
Image Date: 2012-07-28 09:20:14 -0500
Focal Length: 50.0mm
Aperture: f/1.8
Exposure Time: 0.0008 s (1/1250)
ISO equiv: 100
Exposure Bias: none
Metering Mode: Matrix
Exposure: aperture priority (semi-auto)
White Balance: Manual
Flash Fired: No (enforced)
Orientation: Normal
Color Space: sRGB
GPS Coordinate: undefined, undefined
Software: Adobe Photoshop Elements 10.0 Windows

Typically the maximum shutter speed you can use with any lens in 1/twice the focal length so (since you are using a crop frame camera with an effective focal length of about 80 mm) you shouldn't shoot any slower than about 1/160. You shot at 1/1250 which means you could close the aperture more than 2.5 stops, still have sufficient shutter speed and a great deal more depth of field and much better lens performance.

I don't know Canon but you could increase the ISO quite a bit before you get color noise.

This is fantastic advice about shutter speed. As you can see, I'm having issues with focus on this particularly fast moving subject, so it had me thinking about a lot of things for improvement, including my shutter speed. I've been trying aperture priority mode as it seemed to be what I was seeing others using who were shooting portraits. Thus, I haven't been thinking about where my shutter speed was ending up. I actually wouldn't have guessed that it was this fast, since I was considering blaming that for my poor focus.

I am a fan of bokeh in portrait shots, but maybe it's a bit too much bokeh, as others have made reference to my depth of field. This is what attracted me to this lens, in addition to the budget friendly price.
 
Bokeh is a product of the lens where it is OOF.
The only way you can manage it, is by managing the DOF with the aperture.

Look at DOFMASTER.COM and get an app for a smartphone or use the on-line calculator for your lens.

Glad to have helped in some way.
 

Create an account or login to comment

You must be a member in order to leave a comment

Create account

Create an account on our community. It's easy!

Log in

Already have an account? Log in here.

New Topics

Back
Top Bottom