play (first time in digital darkroom)

denada

No longer a newbie, moving up!
Joined
Feb 22, 2016
Messages
241
Reaction score
119
Can others edit my Photos
Photos OK to edit
hi all. finished my first 35mm to digital a day or two ago. don't quite have everything i need for my real darkroom, so used a recently purchased epson perfection v600 and photoshop. camera is a nikon fg with series e 50mm f/1.8 lens. kodak tx400 film. c&c welcome and appreciated ...

tumblr_o3wzaxagmc1v9quoao1_1280.jpg


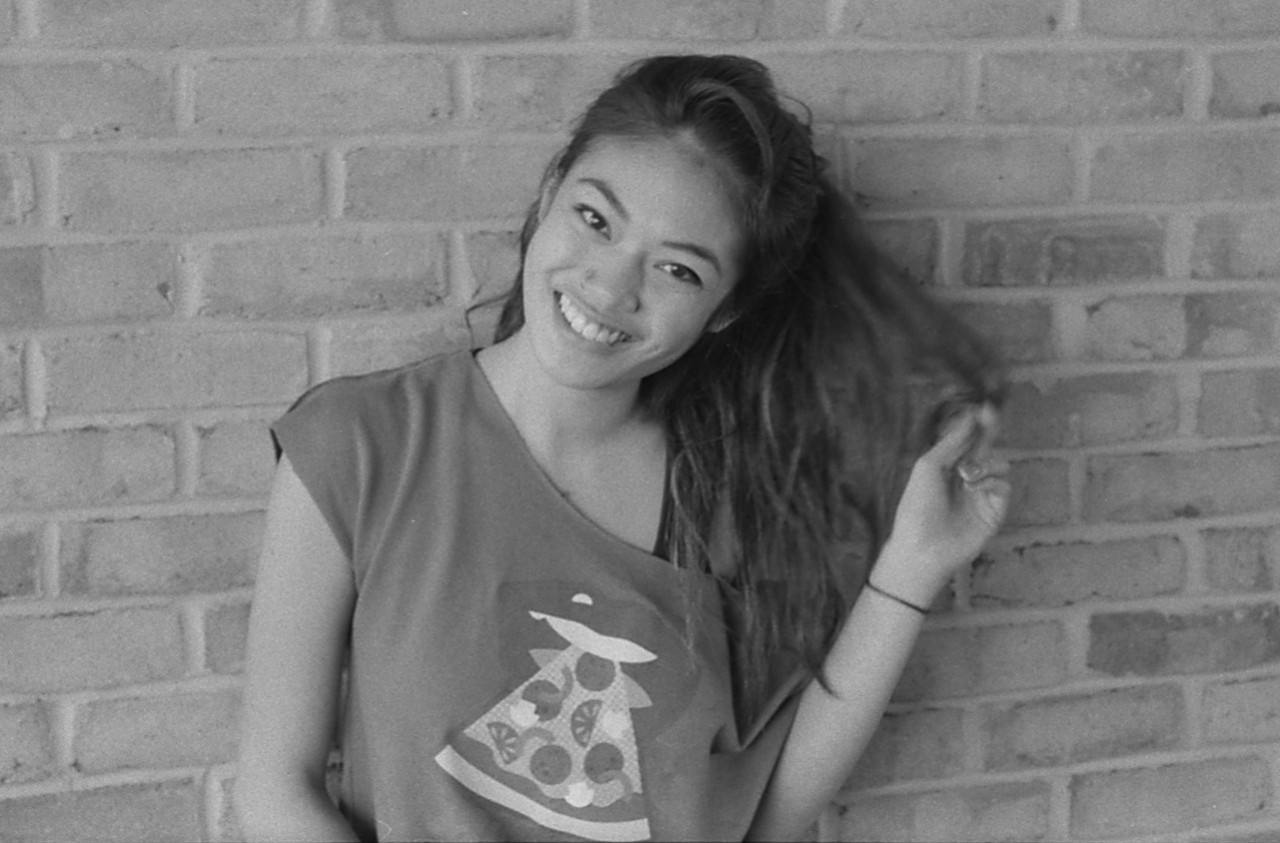
i realize going a bit further on the unsharp mask threshold would have helped her forehead, but i was trying to maintain the film look. i strongly dislike the oil paint skin that is common in mainstream fashion editorials. this is the balance i ended up at.

kills me that her hair is blurred. i imagine from the slow shutter speed, making up for the indoor lighting.

special thanks to gabriella fidel for finding a moment to pose during her lunch rush. unfortunately she could not step outside, so this was indoors.

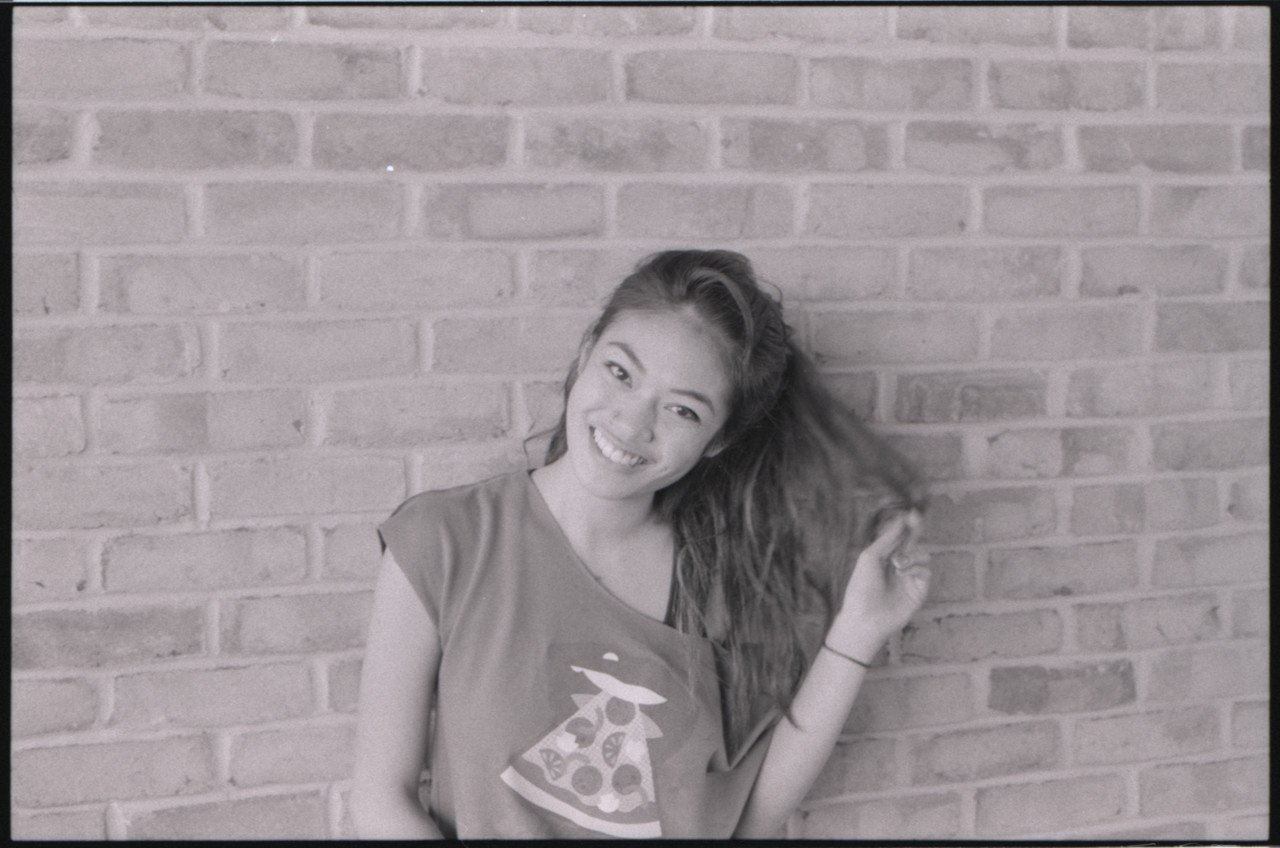
for reference, here's the scanned frame it came from ...
[nsfw]
tumblr_o42ai8ZA3K1v9quoao1_1280.jpg
[/nsfw]

err, [nsfw] code doesn't seem recognized. anyway to create hidden dropdown content on this forum?

thanks!
 
Last edited:
It seems to me that the original scan is a bit small, and does not have the degree of resolution that would make a really first-rate image. For a first effort, I'd say the results are okay, and you will only get better and better. The first thing I'd do is to see just how big and how high a quality you can get from the scanner when making the initial scan; you need to start with a high-resolution, and a LARGE-sized scan, to have enough information to work with during the rest of the process.

ANother issue is how much sharpening to apply in Photoshop. Most scanned film images will require a fair amount of sharpening, best done in Photoshop, and not using the scanner's software to do that sharpening.

A second isue is the shutter speed used to make the original image: I can see b y the degree of hair blurring that the shutter speed was slow; speeds that slow are dangerous, since there can be a lot of sharpness lost due to subject movement, camera movement, and maybe even a bit of mirror slap and or shutter vibration. At speeds slow enough to blur hair that's just allowed to drop, such as 1/2 to 1/8 second, a tripod is almost essential if you want a crisp image, and also, the subject herself stands a very good chance of moving enough to make the original capture a bit 'soft'.

I say keep on shooting, keep on working, keep on improving, keep on exploring the process and all the steps in it.
 
i appreciate it! for the record, both are web copies. i'm just using tumblr is an image host, which maxes out at 1280px wide. i scanned and started from a 48-bit color, either 6400 or 4800 dpi tiff. resulting in a 9297 × 6157px, 350mb master file. i exported 1280px wide jpegs of the scan and the finished product to hotlink from tumblr, which is what you're seeing. sorry, didn't make that clear in the OP.

i actually plan on buying a new computer, as scanning one frame at a time is too time consuming and my computer takes minutes to open a several gb strip of six in photoshop, which is what i'm using. it constantly freezes when i'm trying to go through the images in preview. a 2011 mac air just wasn't made for this task.

the scan was made without any of the silly scanner features like its built-in unsharp mask. all edits were made in photoshop cc. so any flaws with the sharpening can't be blamed on inferior software; i'm still learning the finer details of photoshop.

yep, shutter speed was a problem. in addition to the hair, i believe this also resulted in the "soft" original image you mention, giving me a hard time creating balance with the unsharp mask while still maintaining my preferred raw/film-y aesthetic. i had to use a really wide aperture to not have to go even lower. she was working (waitress), so i certainly didn't have time or permission to set up a tripod. i hope to have my next subject in a less hectic environment.

thanks for the encouragement!
 
Last edited:
i appreciate it! for the record, both are web copies. i'm just using tumblr is an image host, which maxes out at 1280px wide. i scanned and started from a 48-bit color, either 6400 or 4800 dpi tiff. resulting in a 9297 × 6157px, 350mb master file. i exported 1280px wide jpegs of the scan and the finished product to hotlink from tumblr, which is what you're seeing. sorry, didn't make that clear in the OP.

i actually plan on buying a new computer, as scanning one frame at a time is too time consuming and my computer takes minutes to open a several gb strip of six in photoshop, which is what i'm using. it constantly freezes when i'm trying to go through the images in preview. a 2011 mac air just wasn't made for this task.

the scan was made without any of the silly scanner features like its built-in unsharp mask. all edits were made in photoshop cc. so any flaws with the sharpening can't be blamed on inferior software; i'm still learning the finer details of photoshop.

yep, shutter speed was a problem. in addition to the hair, i believe this also resulted in the "soft" original image you mention, giving me a hard time creating balance with the unsharp mask while still maintaining my preferred raw/film-y aesthetic. i had to use a really wide aperture to not have to go even lower. she was working (waitress), so i certainly didn't have time or permission to set up a tripod. i hope to have my next subject in a less hectic environment.

thanks for the encouragement!

Your scanner settings are producing excessively large files for no benefit. There is no advantage to scanning B&W film as 48 bit color. You can scan B&W film as 16 bit greyscale and achieve the same result. You are also not getting any benefit from scanning at 4800 and 6400 ppi. 35mm film does not contain that much information. Scanning nothing at a higher resolution is just lots more nothing. At 3000 ppi you're over-scanning nearly all fine grain 35mm films. You left Tri-X behind long ago.

Scan Tri-X at 2400 ppi and 16 bit greyscale and you'll have much more manageable file sizes to work with.

Joe
 
I think that you are taking on quite a technical burden, learning photography, learning the technical issues of scanning and then learning editing.
Like learning both to sculpt in clay and to cast the clay figures in metal.

While you like the 'test shot' look, eventually you will get beyond this.
 
If you make a massive scan, it must be re-sized downward, in multiple steps, with unsharp masking added to the image throughout the process, and not all in one, single application. My experience in scanning film at high resolution and making large-sized, 16-bit scans is that the original and step one and two size reductions often look kind of unsharp in a weird sort of way, but once they are re-sized in gradual steps, the images look amazingly crisp once the scanned image has been down-sized and sharpened and about 4,500 pixels wide (on 6x6 rollfilm).

I seriously doubt that the 4,800 and 6,400 dpi settings on that Epson are genuine "hardware" values, but are most likely just up-rezzed software setting values. I'd guess that the 2,400 or 3,200 dpi settings are about the highest ones that will have any real benefit to the final image's detail.

Again--keep at it! There is a lot to learn. Just because there is a lot to learn doesn't mean it's not worth the effort. If everything in life were easy, then why would we even bother to do more than the bare minimum? Why would we even get out of bed each day?
 
I seriously doubt that the 4,800 and 6,400 dpi settings on that Epson are genuine "hardware" values, but are most likely just up-rezzed software setting values.

Epson claims 6400 ppi optical resolution for the Vxxx series scanners, but your instincts are dead on. In actual hardware tests they don't manage 2000 ppi. Everything claimed beyond that is "fabricated" by the Epson campaign staff. They're probably the best bang for the buck in a jack-of-all-trades scanner; I've got a couple of them at the various campuses I visit and I like them. But you've got fact check the ad copy.

Here's a head up for the OP: Epson instructions packed with the scanner tell you to place film in the scanner emulsion up in the holder. DO THE OPPOSITE! If you follow the instructions you'll be scanning through the film base -- dumb. Film emulsion down and then flip the image in Photoshop for a sharper more detailed scan.

Joe
 

Most reactions

New Topics

Back
Top